In this article, I will describe all the steps that allowed me to make my first homemade wheel.
As soon as I started cycling, I quickly became interested in bicycle wheels and understood the importance that they had in terms of performance, comfort and sensations. I bought several pairs, inexpensive without worry about all the criteria. Then I had a pair of handcrafted wheels (38mm) assembled by a professional. Wheels that go everywhere, they are light which makes them reactive and their heights allow to have a aerodynamic touch. One day, a spoke dropped me and it was from there that I started to take an interest in the wheels. Indeed, I started by repairing my broken spoke which led me to start my research and deepen my knowledge about it. I am passionate about sport, always thirsty for knowledge and new challenges. I embarked on this new challenge with the aim of achieving a specific wheel to optimize aerodynamics, on flat courses that we find on some Triathlons or Duathlons that I am used to participate. An aerodynamic wheel which, once launched, offers good inertia. But also quite light and rigid to be able to relaunch it effectively. And finally transmit with the least possible loss, all the power supplied by the cyclist.
My goal is not to “reinvent the wheel”, so I will essentially share my feedback, share what I learned, the choices I made, the articles and the books that allowed me to finalize my first wheel. At first, I will detail all the steps that allowed me to choose all the components. Then, I will share the assembly experience and finally I will finish with my first road test.
Characteristics
A wheel suitable for all routes and all climatic conditions does not exist. This is why cyclists generally have several pairs whether it is to have a pair for training and a for competition or to answer different tests. It is possible to realize, today many set-ups to suit all types of routes (mountains, flat or hilly), climatic conditions (meaning and strength of the wind, rain) and runner (climber, roller, puncher …). You understand that with all these parameters, it would need 20 pairs in his garage… which is quite difficult to achieve and especially difficult to get his wife to accept that. So you have to compromise, for that you have to ask yourself good questions. A good wheel means nothing without taking into account the context of the course, the environment or the type of cyclist. I will try to describe the physical properties of a wheel in order to to be able to determine on which parameters, it will be necessary to play to achieve the wheel that we really need.
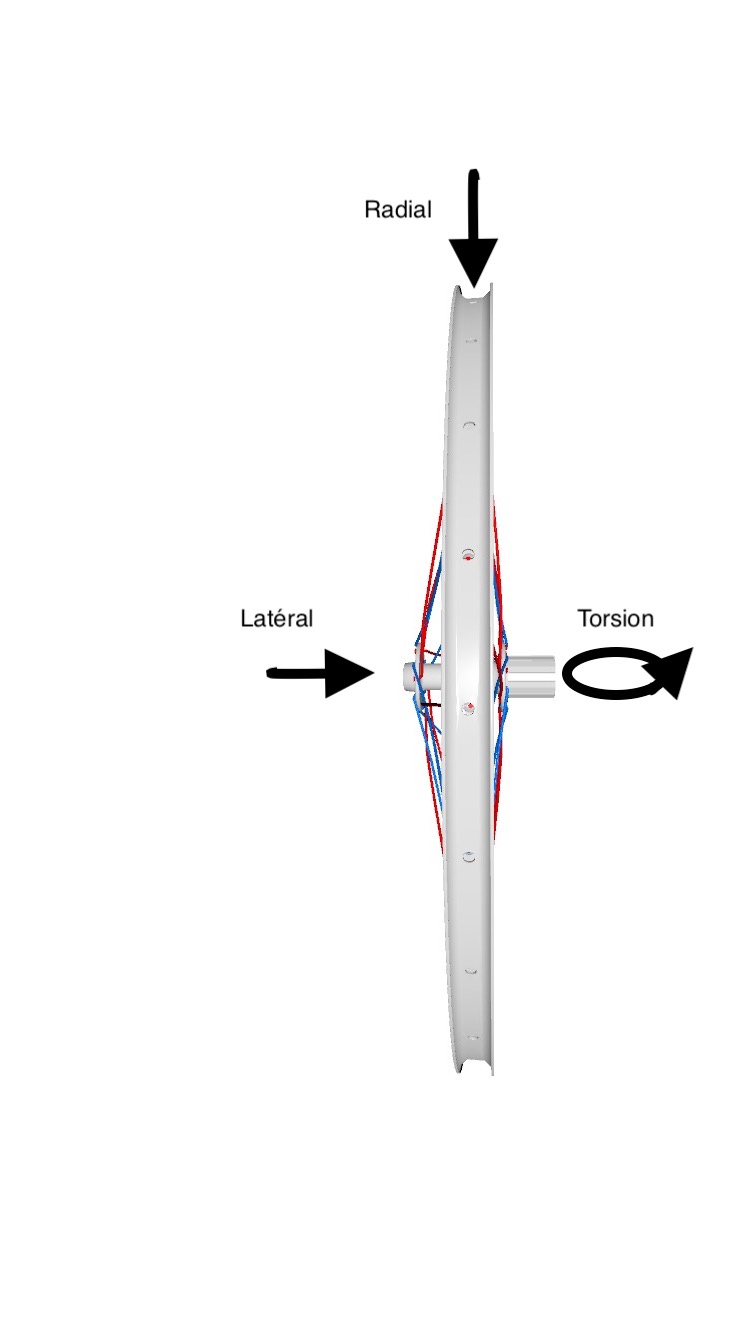
A wheel is subjected to 3 types of force which will cause deformation: radial, lateral and torsion. It’s with these 3 types of effort that we will be able to talk about the stiffness of the wheel. Radial force is induced force by the weight of the cyclist and the compression with the road. So a good wheel will have to support the weight of the cyclist without deforming. A carbon or aluminum rim today offers plenty to support this load. The lateral force will be subjected to the wheel when the cyclist will start dancing and the torsional force will be caused by the power developed in the pedal stroke to the hub. For the torsional and lateral force, a hub strong and well-tensioned spokes will allow the least deformation and therefore retransmit the maximum of the power developed up to the road. The more the wheel transmits the developed power, the more rigid the wheel.
Then, a wheel has a kinetic displacement which will allow to obtain inertia. For to have as much inertia as possible you have to optimize its aerodynamics, but not only. Indeed, the heavier we will be the faster we will go once launched. But it will be wise to optimize aerodynamics more than to increase the weight, because the heavier we are, the harder it will be to reach the moment of inertia. Like a train which must provide a enormous torque at start-up, but which once launched will provide very little energy. But for a cyclist, who needs to permanently raise this is not possible.
To obtain an aerodynamic wheel, you will have to adjust the rim height, the number of spokes, the width of the rim or the number of spokes and their shapes. The ideal is a solid wheel, the air flows directly to outside. It will also be heavier so once launched will have optimum inertia. The cyclist can go faster by providing the same power. But the solid wheel is harder to restart and if the wind is side it becomes a burden. So a full wheel to make lap time on flat ground with a favorable wind. The compromise is therefore to play the height of the rim, for example an 88mm will offer more aerodynamics than a 38mm because a larger air exhaust area. But it will take be careful not to have too many spokes, because who says more rays says more friction. And we will have to opt for flat spokes to limit this friction. The width of the rim may also contribute to the good evacuation of the air and finally it will need a hub which will offer the least friction to bearing level. In addition, aerodynamics will be played at the rear. Indeed, at the front it has much less of importance because in all cases the air must pass the width of the cyclist. We must also think that the more the wheel height at the front will be high plus the bike will be less controllable. The gain between putting a 50 or 88 wheel at the front is so negligible that it is better preferred good bike control. Finally, the inertia will only feel at over 30-35km/h so if you are not able to reach this speed it is useless. Too many cyclists have bikes that are unable to send and who suffers every Sunday. Admittedly it is beautiful, it looks professional, but not suitable.
To obtain a dynamic wheel that responds to all attacks, you will need a light wheel so you will have to optimize the weight of all the components, but it will have to be rigid enough to undergo lateral force as a dancer. So a carbon wheel will have more response. To make a hilly course with a lot of stimulus, a pair of 38mm with a light hub allows both dynamism and a touch of aerodynamics. It’s really the versatile wheel because even if there is wind, it passes. They are really a good compromise and we see more in the peletons.
To make pure mountain you will need the lightest wheel possible so you will have to play on a rim height low, not wide, few spokes and a light hub.
To make group lowland routes, for cyclist type roller or sprinter, we can opt for a pair of 50mm but taking a hub with high flanges which will be more rigid, because the spokes will be more short. A wheel at the same time aerodynamic enough easy to revive to hold the wheels of the flap and be able to send big gear for sprints.
There are still plenty of possible combinations given the number of parameters. A good wheel results from a good combination of all these components, according to the needs of the rider. And above all we cannot say that it is a good wheel because it is visually beautiful. What I recommend is to have several types of wheels, depending on the route and the conditions. Of course we cannot have 20 pairs. But 2 or 3 pairs can cover a large number of cases.
Components
I will detail the different components that I have chosen, according to my need.
Rim
The height
Since I am looking for an aerodynamic wheel specifically to roll on flat ground. I go take a high rim height 88mm. The top would be a solid wheel, but it would be used very rarely while an 88mm will still be dynamic enough to pass hilly portions. To choose you must make the best compromises in relation to their needs, their playing field and environmental conditions. So an 88mm seems to me a good compromise to be dynamic enough to pass over hilly parts and to be able to enjoy it regularly. A full wheel in the Lauragais, I could take it out twice a year.
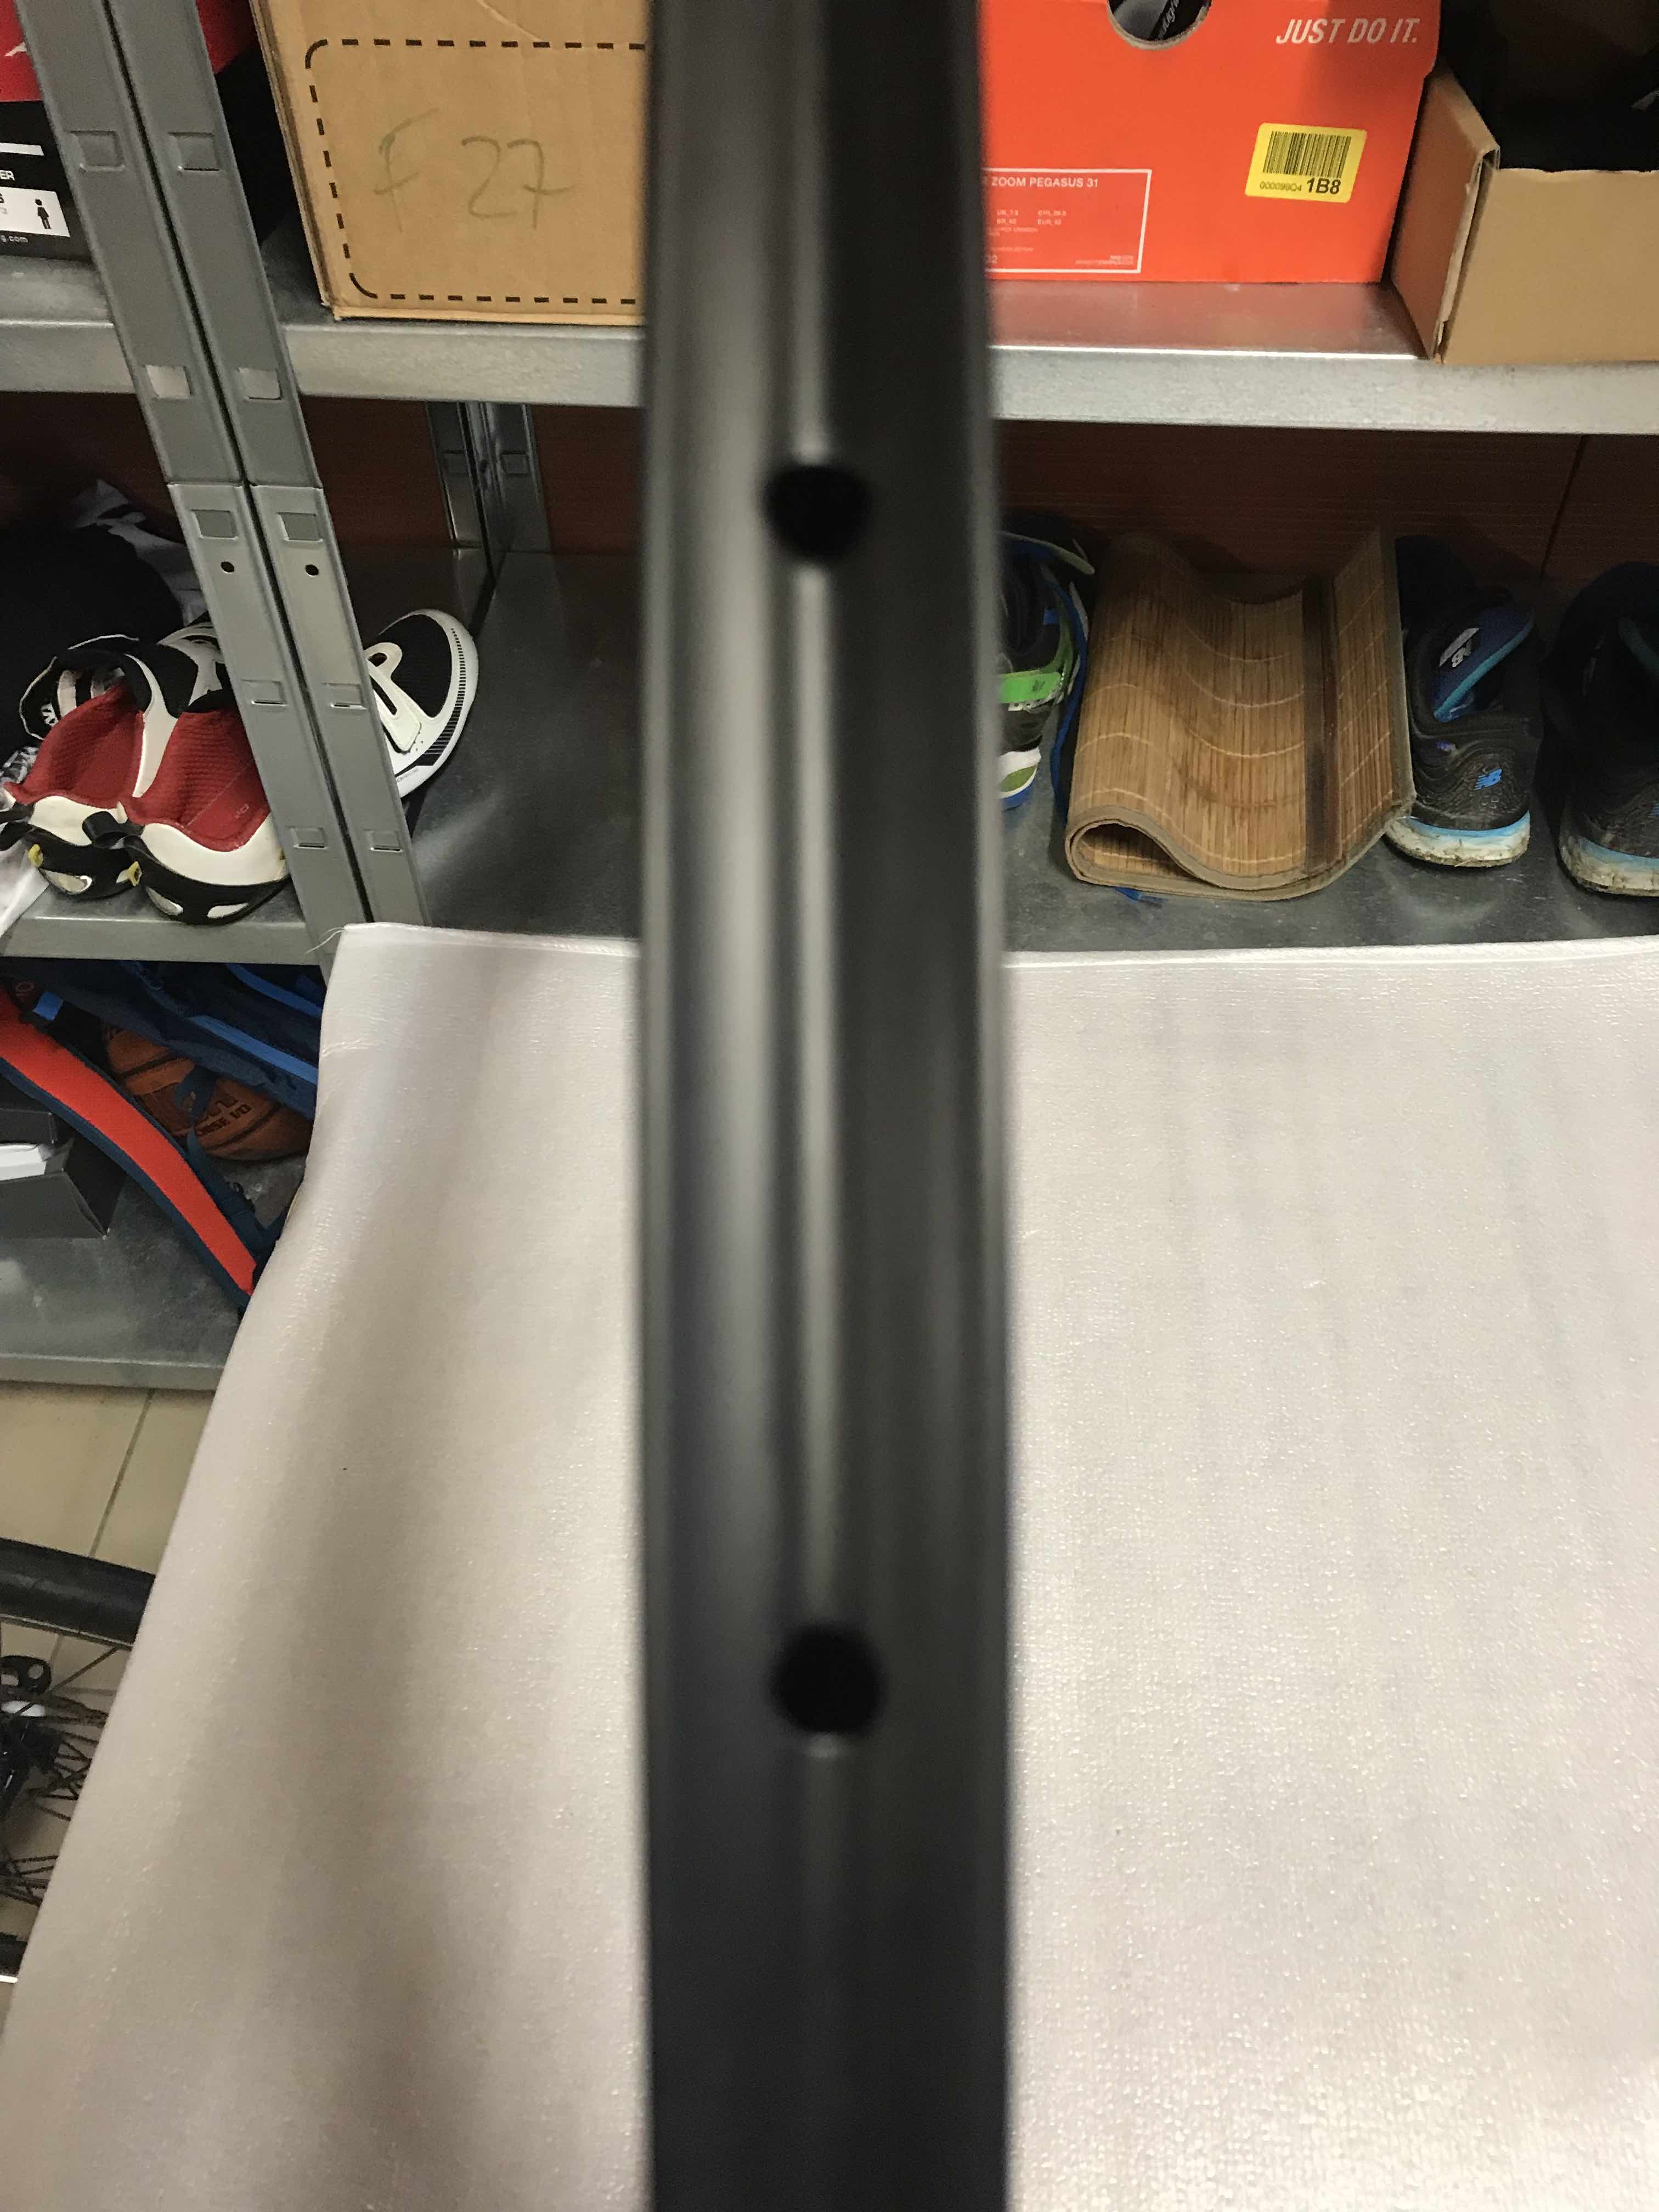
The width
Studies have shown that evacuating air on a wider rim at the rear would promote aerodynamics. In addition, who says wider says more comfort so I will try to opt for a width of 25mm which is a little fashionable.
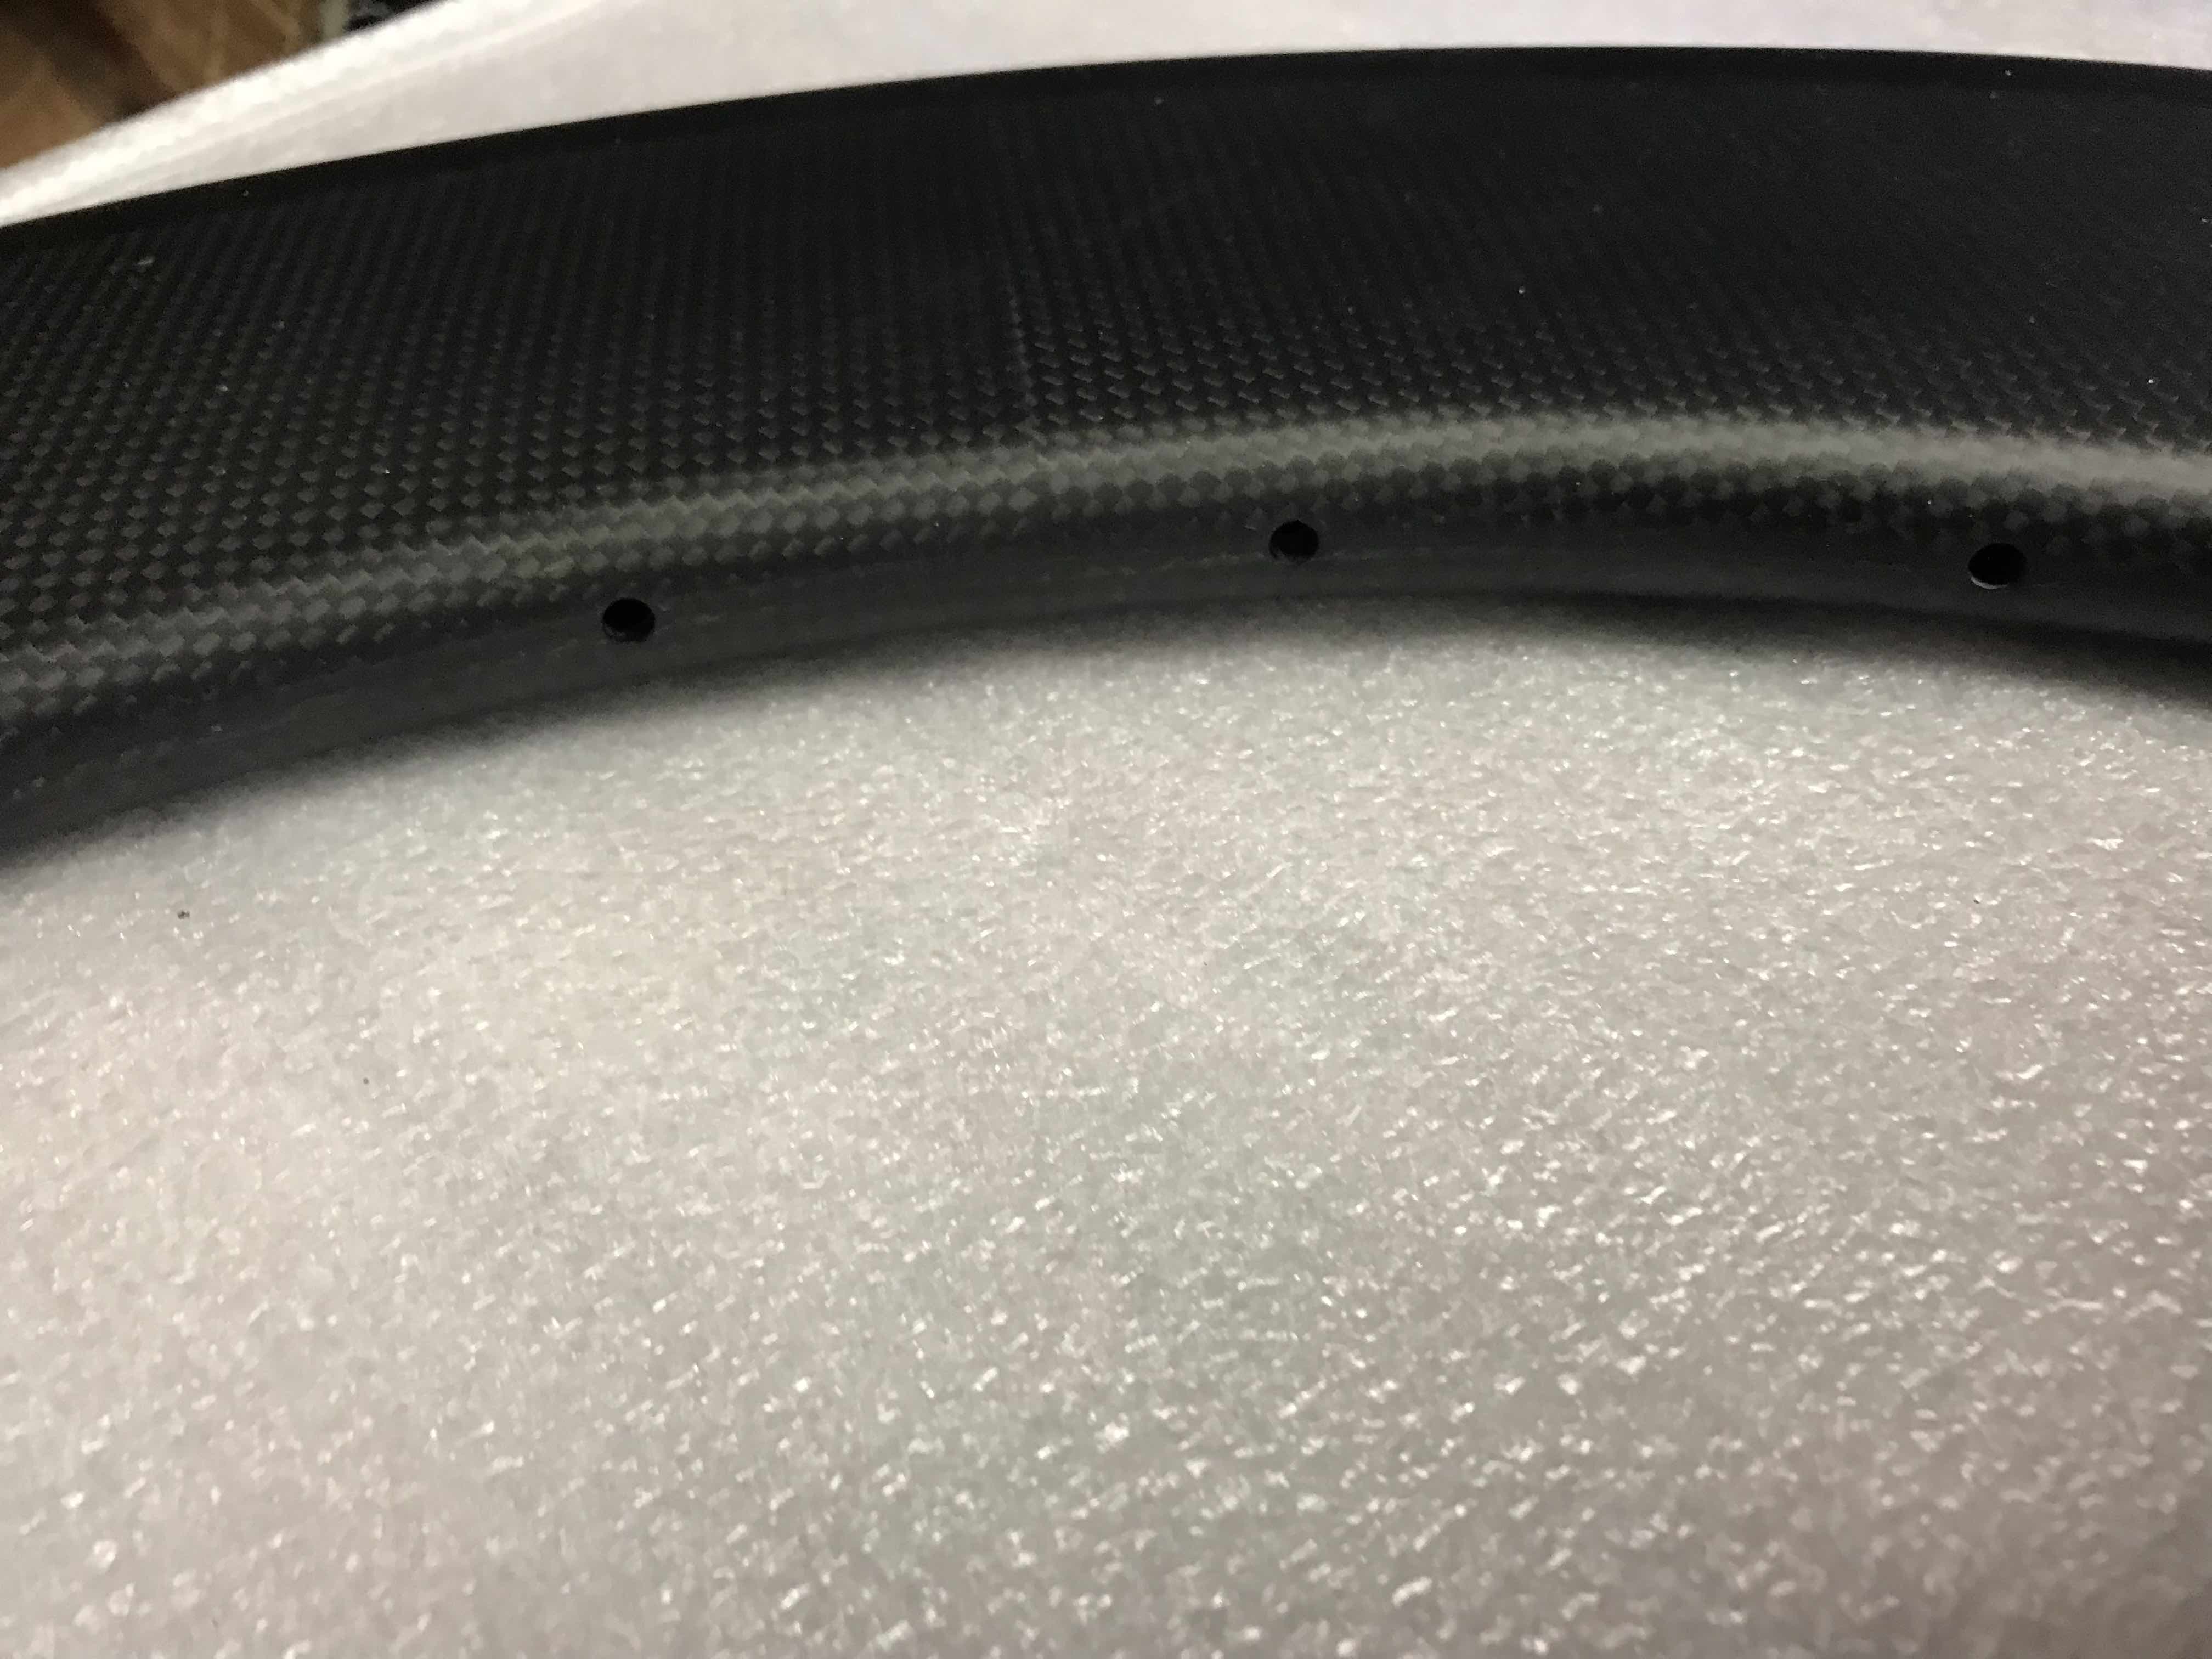
Number of holes
The fewer the spokes, the more aerodynamic the wheel will be. But that necessarily weakens the wheel even if you are light. You have to think about braking and sprinting at full power. Putting 20 spokes in front is okay, but for a rear wheel it is better to start on 24. On hubs called Straight Pull (with straight spokes) you can put 20 at the back, because the straight spokes are less fragile. I think I will test this type of assembly for my next pair. Finally putting more than 24 would have the opposite effect. The right compromise would be to put a wheel with a stick (Jalabert style), a little more goes everywhere than a solid wheel. I opted for a classic assembly with symmetrical holes.
Material
No surprise, I chose carbon fiber type 3K T800 as the majority of carbon wheels on the market, light and rigid.
Tubular tire
I chose a tubular rim, I will detail my tire / tubular choice in a dedicated chapter later.
Characteristics:
- Diameter: 700C
- Material: carbon, T800 3K
- Type: Hose
- Height: 88mm
- Number of holes: 24
- Width: 25mm
- Finish: Matte UD
- Weight: 520g +/-5g
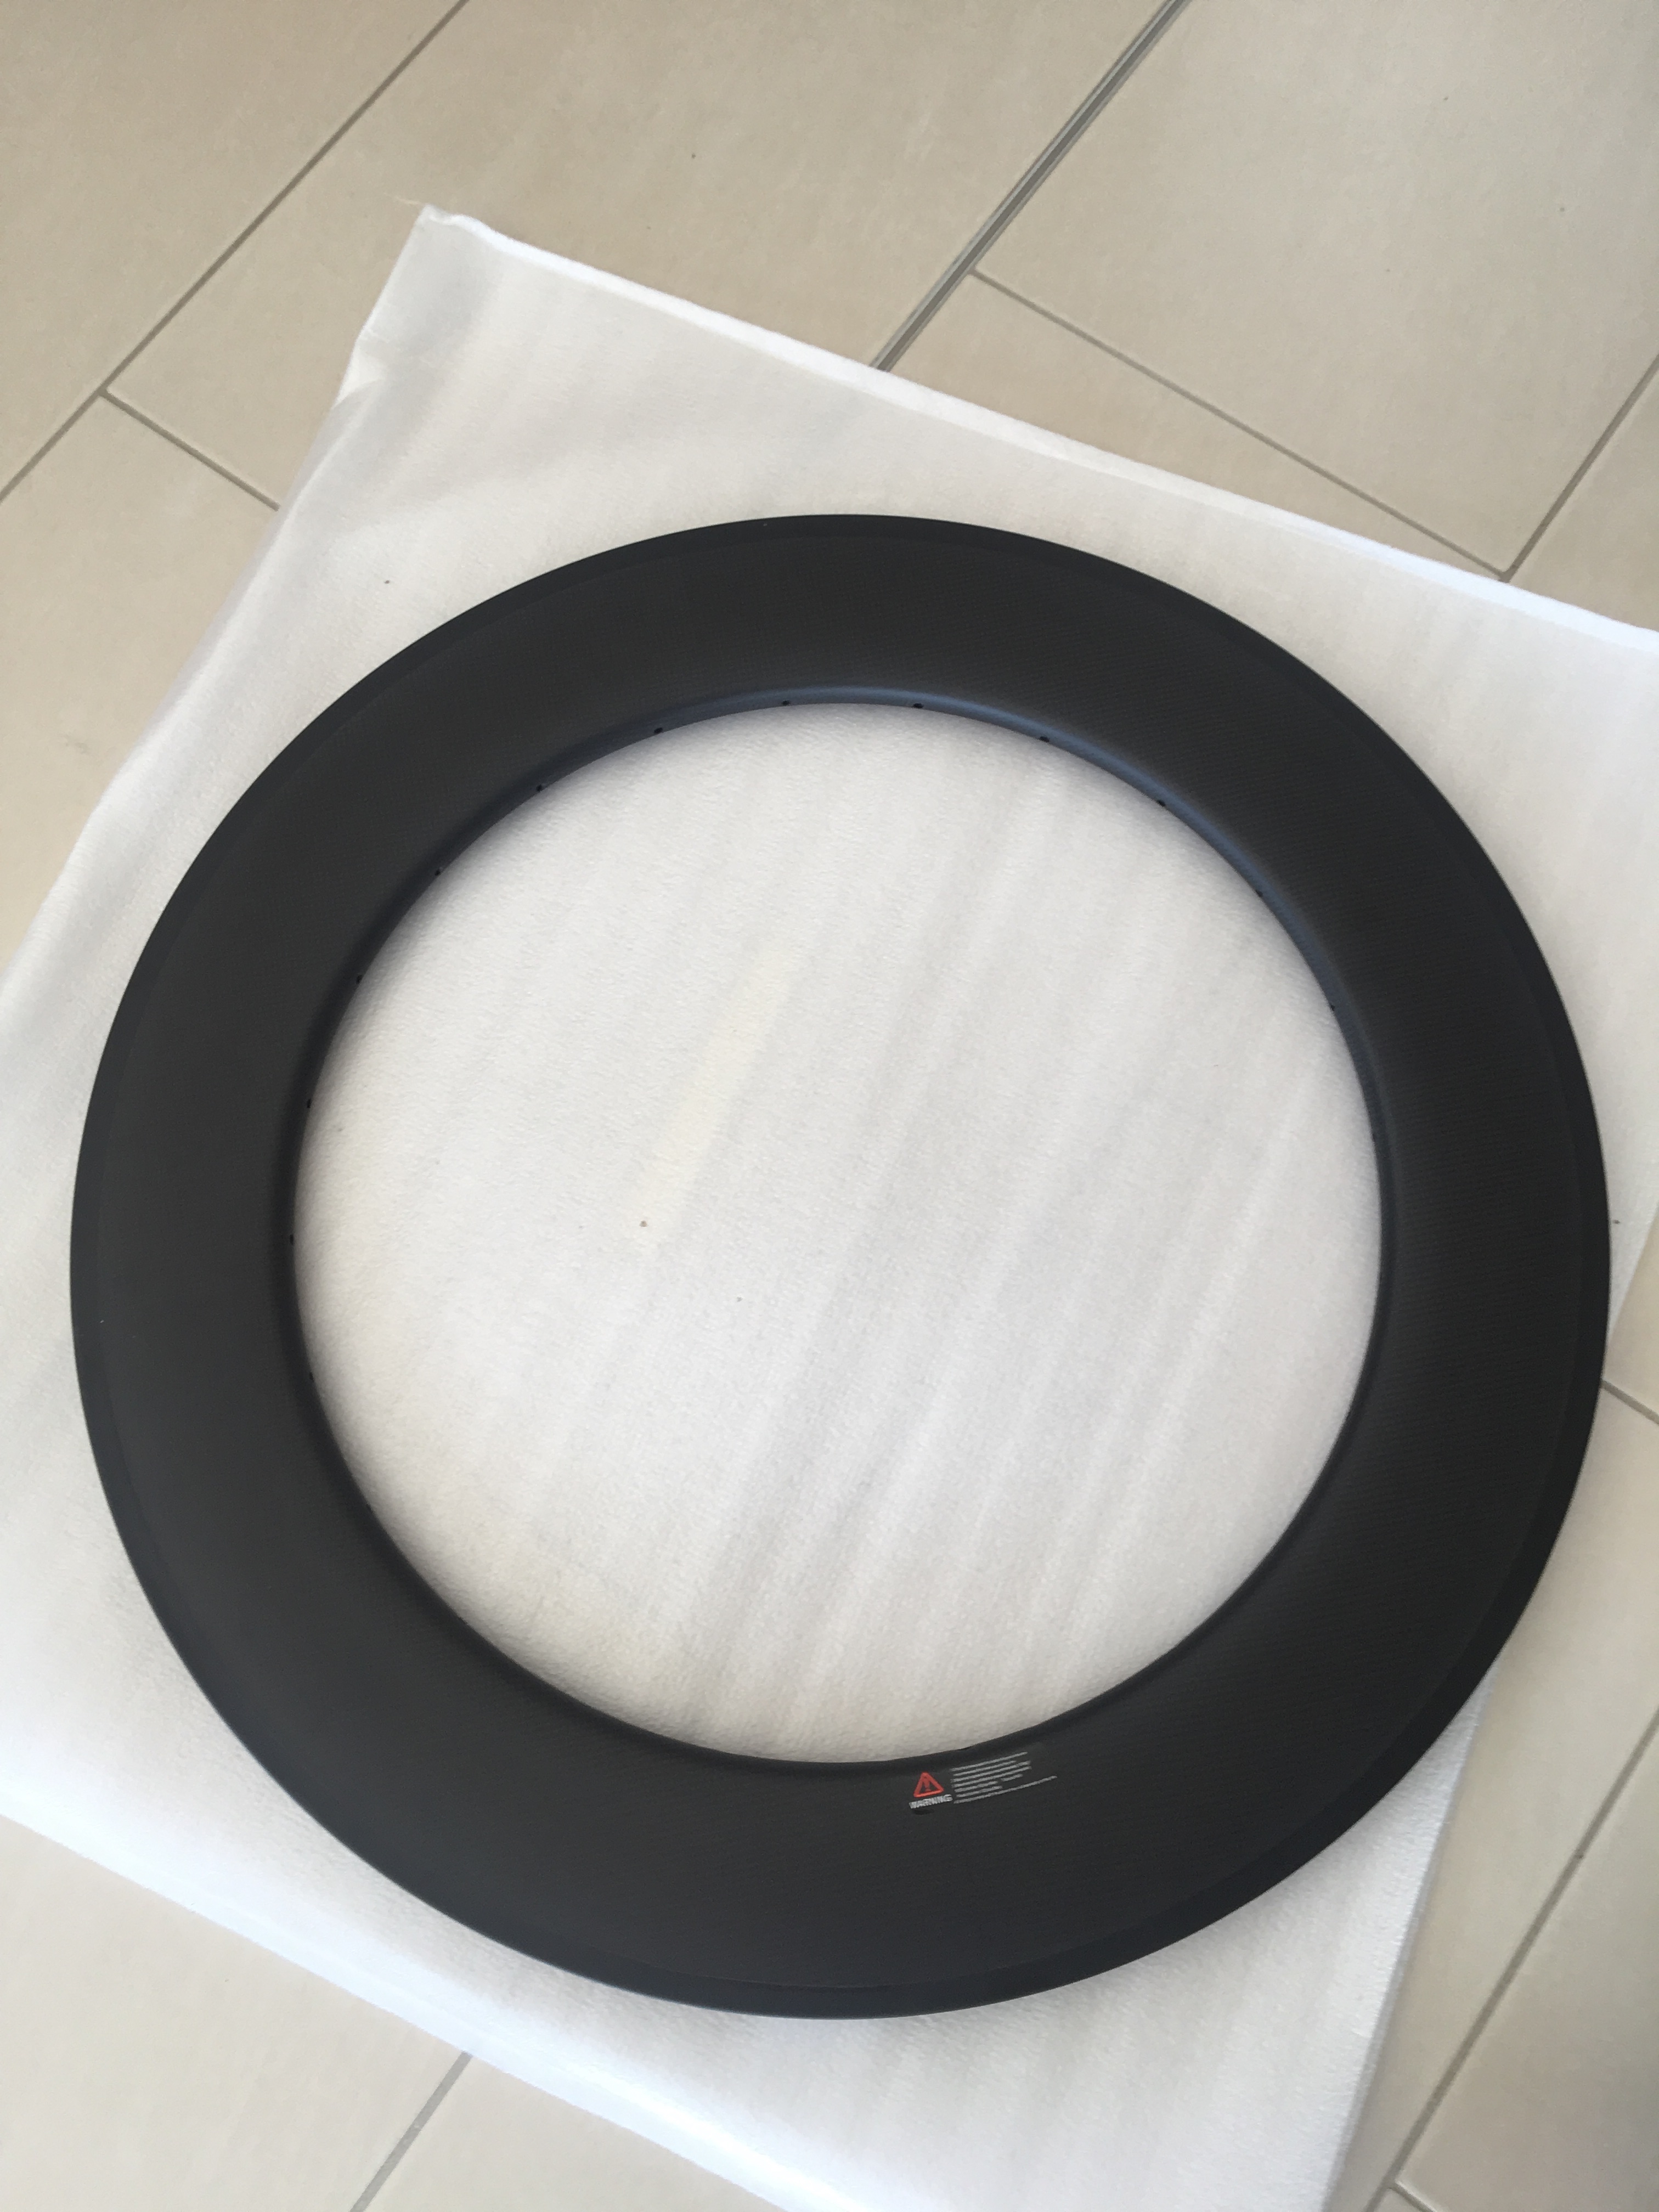
I found a supplier among many others on AliExpress, there is a choice … Still need to find a serious supplier. A good evaluation, a good number of sales, a detailed description, delivery costs correct and a guarantee. I was able to exchange directly by message very quickly and the delivery time was clear. I am very satisfied, it will be necessary to see in the long term, the use. But on delivery, I was amazed by visual quality.
- Price: 67.36 €, plus 36.51 € for shipping costs, for a total of 103.87 €
Hub
The hub is arguably the most important component of a wheel. It is therefore very important to choose a good quality hub, if you have to put money it is of course the hub. But there are lots of good ones hubs, but which will be useful, depending on the context. A light hub will allow better dynamism and a more hub heavy more inertia. The height of the flanges or flanges are important, the wider they are, the more the radii the shorter the stiffer the wheel and vice versa. More information [here] (https://www.roue-carbone.com/guide-achat/le-moyeu-de-roue-de-velo). Finally there are many other parameters to take into account:
- The width of the frame on which the hub will be installed (130mm in my case, which is common on road bikes)
- The material that will necessarily impact the weight (Alu or Carbon)
- The type of bearings is what often drives up prices. Good bearings that allow the least possible friction and therefore less loss. There are very expensive ceramic bearings. Must also look at the quality of the seals, if you have good bearings, but as soon as you go out in the dirt rain gets dirty and you lose all efficiency. And finally, you have to look at the interview if there is any.
- You have to look at the type of cassette Shimano, Compagnolo … and the number of gears
- The number of holes on each side, depending on the assembly you want to make.
- The type of disc brake or v-brake
- Classic or Straight Pull. Straight Pull hubs are fashionable because they have a better longevity by using straight spokes and in fact we can put a little less spokes and therefore get a better aerodynamics (I will test on a next pair, apparently it has not yet been proven so let’s take the time and feedback more than marketing).
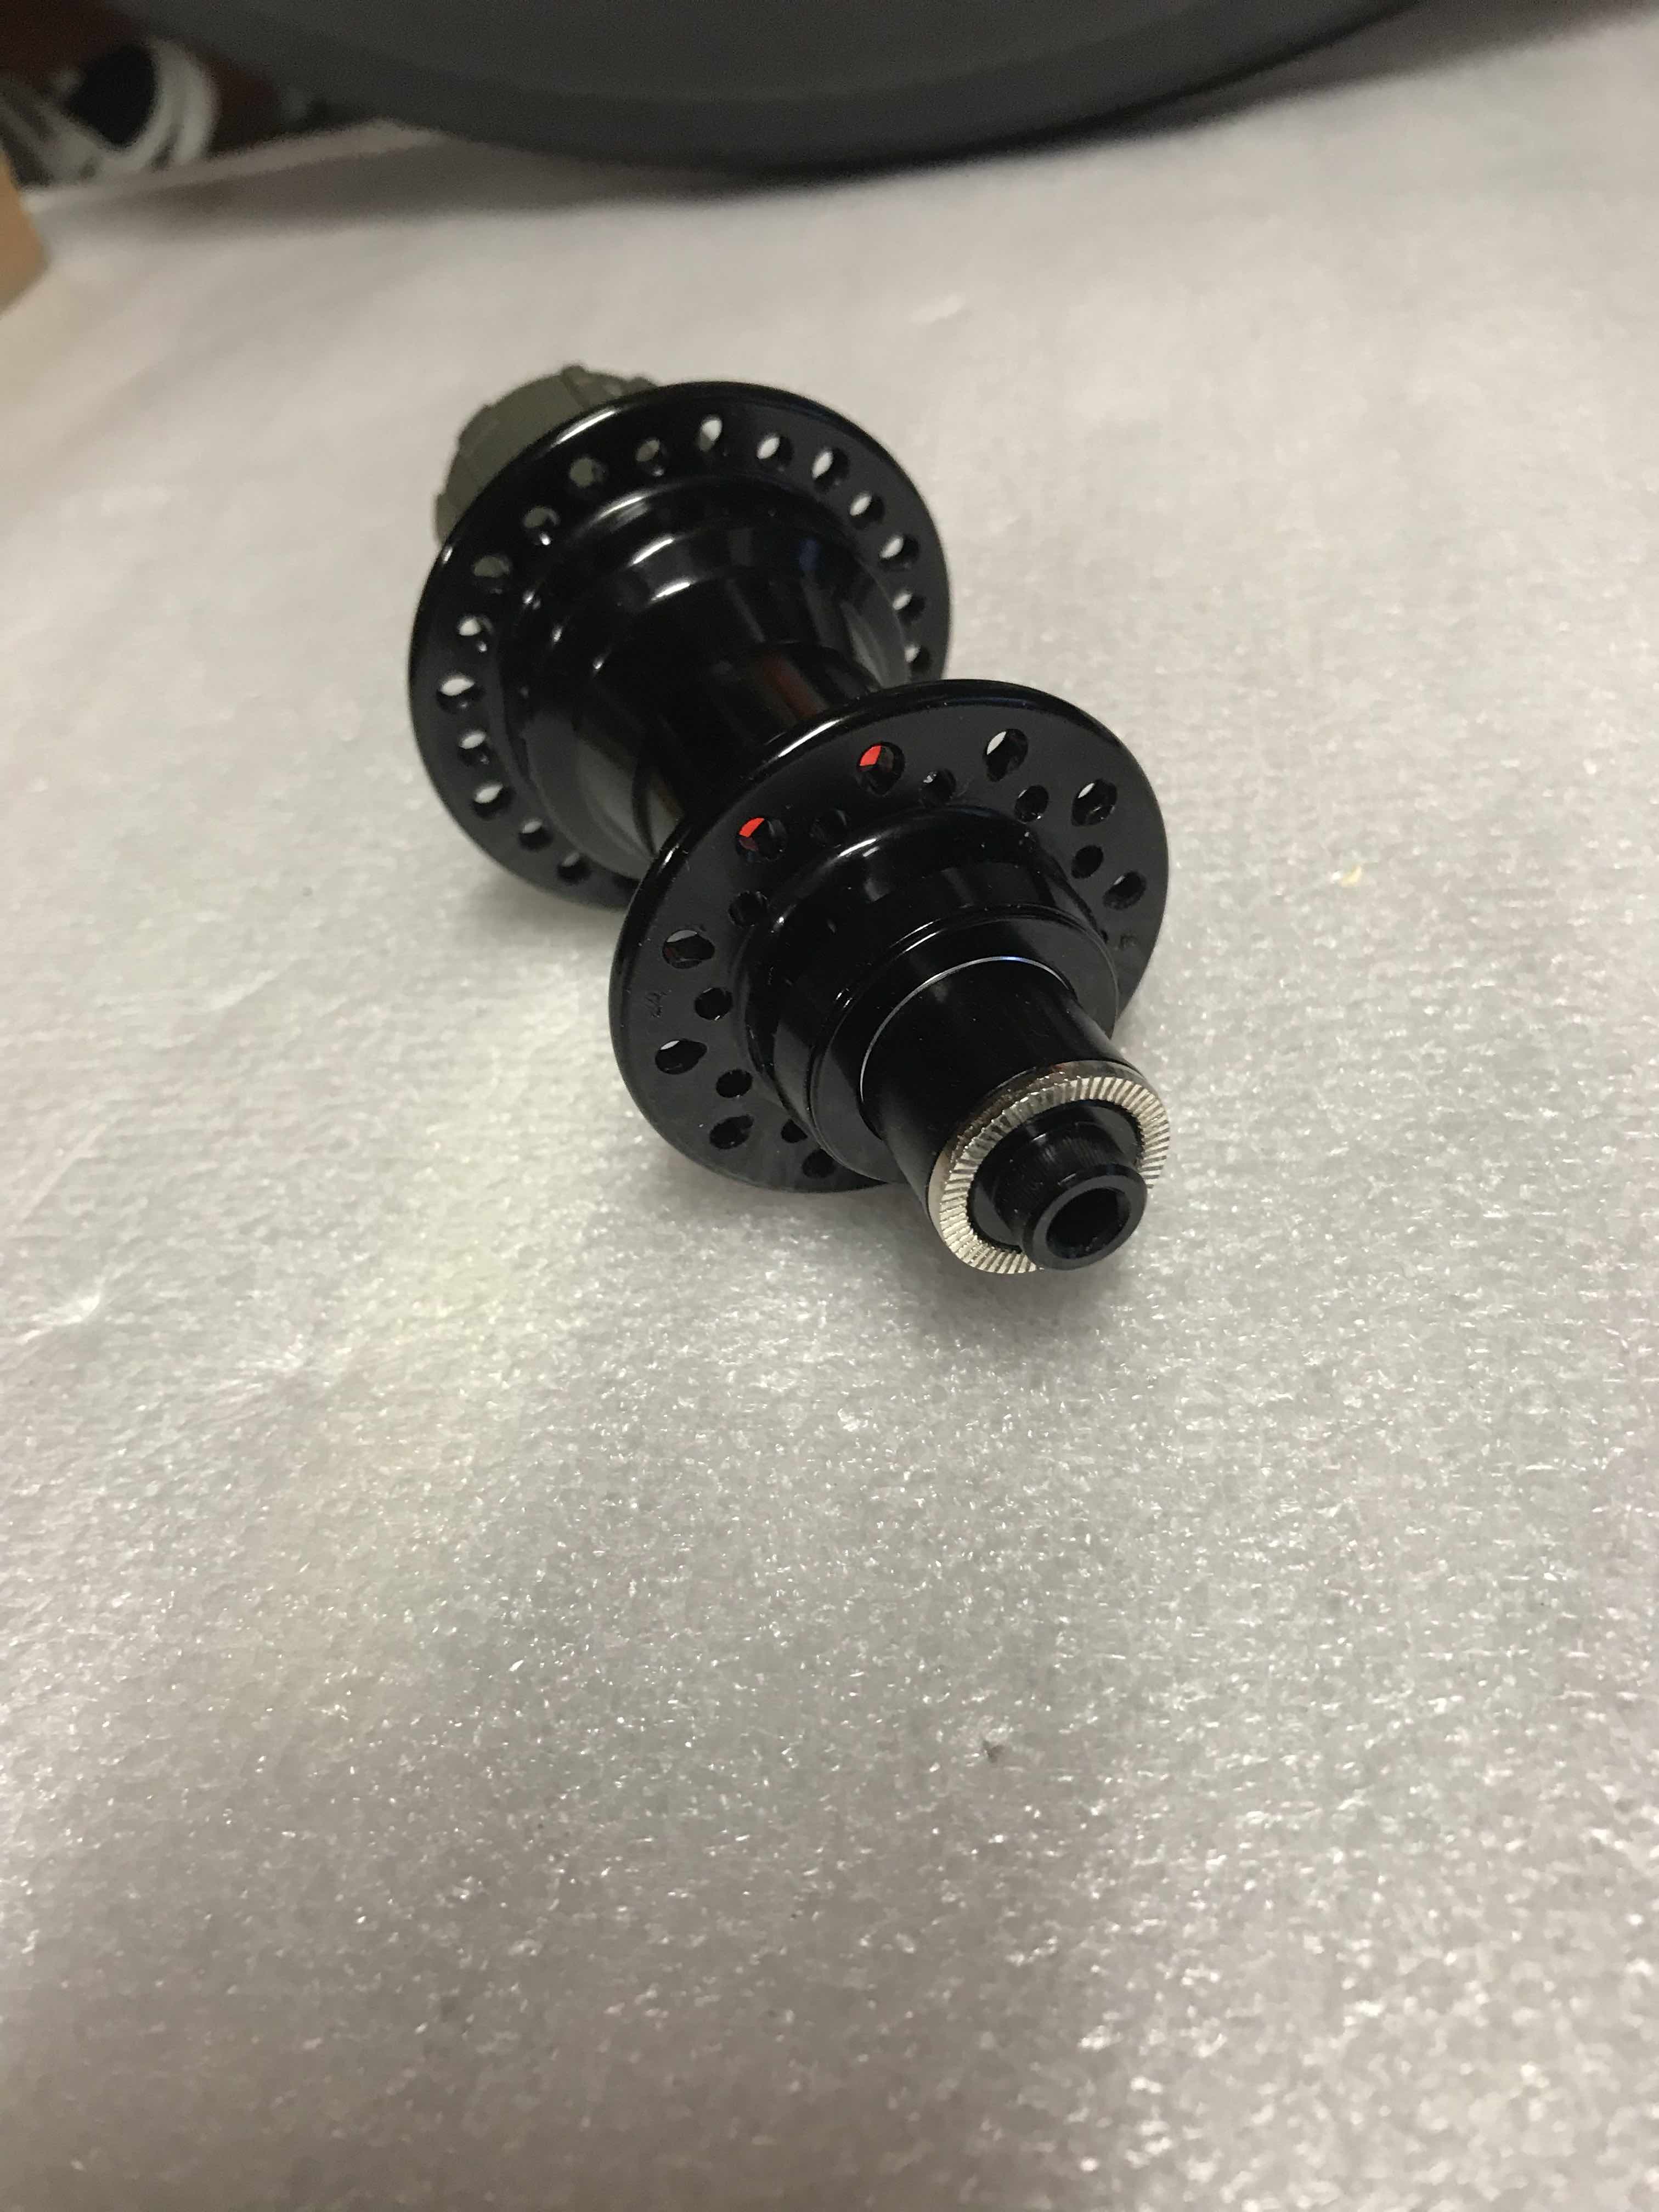
For my first wheel, I did not want to take a high-end hub directly (it goes up to 500 euros). I have looked for good value for money. The American brand Novatec is a good compromise, because it is possible to buy them directly in China and which says fewer intermediaries says cheaper. So I need a hub:
- 130mm spacing
- Shimano 11v compatible
- V-brake
- J-bend spokes (angled)
- I want to make a 24 hole wheel with 2 crossings on each side. So I need a hub with 12 holes each side.
- Aluminum and light.
- A high flange height (flange) but not too high.
- Low maintenance and well tested bearing.
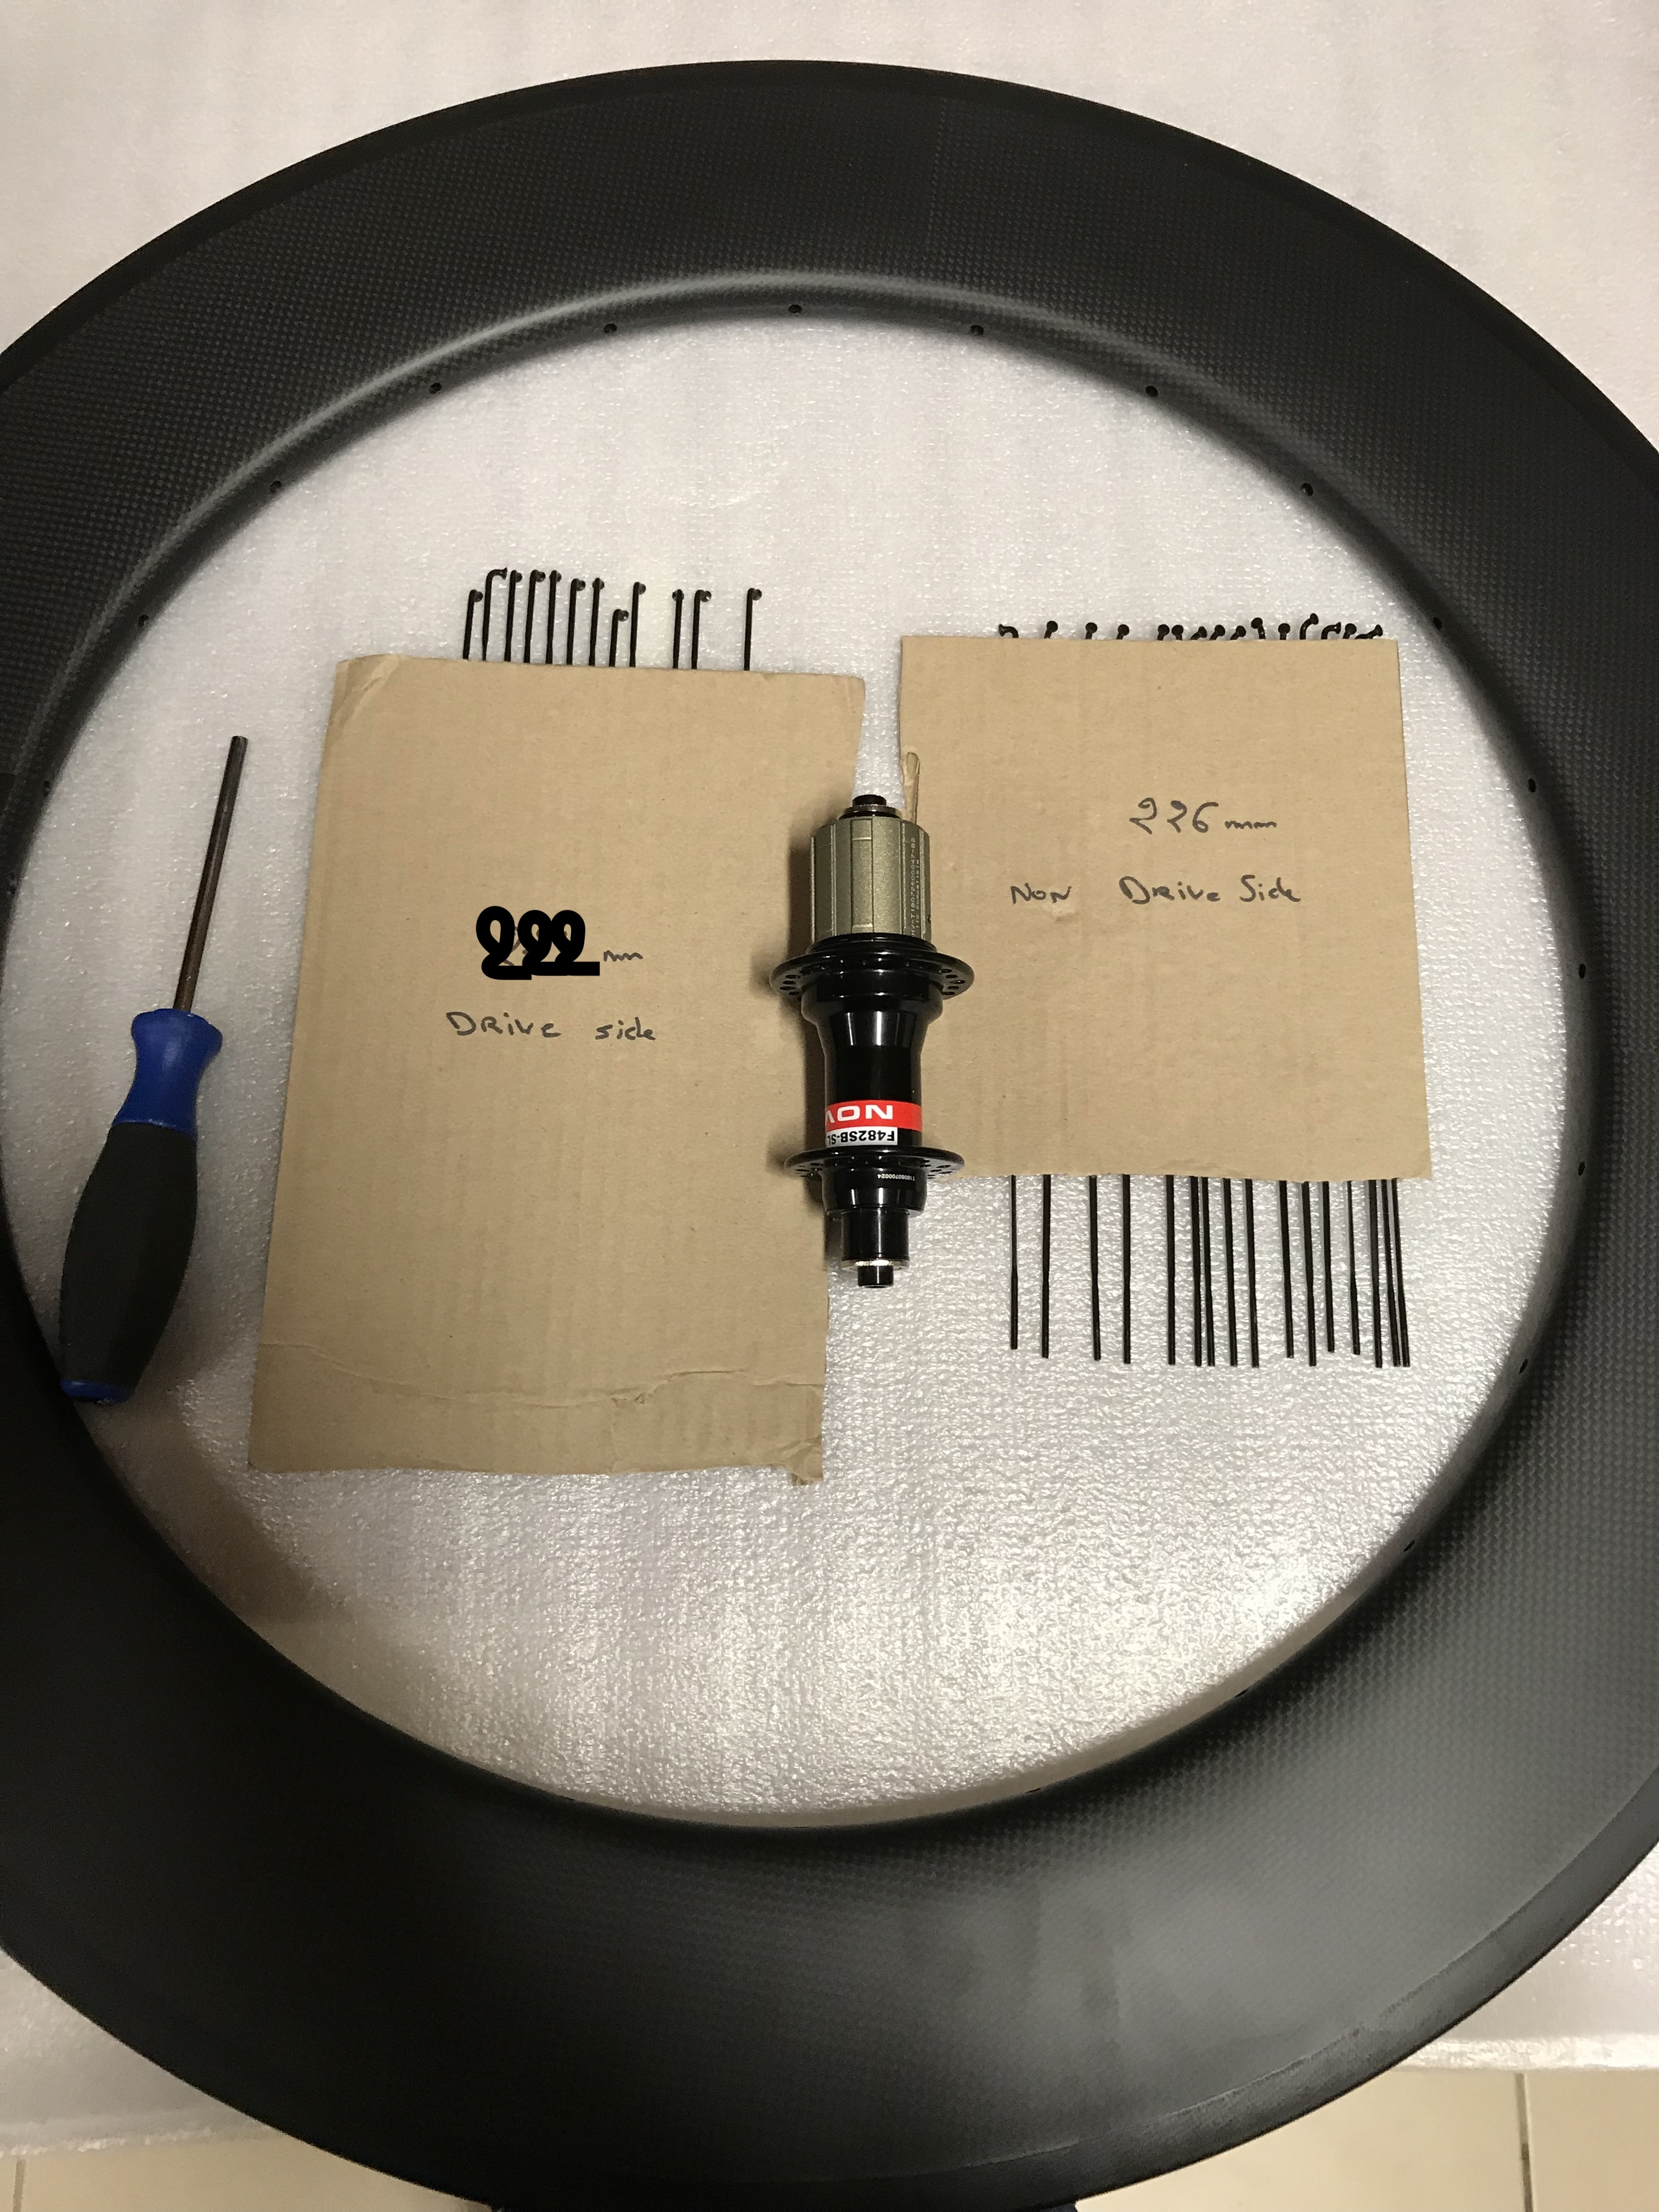
I chose the hub Novatec F482SB which meets my specifications above.
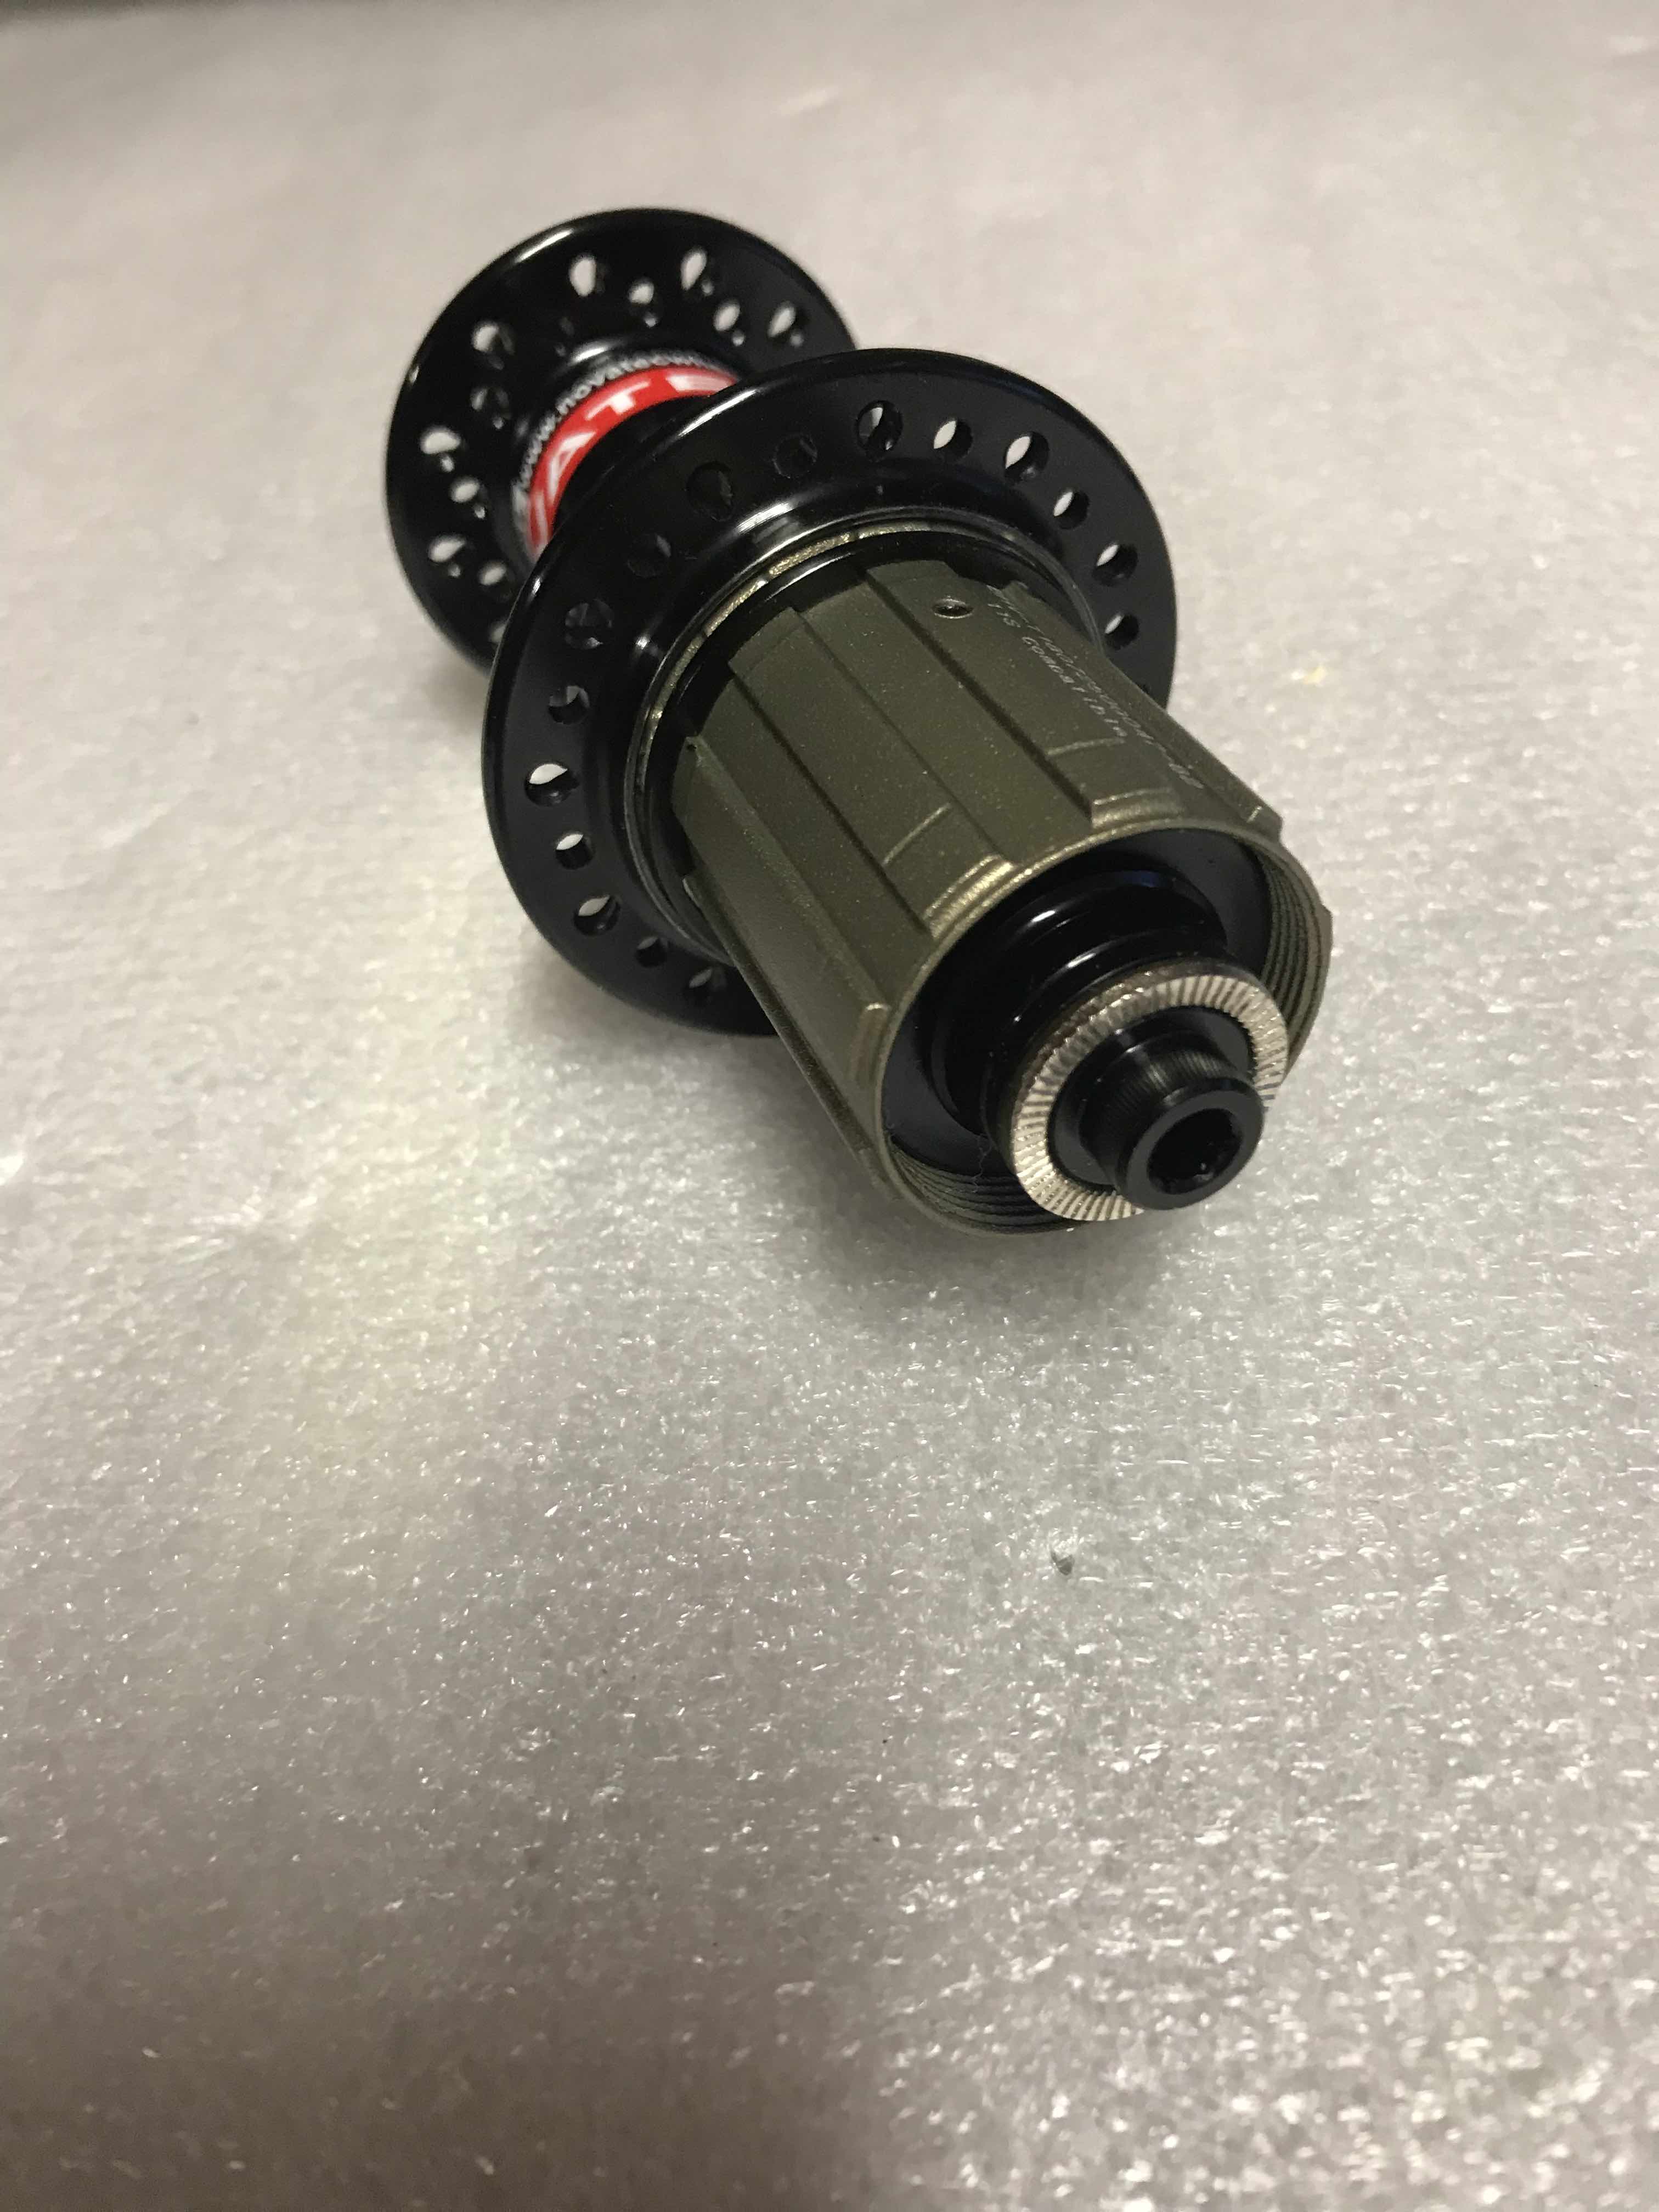
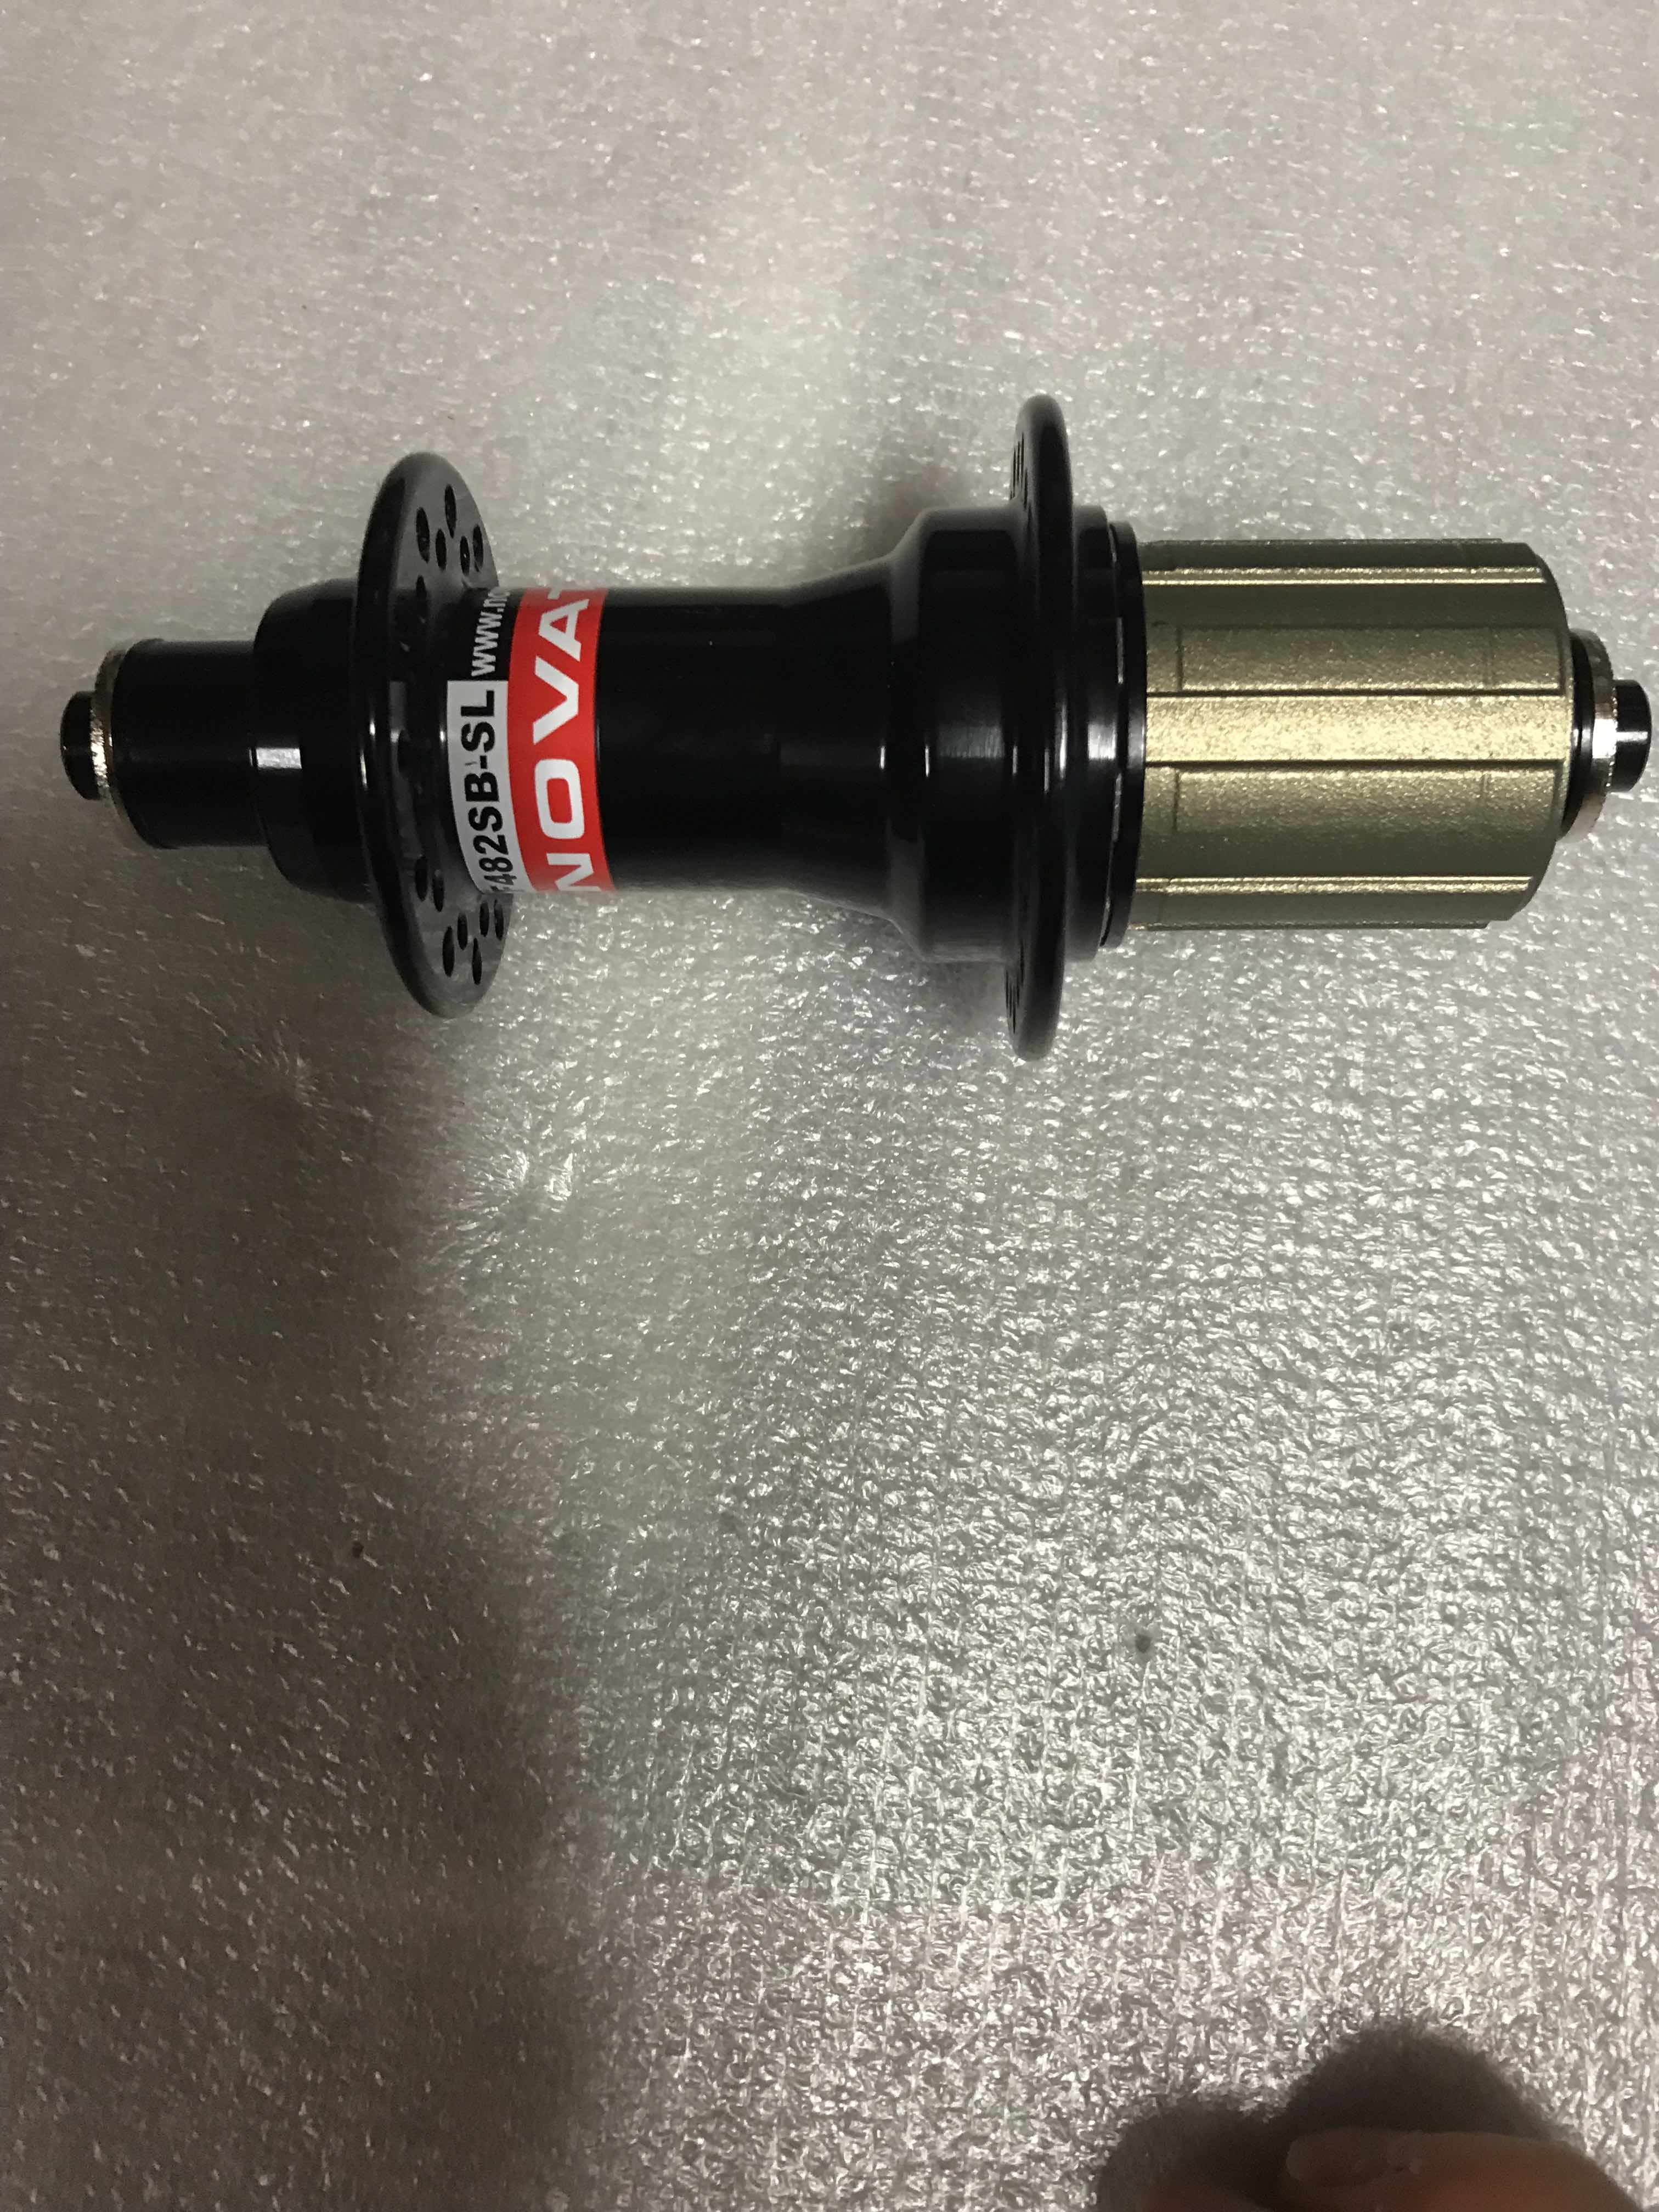
Price: 59.98 € including shipping costs
Spokes
Since I want to make an aerodynamic wheel, I turned directly to flat spokes. There are 2 major brands that stand out in the Sapim and Dt-Swiss fields. I chose the Sapim CX-Ray, which are light, very fine and resistant (in Steel) [Sapim CX-Ray] (https://www.sapim.be/spokes/aero/cx-ray).
Be careful not to buy the shelves now. A chapter will be dedicated to this later.

- It is possible to choose the color
- In addition, I took J-Bend spokes (bent), there are straight spokes which are intended to Straight Pull hubs. Spokes of this type are less tiring because they have no elbow. I think I will test on another pair.
Price: 2.20 € each
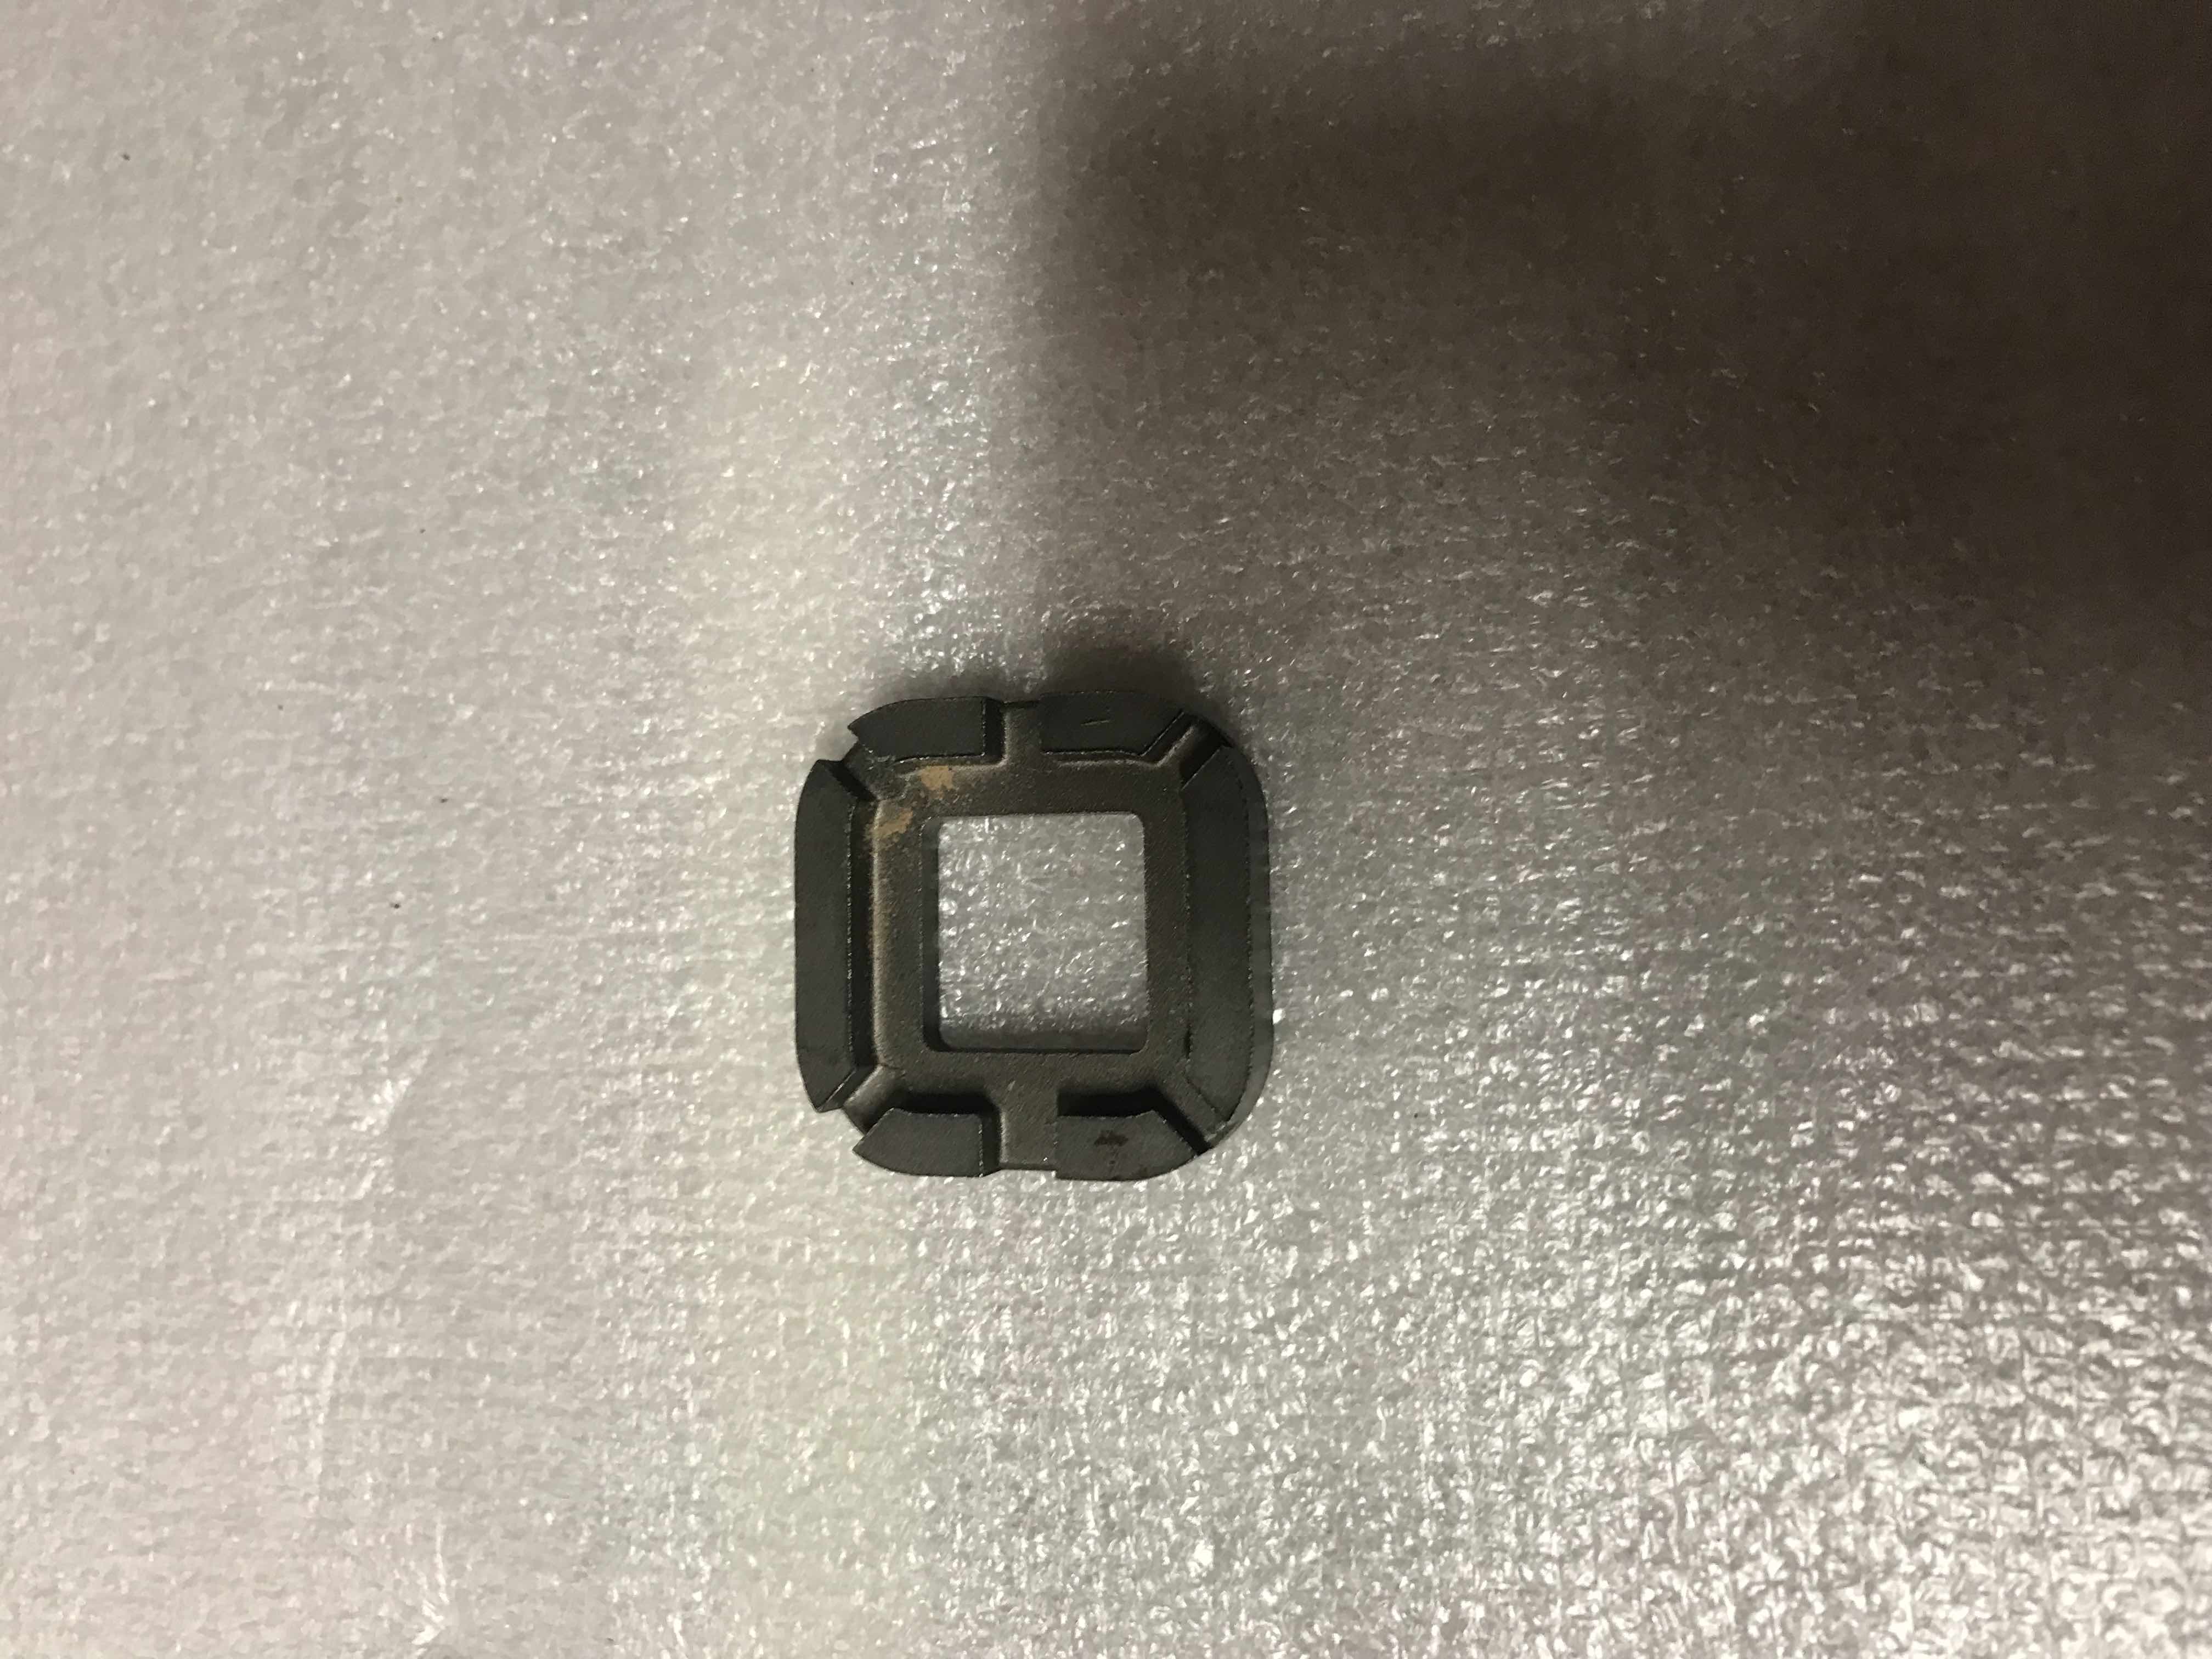
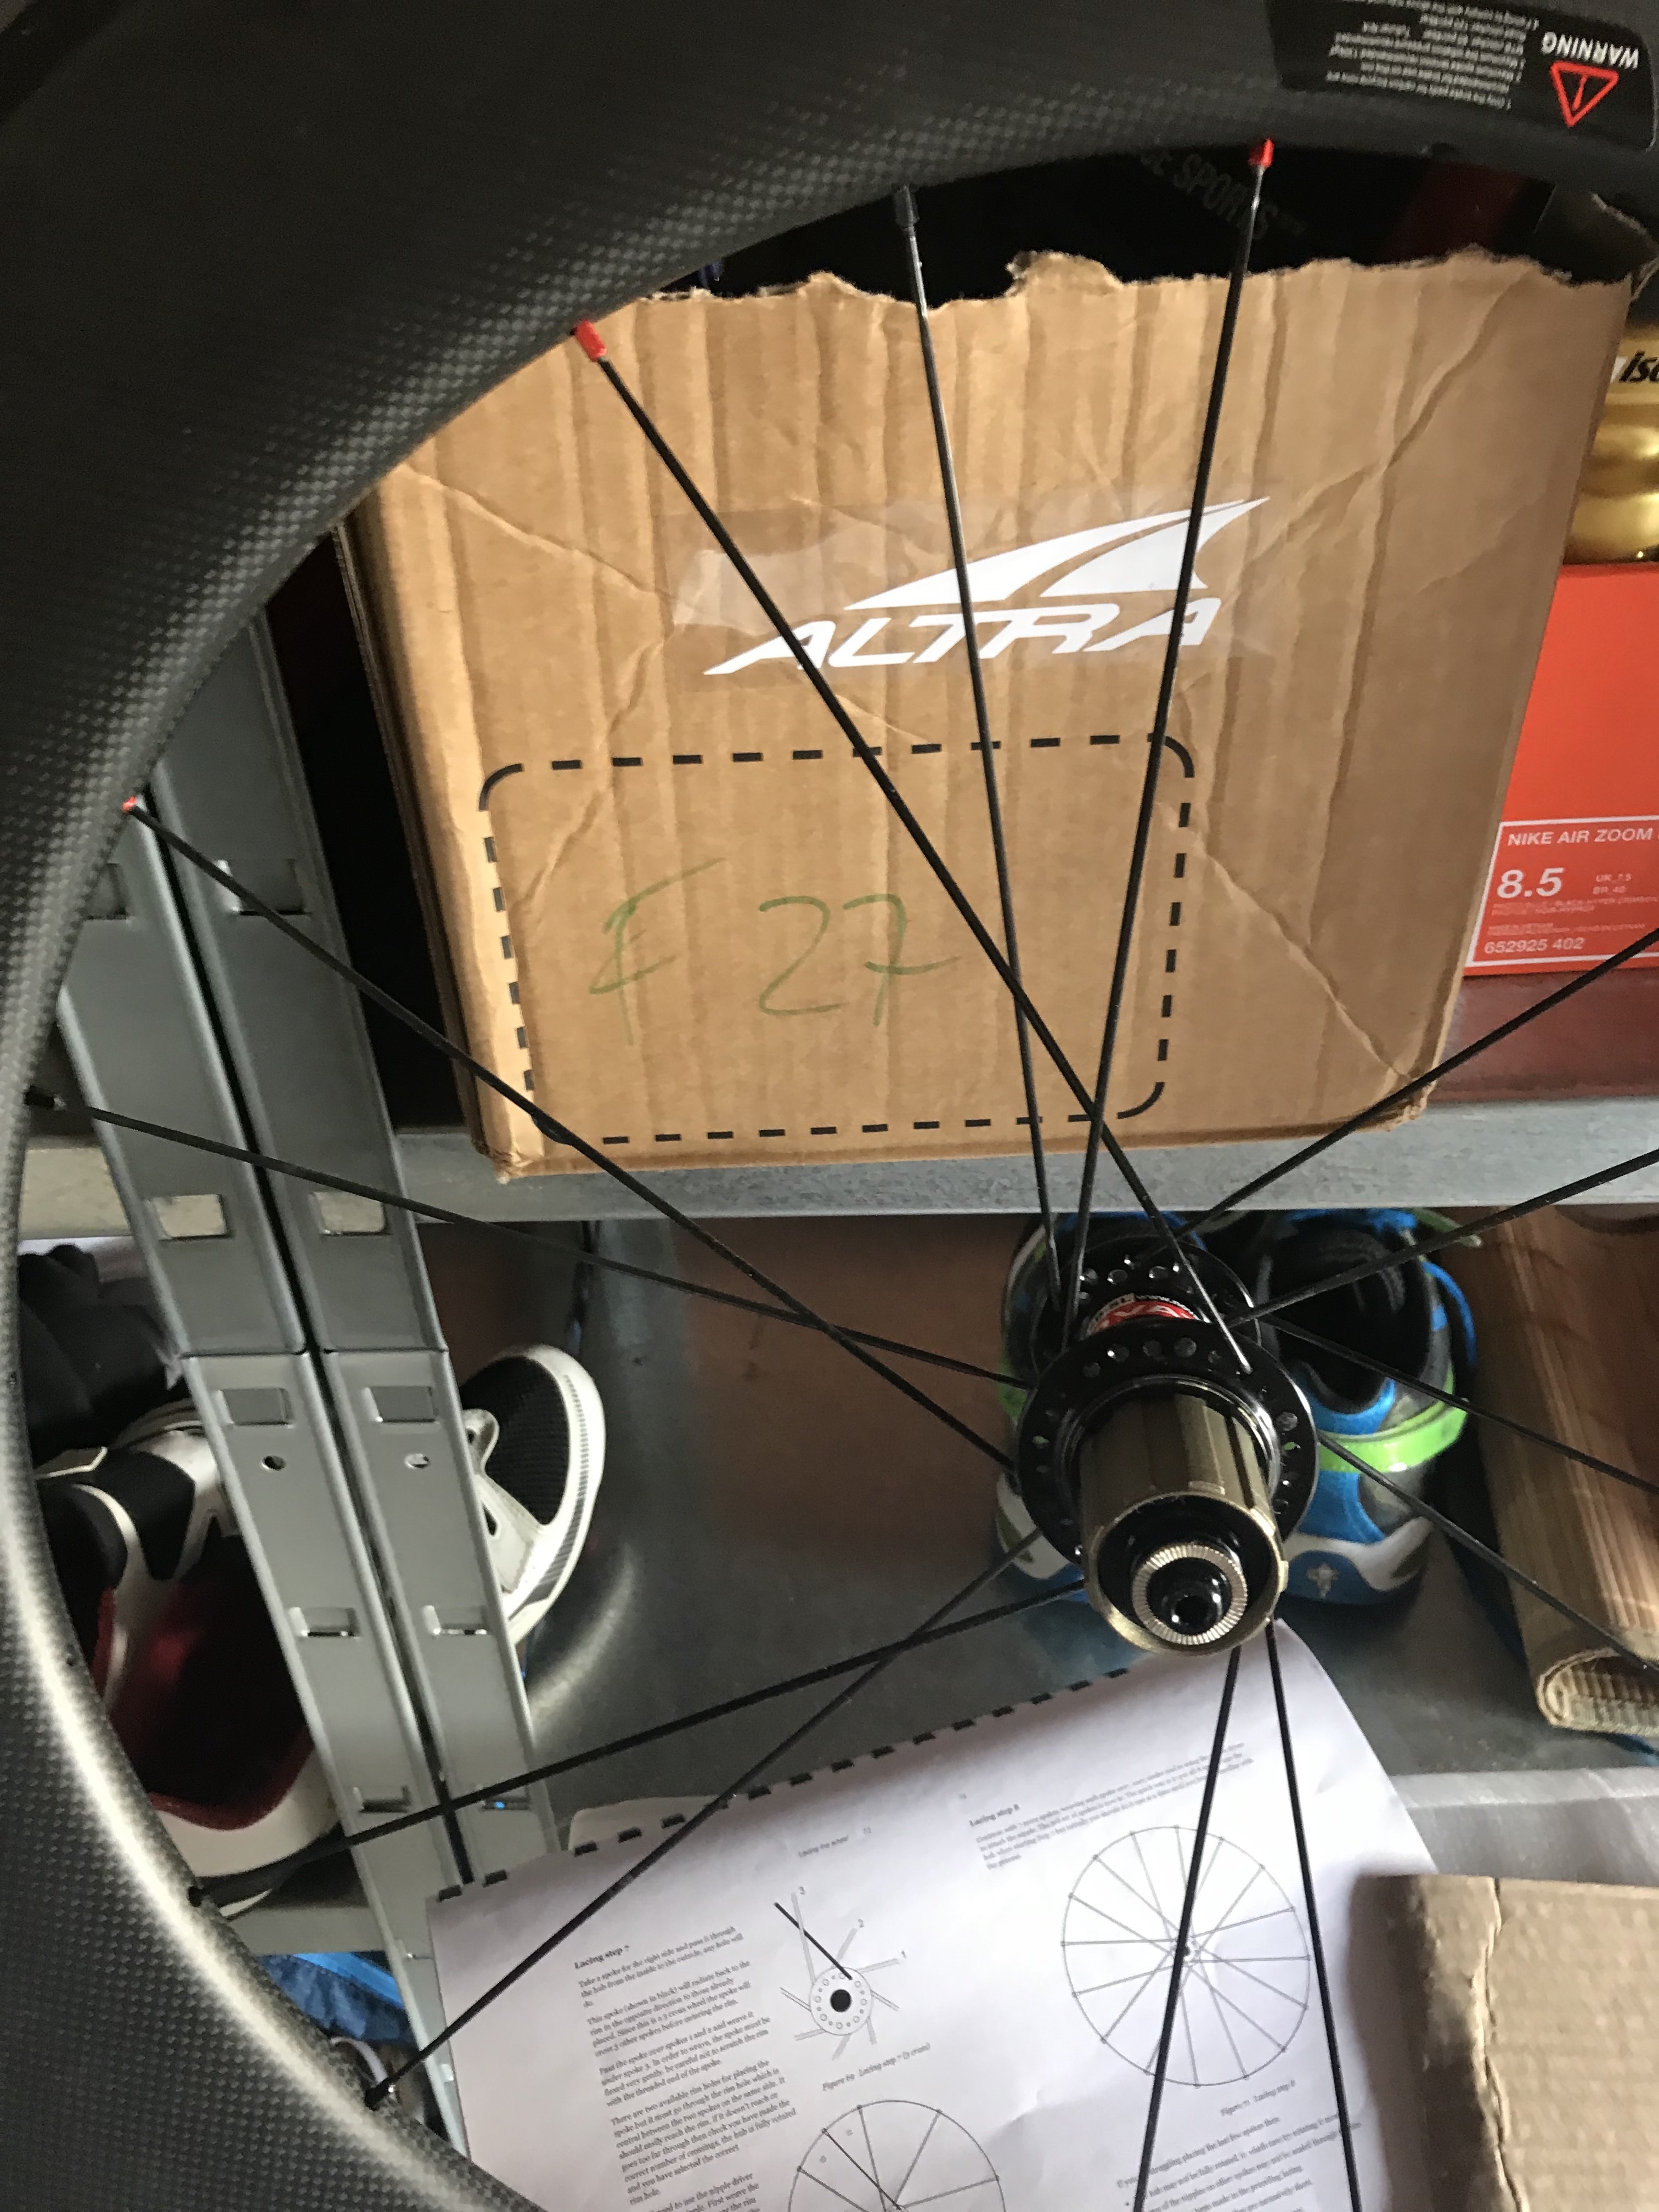
Nipples
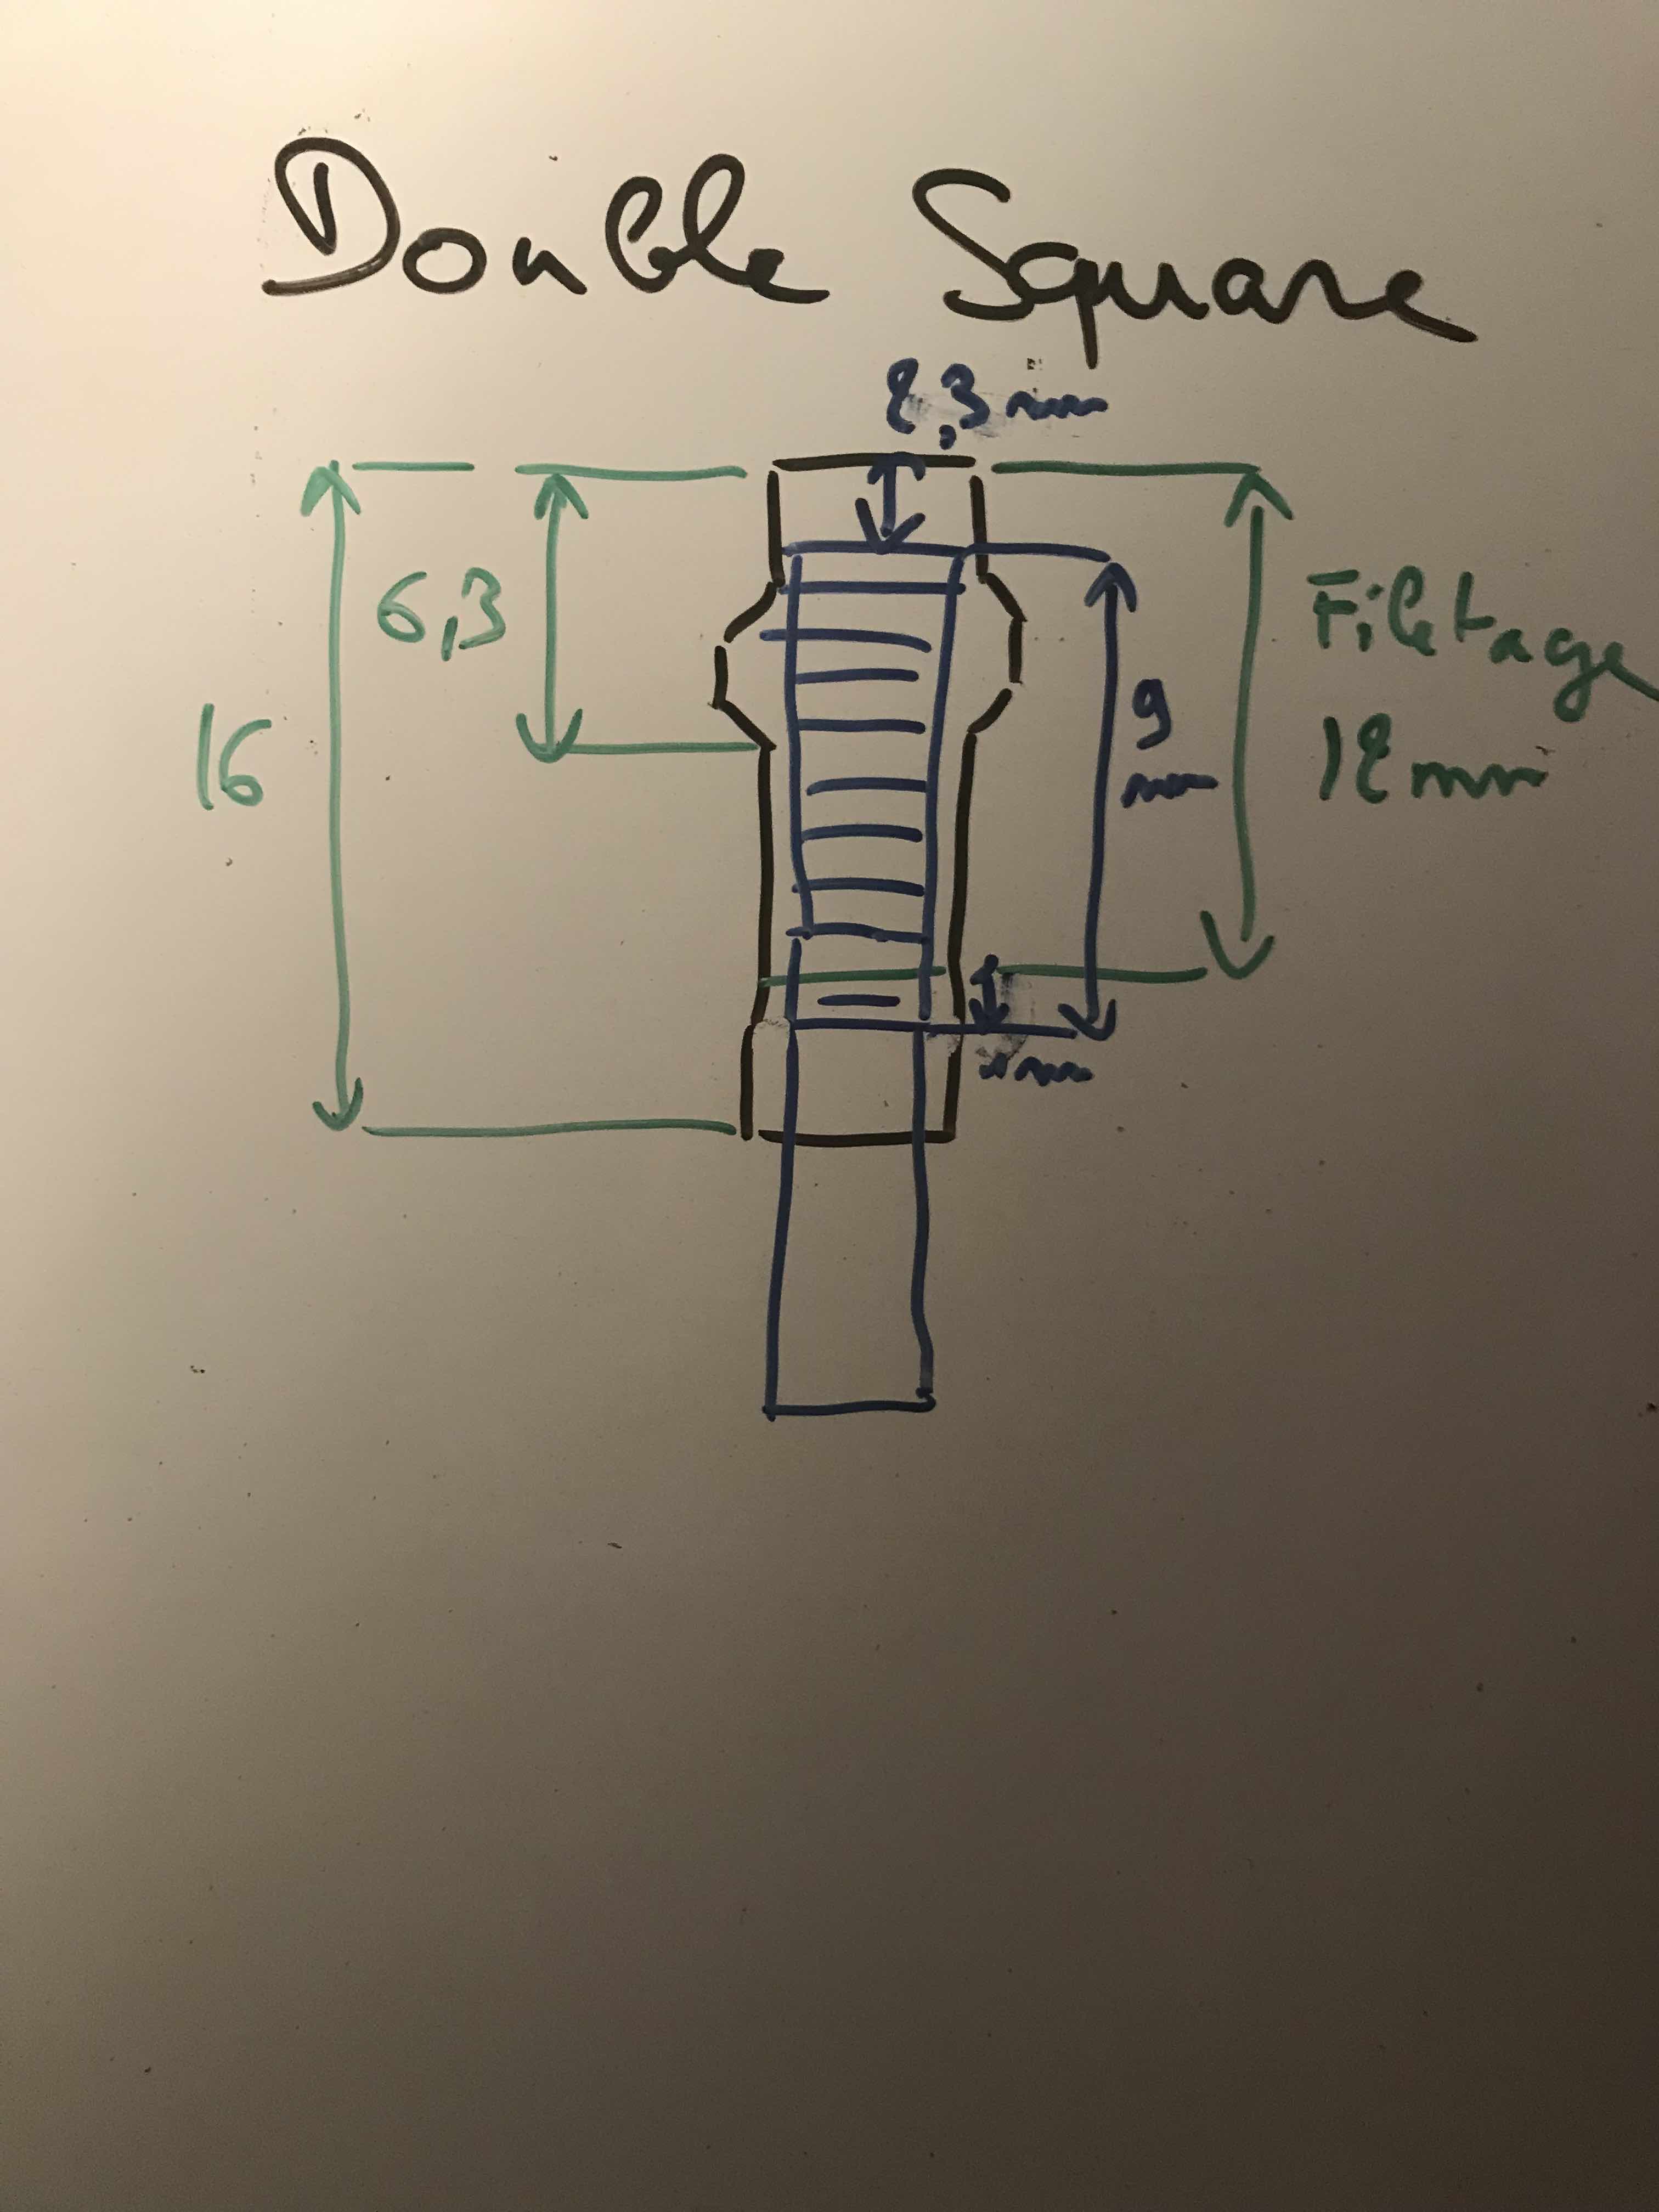
Regarding the nuts we can take what we want, each brand offers different lengths or heads. My choice is like for the departments, at Sapim [Double Square] (https://www.sapim.be/nipples/design/double-square). So simply that the Double Square have a square head which allows you to use this tool (see image below). Given the height of the rim (88mm) this type of tool makes it easy to screw inside, we will see it during the assembly. The Alu and Brass mixture make it both light and resistant.
- You have to look at the material, 100% Alu nuts will be more fragile.
- Pay attention to the type of head, some brands like Dt-Swiss have nuts that require the use of their tools special.
- You have to look at the size, there are 12-14-16mm, you must especially have the detail of the thread so, we will see later, choose the right length of the spokes.
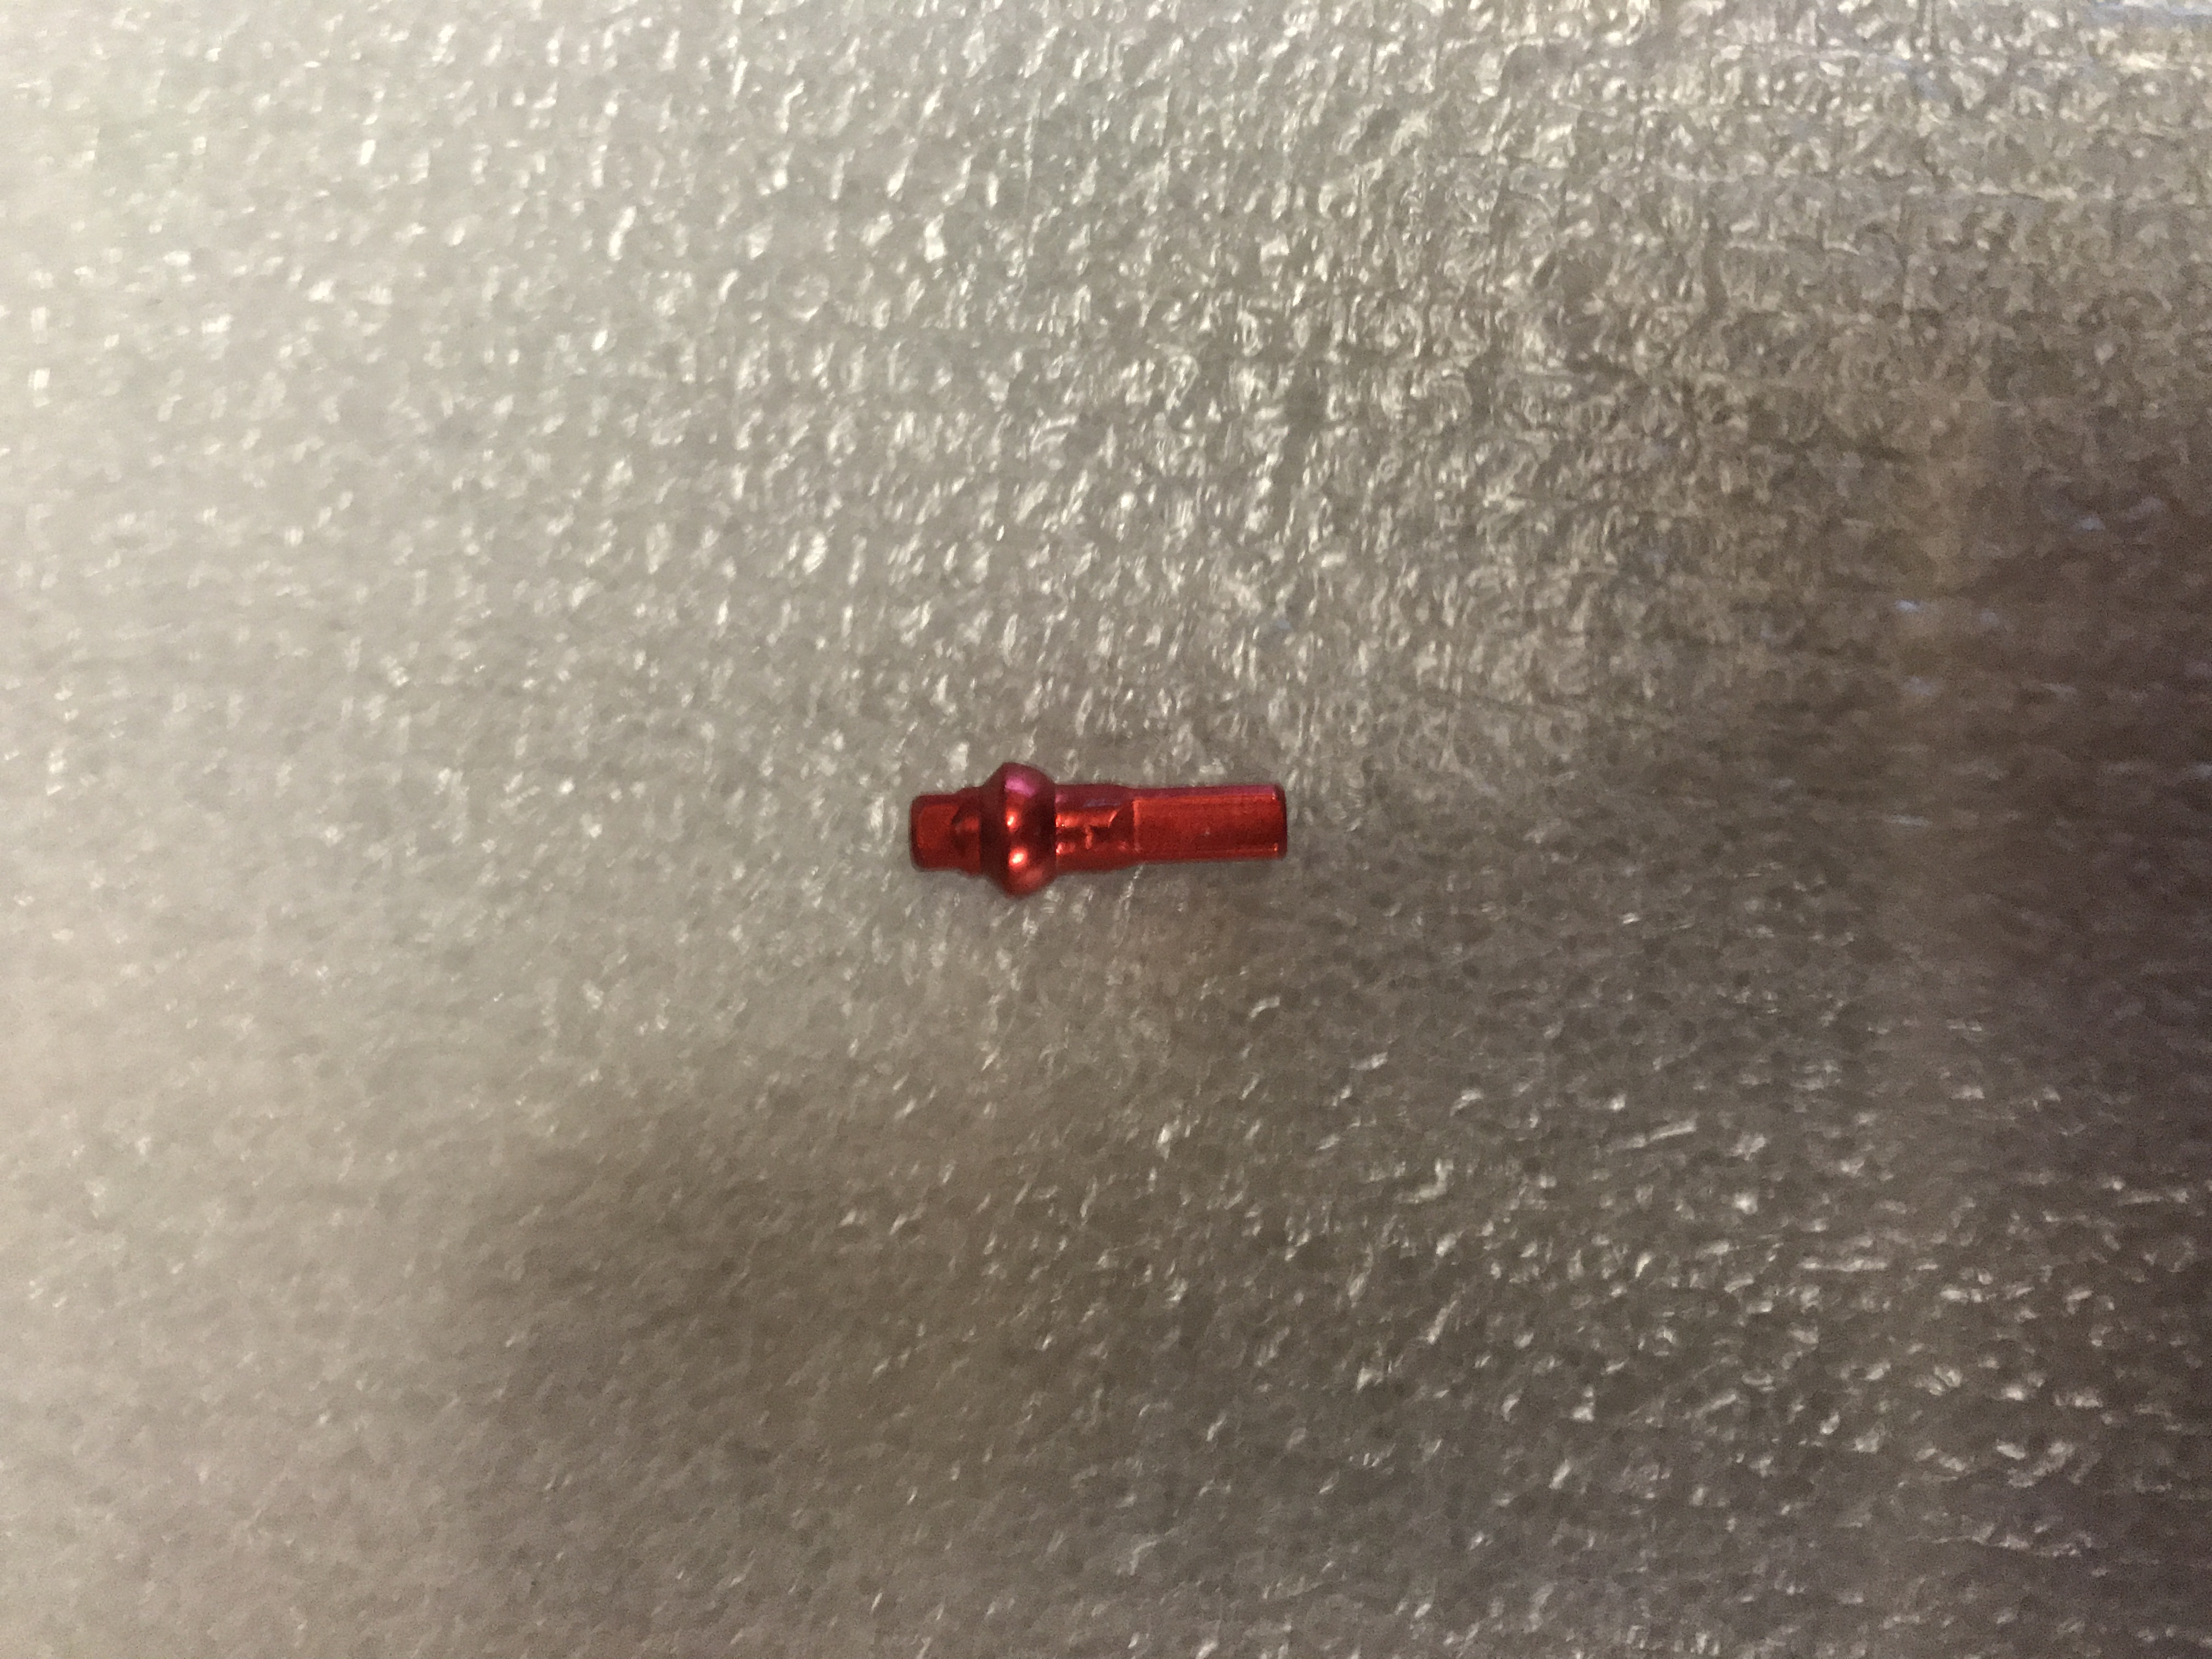
There are different colors, I chose to alternate red and black, just for the “style”
Price: 0.40 € per unit
Tire or Tubular
This is always the big question among cyclists. I will give you my personal opinion on this. The hose and the tire all have different characteristics from their designs and can bring different benefits, it all still depends on the compromises you are ready to make, according to your need. In in any case, a good quality tire will always be better than an entry-level tire and vice versa. There is already a lot of articles that talk about this subject, I invite you to read the one that sums up the subject well: [Difference between Tire or Tubular] (https://www.roue-carbone.com/guide-achat/difference-entre-pneu-boyau-de-velo) {: target = “_blank”}
Even if the hose has many negative points in terms of practicality:
- Always have a spare hose on you
- the installation is a little more perilous and long, it must be done in several stages and you have to buy glue.
- A puncture is expensive, because you have to change the hose and not just change the inner tube
- The braking is less precise, because you brake on the rim directly (unless your hub is disc of course).
But they bring advantages in terms of performance, they are often lighter for an equivalent range in tires, they absorb road defects better which makes them more efficient and also more comfortable. Of more, we can put a greater pressure which allows less grip with the ground and therefore less friction. But you still have to choose a quality one. Since I rolled my gut, I wouldn’t want to go back to the tire but that’s my personal opinion. But it is important to choose a quality hose or tire because it would be a shame to waste the effort put into the underlying components. That is, the hose or tire is the last element before the road so you have to be able to transmit the maximum force with the least losses.
What characteristics should be taken into account when choosing a tire or tire?
TPI
TPI = Threads Per Inch
This is the number of wires making up the carcass.
The higher the value, the more the carcass will be both flexible (because the wires are thinner) and difficult to pierce. (at the expense of weight, finally everything depends on the materials).
Width
[Each rim has its own tire width] (https://engineerstalk.mavic.com/fr/a-chaque-jante-sa-largeur-de-pneu/) {: target = “_blank”}
After reading this article, we understand the advantage of having a wider width at the back, especially when we are looking for aerodynamics and in addition it improves comfort, that’s why I chose a 25mm rim and a 25mm hose.
Others
There are plenty of other parameters to look at, including the type of valve and especially its length. Indeed, given the 88mm rim height, i will need a valve extender. You also have to pay attention to the material that will affect performance: grip, wear, behavior on wet roads … finally look at the weight and of course find the best quality / price ratio in relation to your needs and budget.
Finally here is what I chose in terms of quality / price ratio and meeting my needs:
The Vittoria CX Tubulars really have high-end features for a reasonable price. I already had chose these hoses for my 38mm, I’m very happy with them for years and several thousand kilometers counter.
- Presta valve 34 mm
- 25c
- 320 TPI
- 250g
- Price: 34.99 €
Quick hitch
I use the same for all my wheels so no need to buy them. What is important is the weight so if you have low-end quick couplers, it’s best to have a light pair. That would be a shame to lose all the weight gained by the previous components.
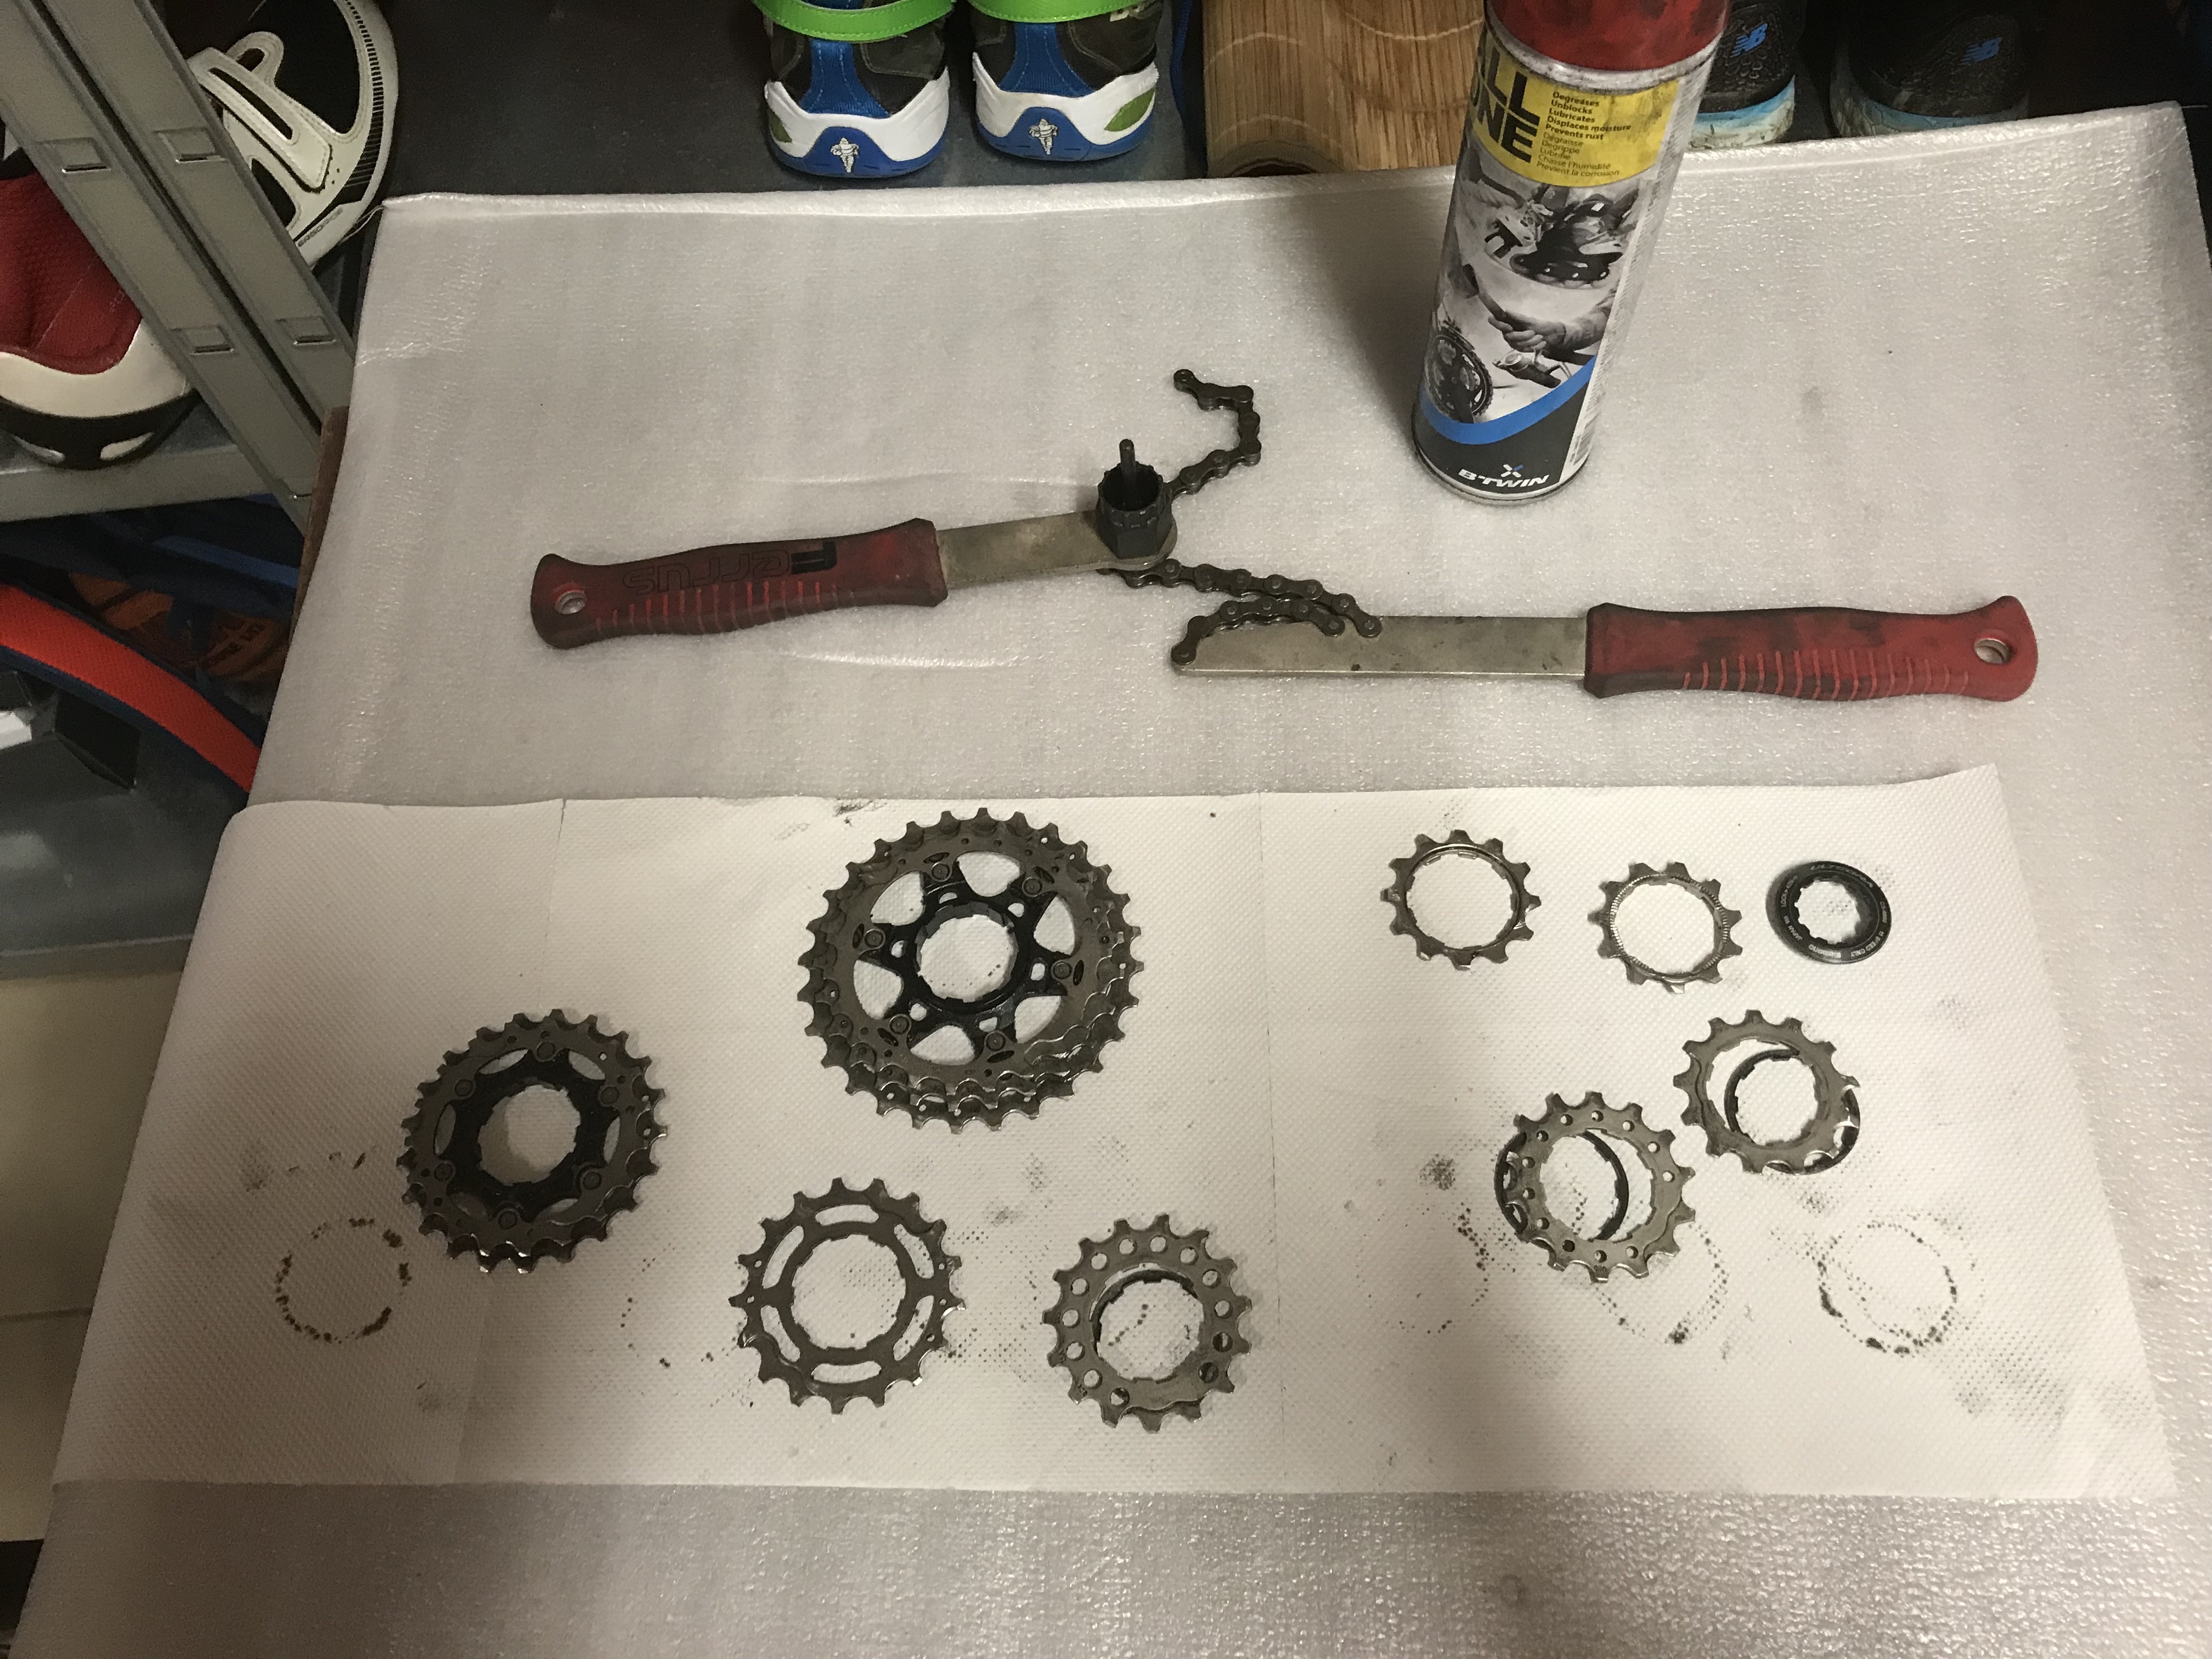
Cassette
It’s the same for the cassette. Not necessarily useful to have them for each wheel or at first. Interchange the cassette takes ten minutes and that has the advantage of being able to clean it well. It all depends if you change wheel at each outing or from time to time. A cassette costs around 50-60 euros so we can get by with one, first, then buy another later to quickly interchange.
Brake pad
Since I opted for a carbon rim, I need suitable brake pads. I opted for SwissStop FlashPro Black Prince which have the advantage of being also compatible on aluminum rims, which allows not to interchange when I take my wheels with tires in winter or on Home trainer.
Design
Spoke length
Choosing the right spoke length is probably the most important and more delicate. In fact, making a mistake of 1mm too short or too long can prevent the mounting of the wheel upon power up. The length of the spokes will depend on the hub, the rim, the number of spokes and how you want to lace the spokes. Basically everything that was chosen previously will enter as a parameter to define the length of the spokes. You will understand, this is why one cannot buy the shelves before having chosen all the preceding elements.
To do this, it will be necessary to collect a certain number of parameters in order to be able to determine the correct length. Some measurements can be collected from manufacturers, but there are often errors so as it is necessary to be very precise as much to verify yourself. All parameters in hand, it is possible to use online configurators which will directly determine the correct length of your spokes. But I’m curious … and to master something well, I think that you really have to understand what is behind an algorithm, certainly very useful to gain time. So throughout this chapter I’m going to demonstrate how I got my spoke length step by step.
Overview
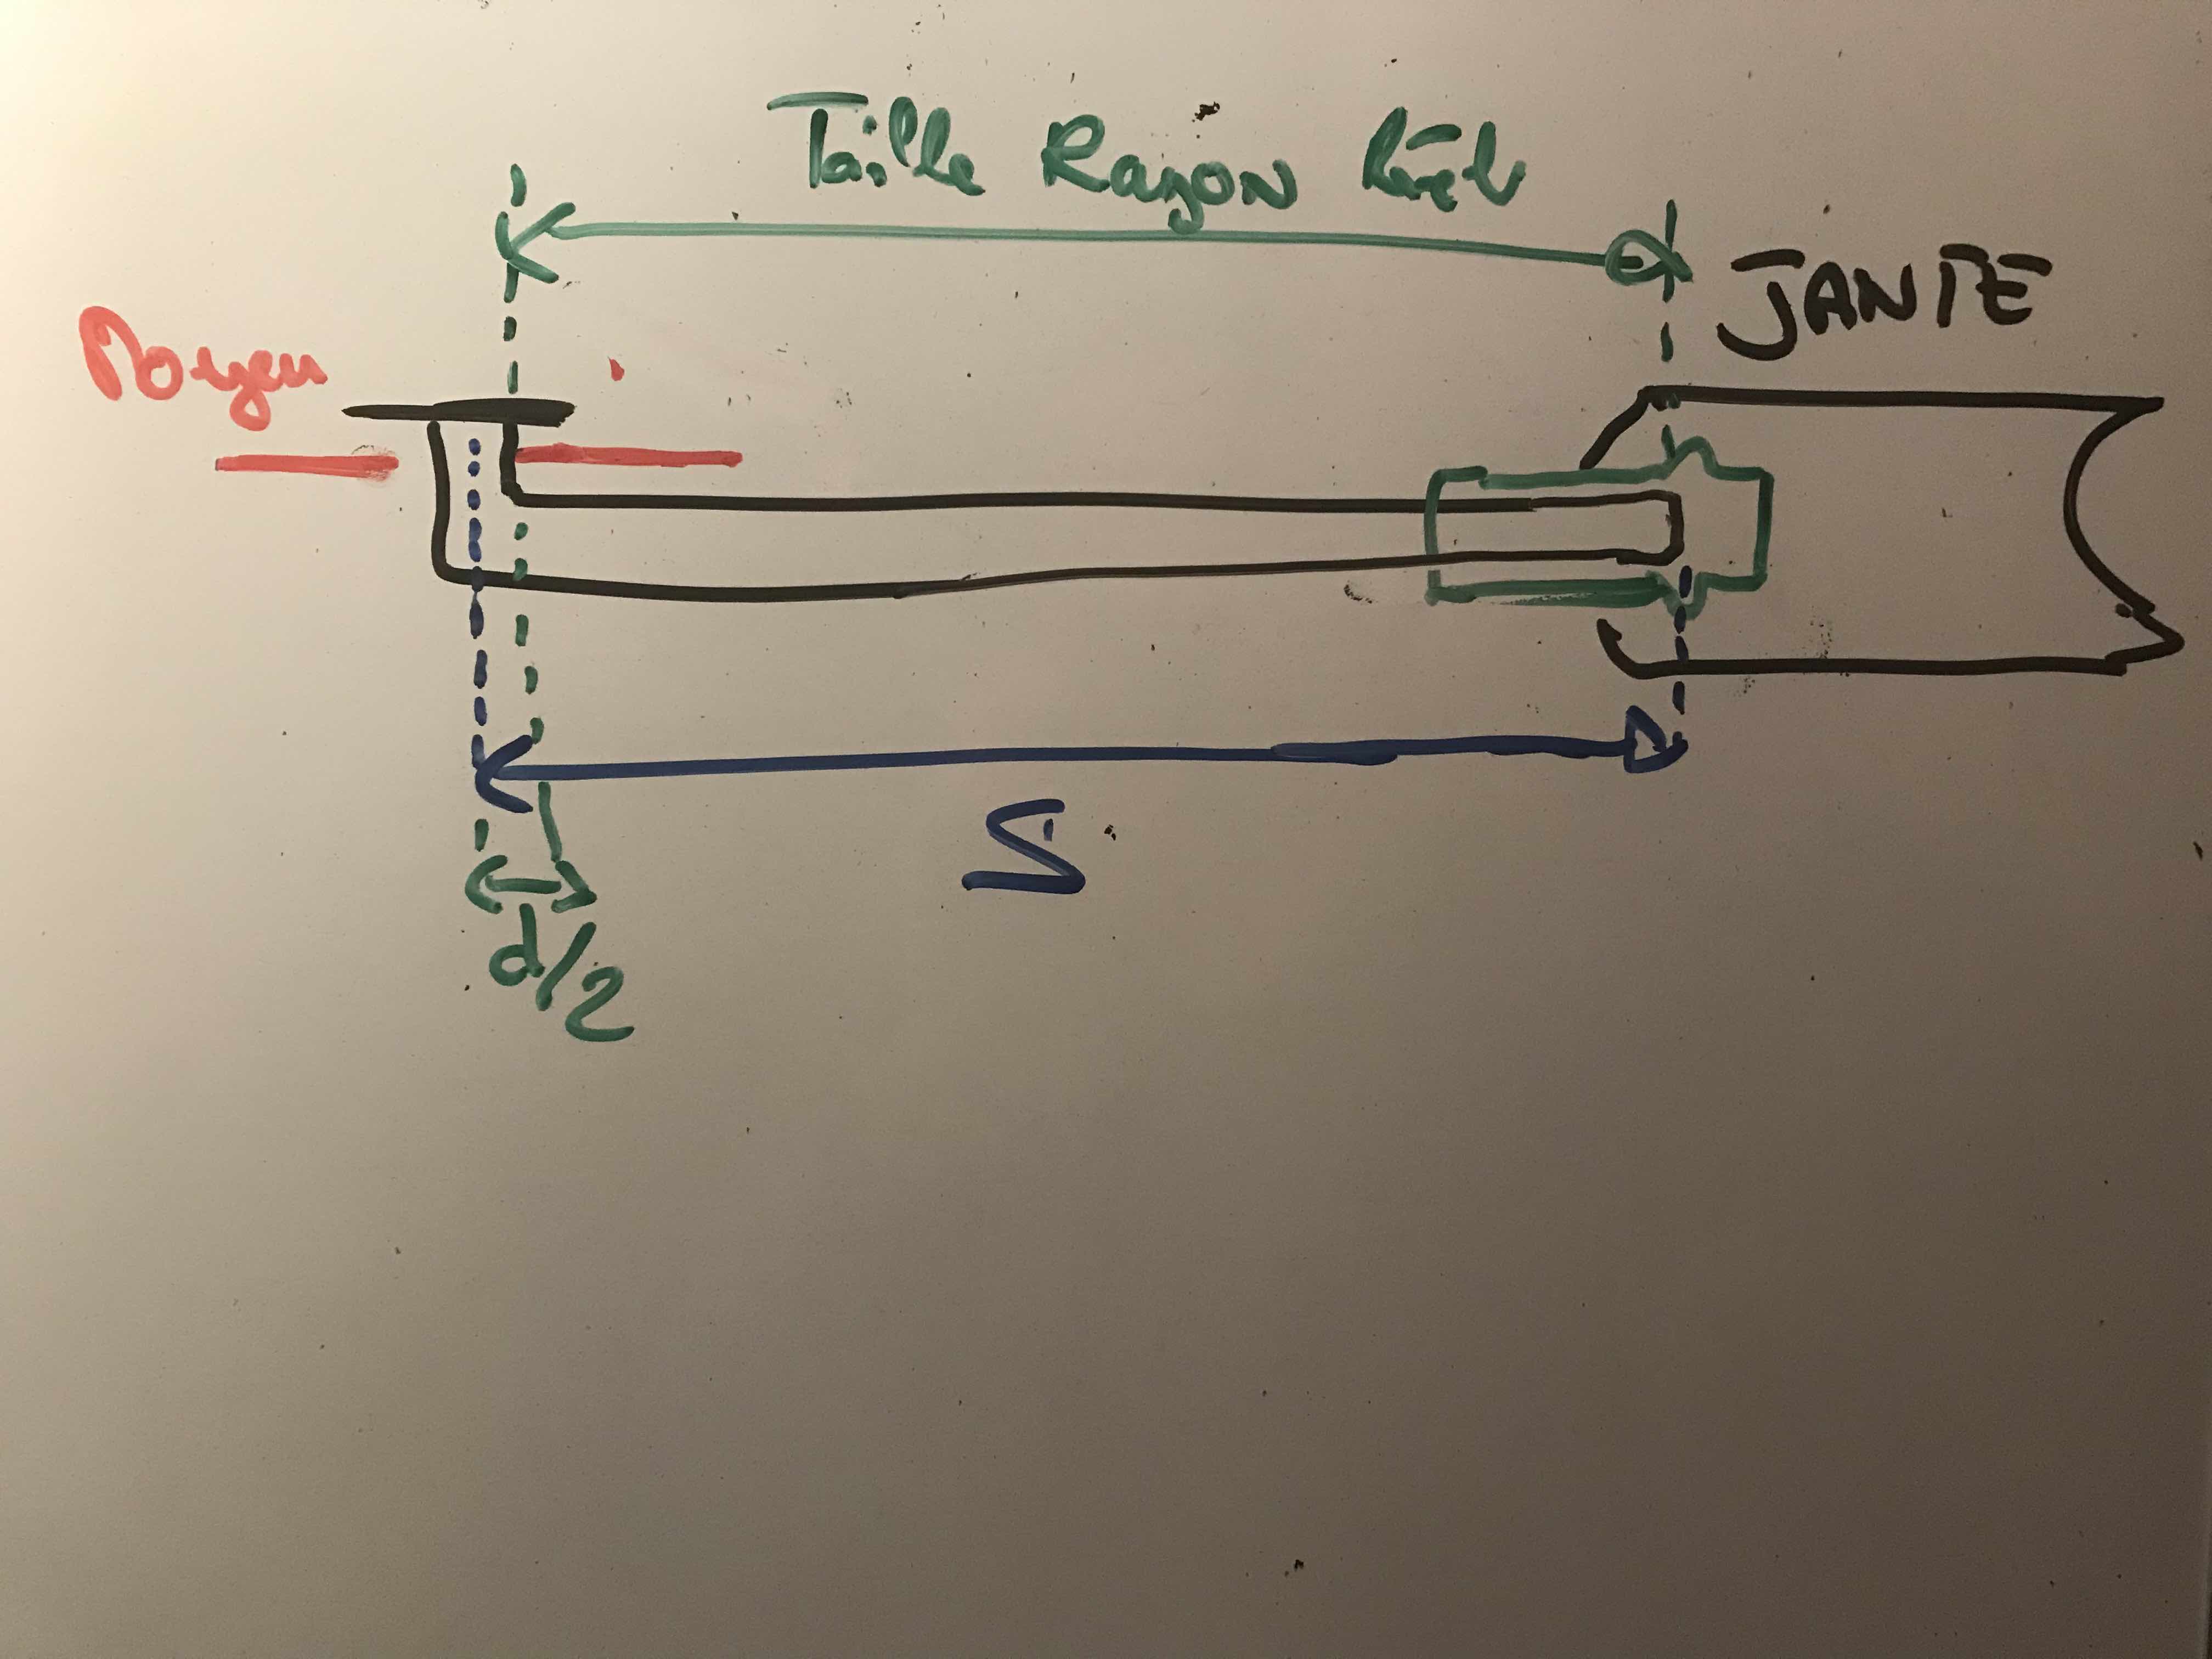
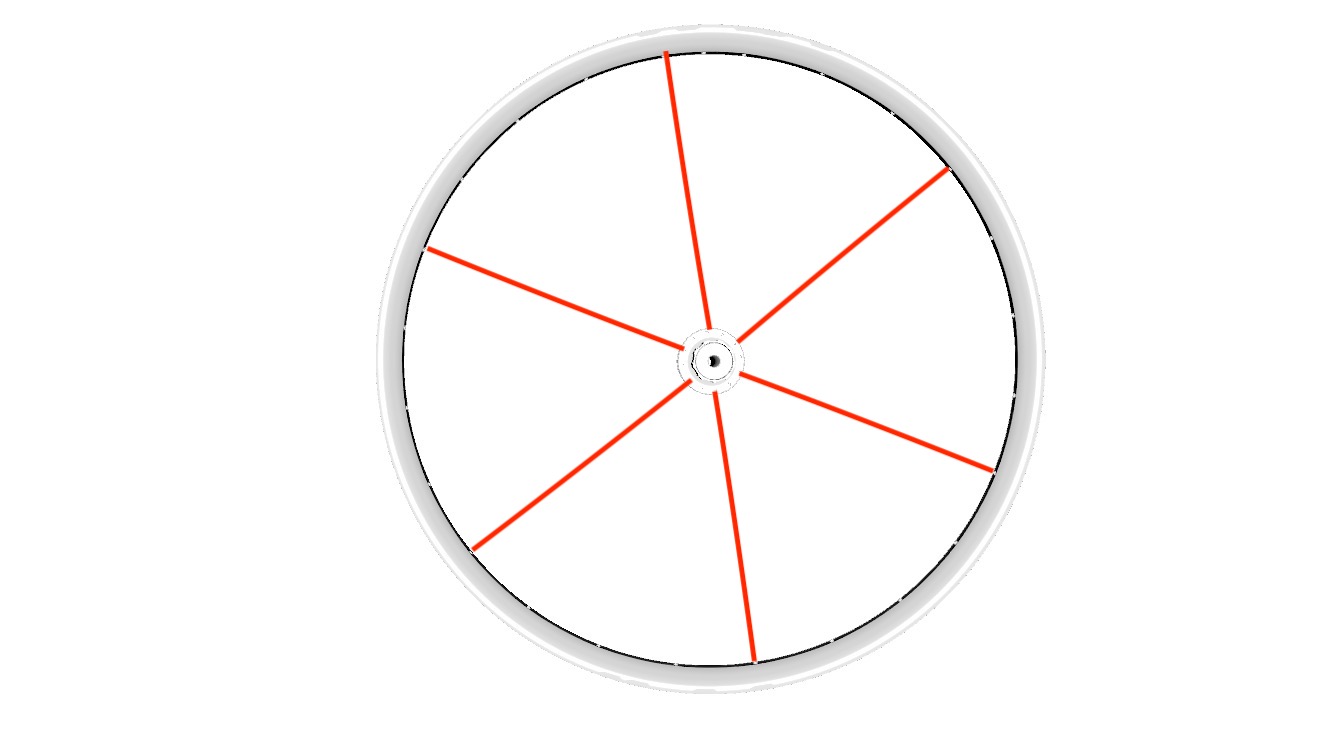
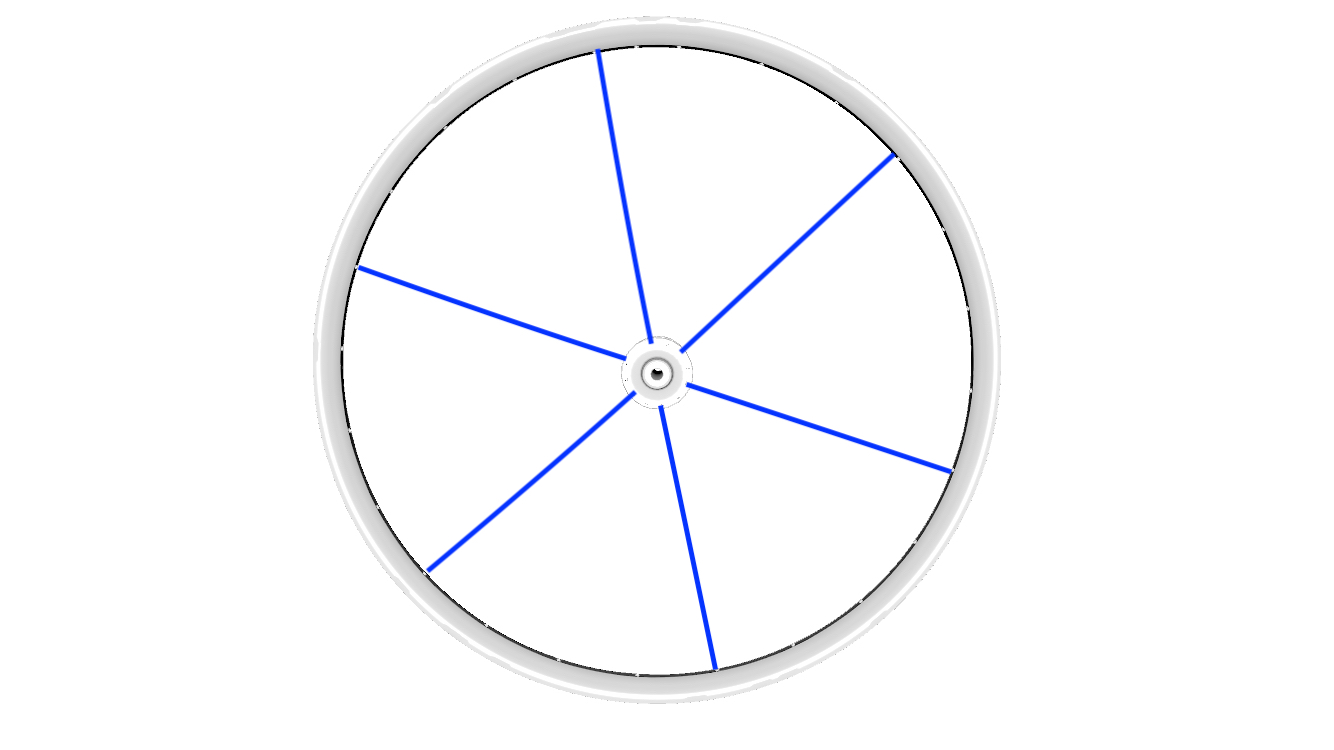
I like to demonstrate something starting with the final result, so here is an overview of what that we seek to determine (S).
In this diagram, I have represented a front view on the left and a top view on the right. The spoke in the stretched position is shown in red with the currently unknown variable S that we will determine. It can be seen that the hub is centered relative to the rim, which causes an angle for the radius to reach the rim. In green, I represented the nut is especially where the spoke will be housed in position tense. Below, I simplified the 2 diagrams into 2 triangles HLR and LSF with for the moment only unknowns, but that we can replace.
HLR triangle
- H = The distance between the center of the hub and the hole where the spoke will be housed
- L = An intermediate length which will make it possible to make the link between the 2 triangles
- R’= ERD/2 This is the effective radius of the rim (I will detail this in the next chapter)
- Phi = Angle that the ray will take, depending on the number of crossings
LSF triangle
- L = Intermediate length calculated in the triangle HLR
- S = The length of the radius
- F = The distance between the hub flange and its center
So first, I will describe how to take the different measurements on the rim and the hub. Then in a second step I will be able to deduce the value of L in the triangle HLR and substitute L in the triangle LSF in order to deduce the value of S.
ERD measurement
The ERD (Effective Rim Diameter) as I said above, this is the rim diameter , but taking into account the distance where the spokes in the nuts will really fit. The ERD is sometimes supplied when buying a rim, but the supplier often does not take into account the type of nut. he this is the diameter inside the rim. My supplier gave me an ERD of 464.5mm, we will see that in the end we will be very far from this value. So how do you measure it? I’ve watched a lot of videos and tutorials, the one that seemed to me the most simple, precise and effective is the following, once again this is my personal opinion.
So just take 2 spokes, 2 nuts, tape, a rubber band and a foot sliding (a simple meter may suffice).
-
I take the 2 spokes that I bought separately, I took 200mm, we can take what we want.
-
We insert them in the rim with the nuts. But there, you have to be rigorous, the position of the ray must arrive exactly where one wants it to be when it will be under voltage. I chose Sapim double square (see paragraph above).
In this diagram, I have represented where the spoke will be housed in the nut when energized.
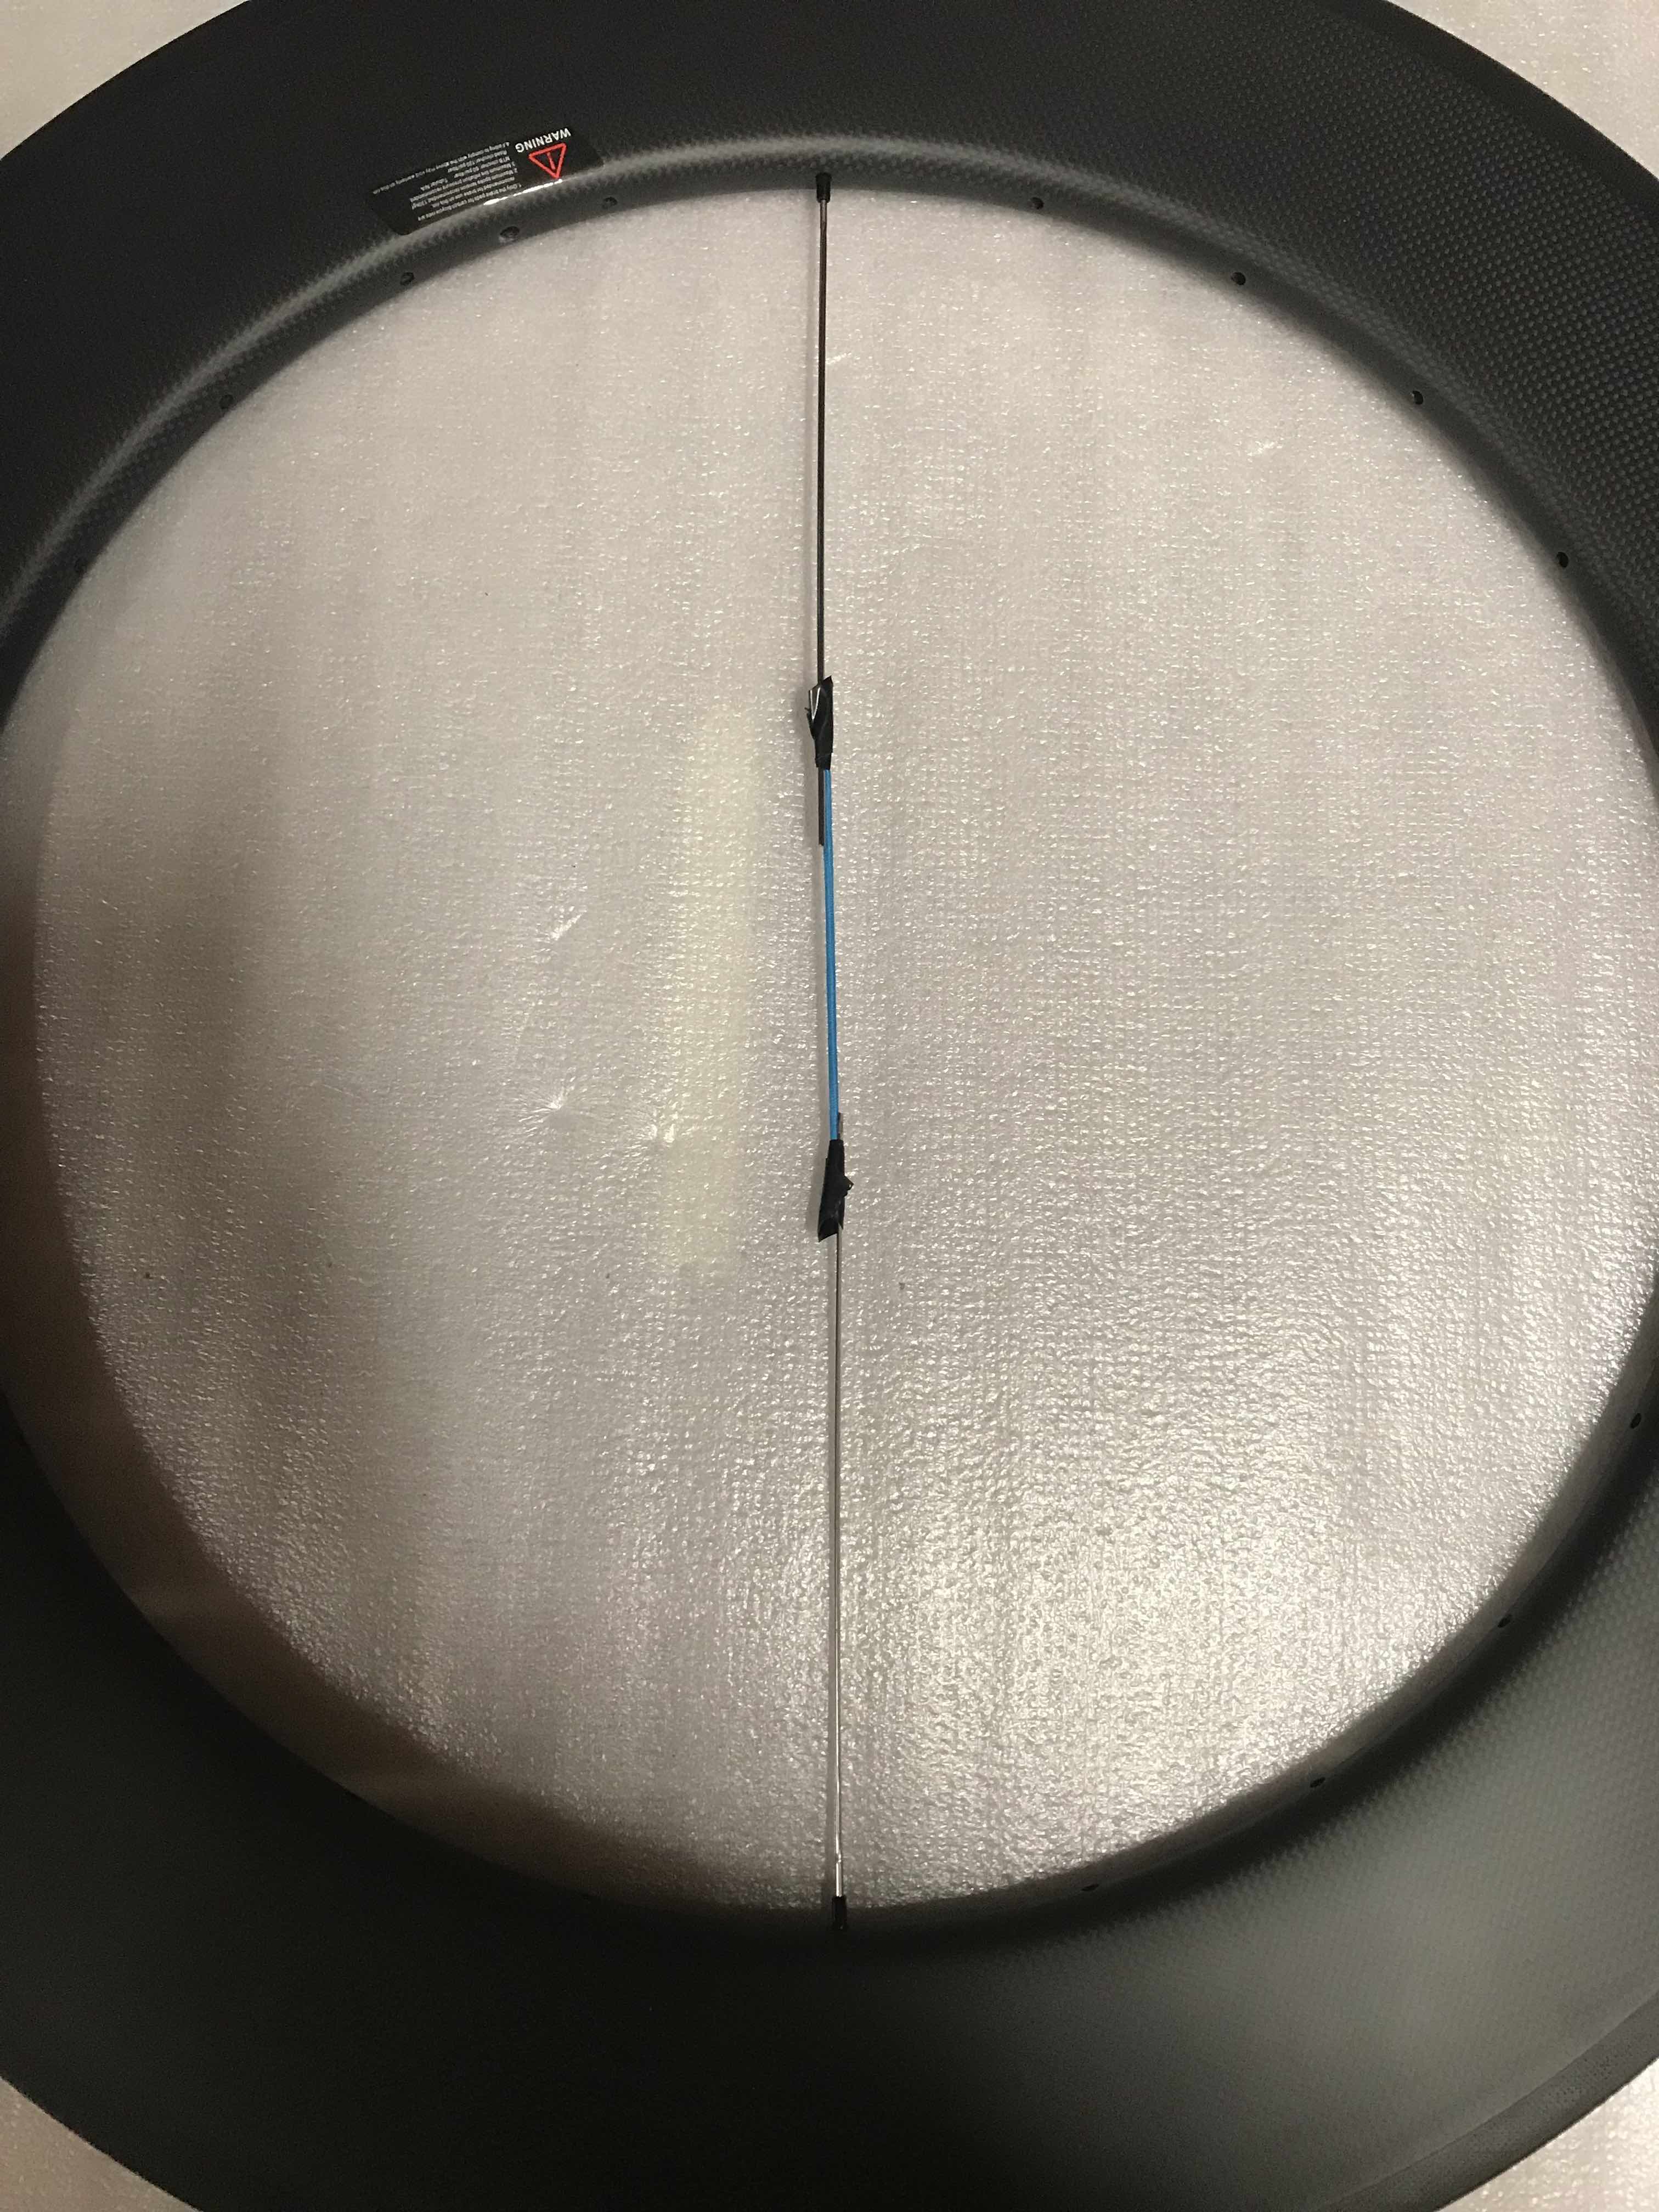
Once the spokes are fixed in the correct position with the nuts, just connect with a rubber band and adhesive tape (see image below).
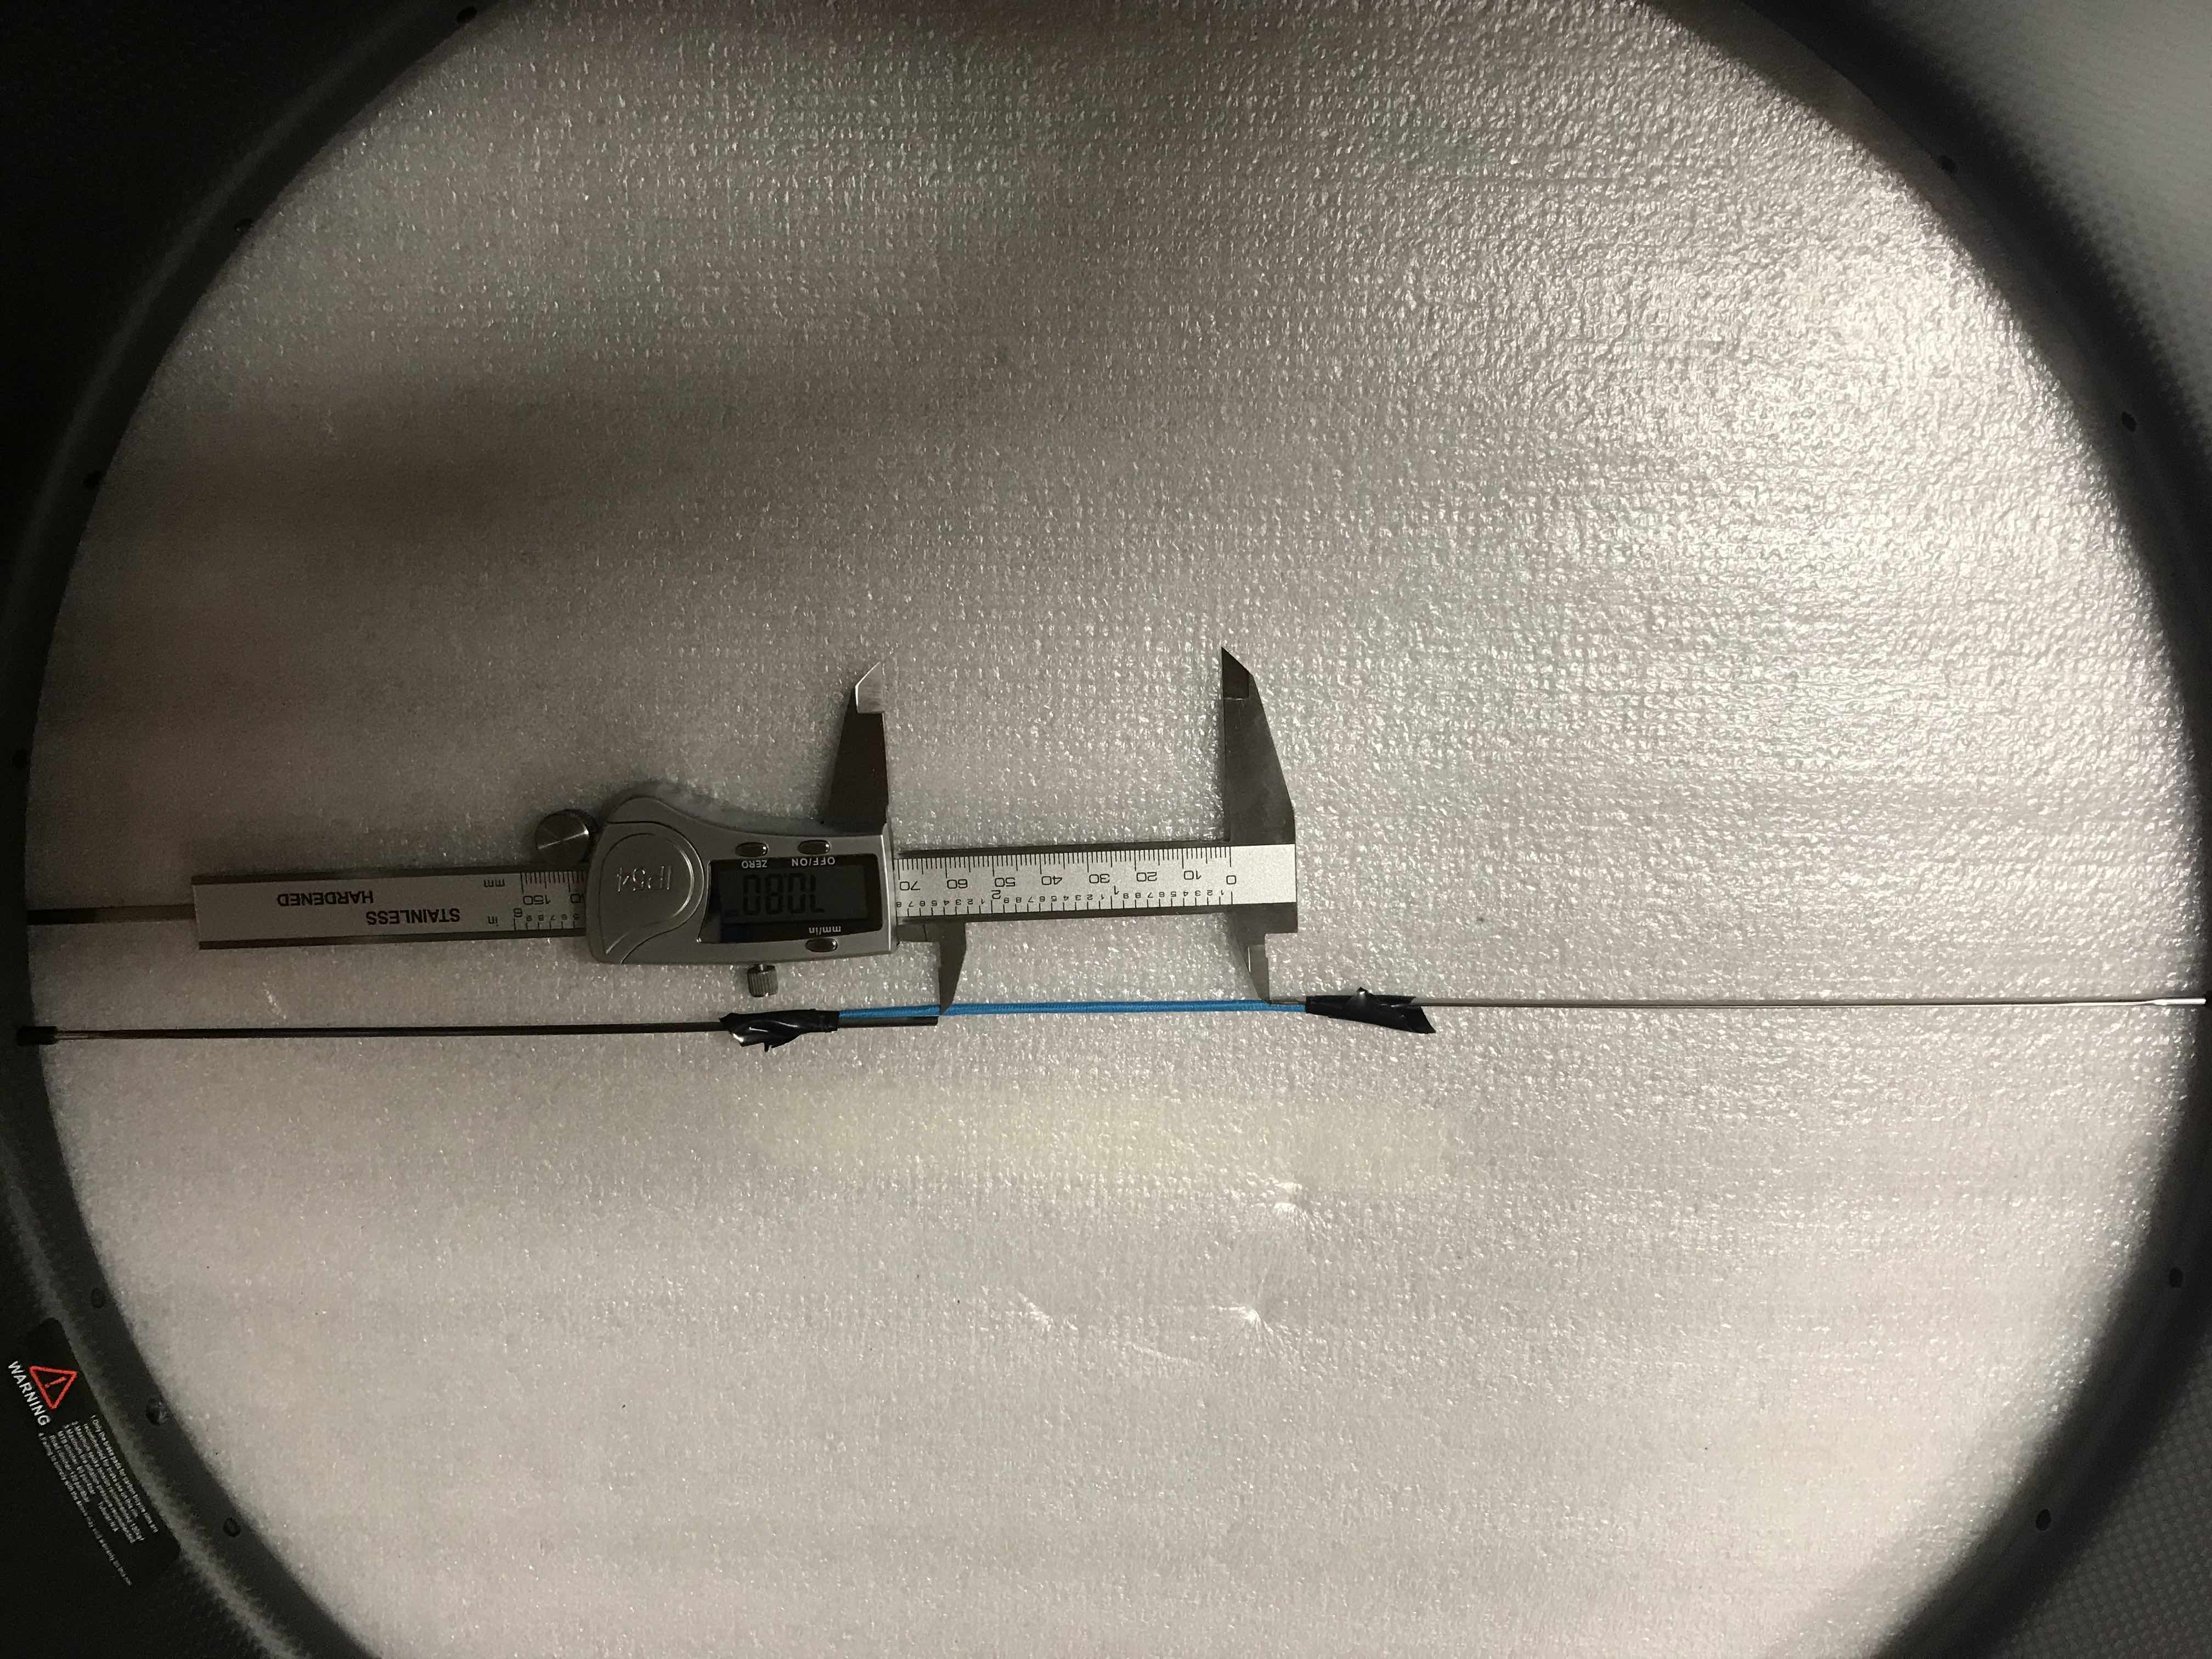
Finally, it remains only to take the measurement between the 2 ends of the spokes. Indeed, since the 2 rays are 200mm.
- ERD = 200 x 2 + the measurement between the 2 ends.
- ERD = 200 x 2 + 71 = 471mm
Very far from the supplier’s 464.5mm. And here is a first value that we can substitute in the equations following.
Hub measurement
The diagram below represents the rear hub, I represented the center of that in blue dotted line, this is where where the rim will need to be aligned. We can see why the lengths of the rays will not be the same for a rear wheel, since there is the cassette to take into account.
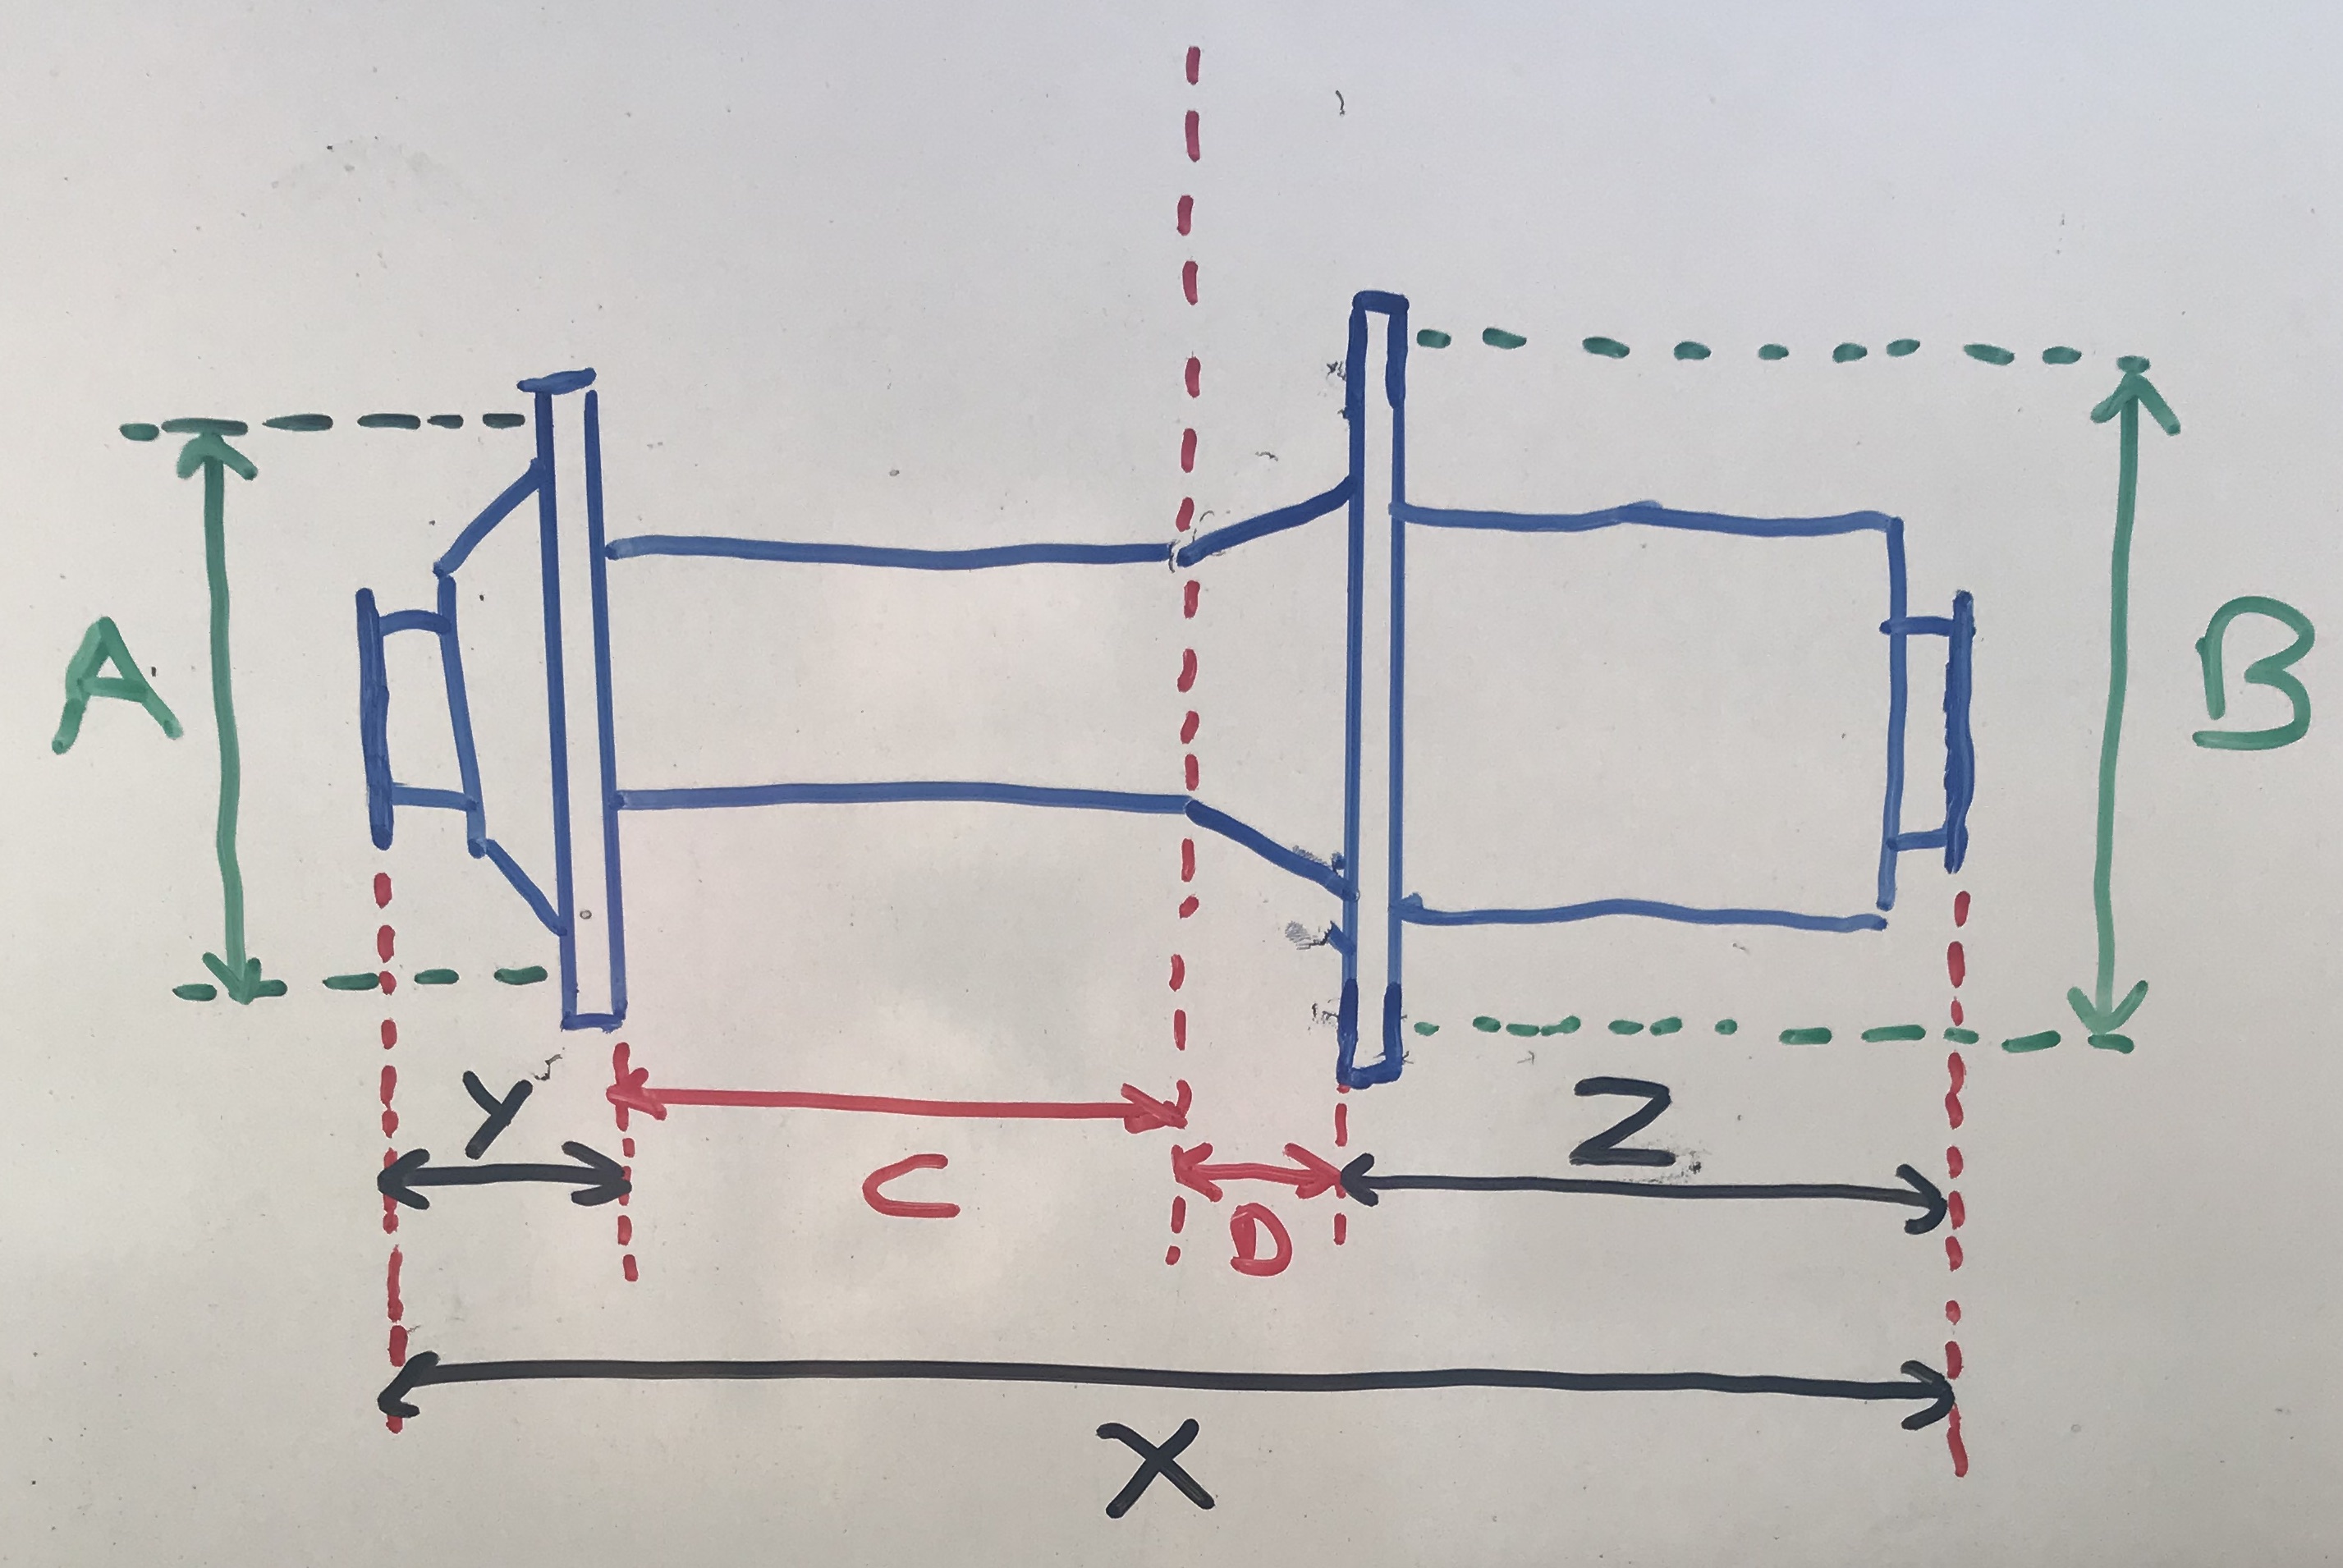
a) The value of X is easy to determine, it is the width of the hub where the hub will be installed on the frame (center distance). This is a standard value on the frames. On classic road bikes, this distance is often 130mm. This is a parameter to take into account before buying the hub, I had previously checked it before to buy my hub (see chapter “choice of hub”).
b) The values which will interest us to determine are the values C and D which will be substituted at H (see image)
H = C for the left side spokes and D for the right side spokes.
To get there you have to measure “y” and “z” to do this I used a piece of wood where I made a hole big enough to ability to lay hub end on each side
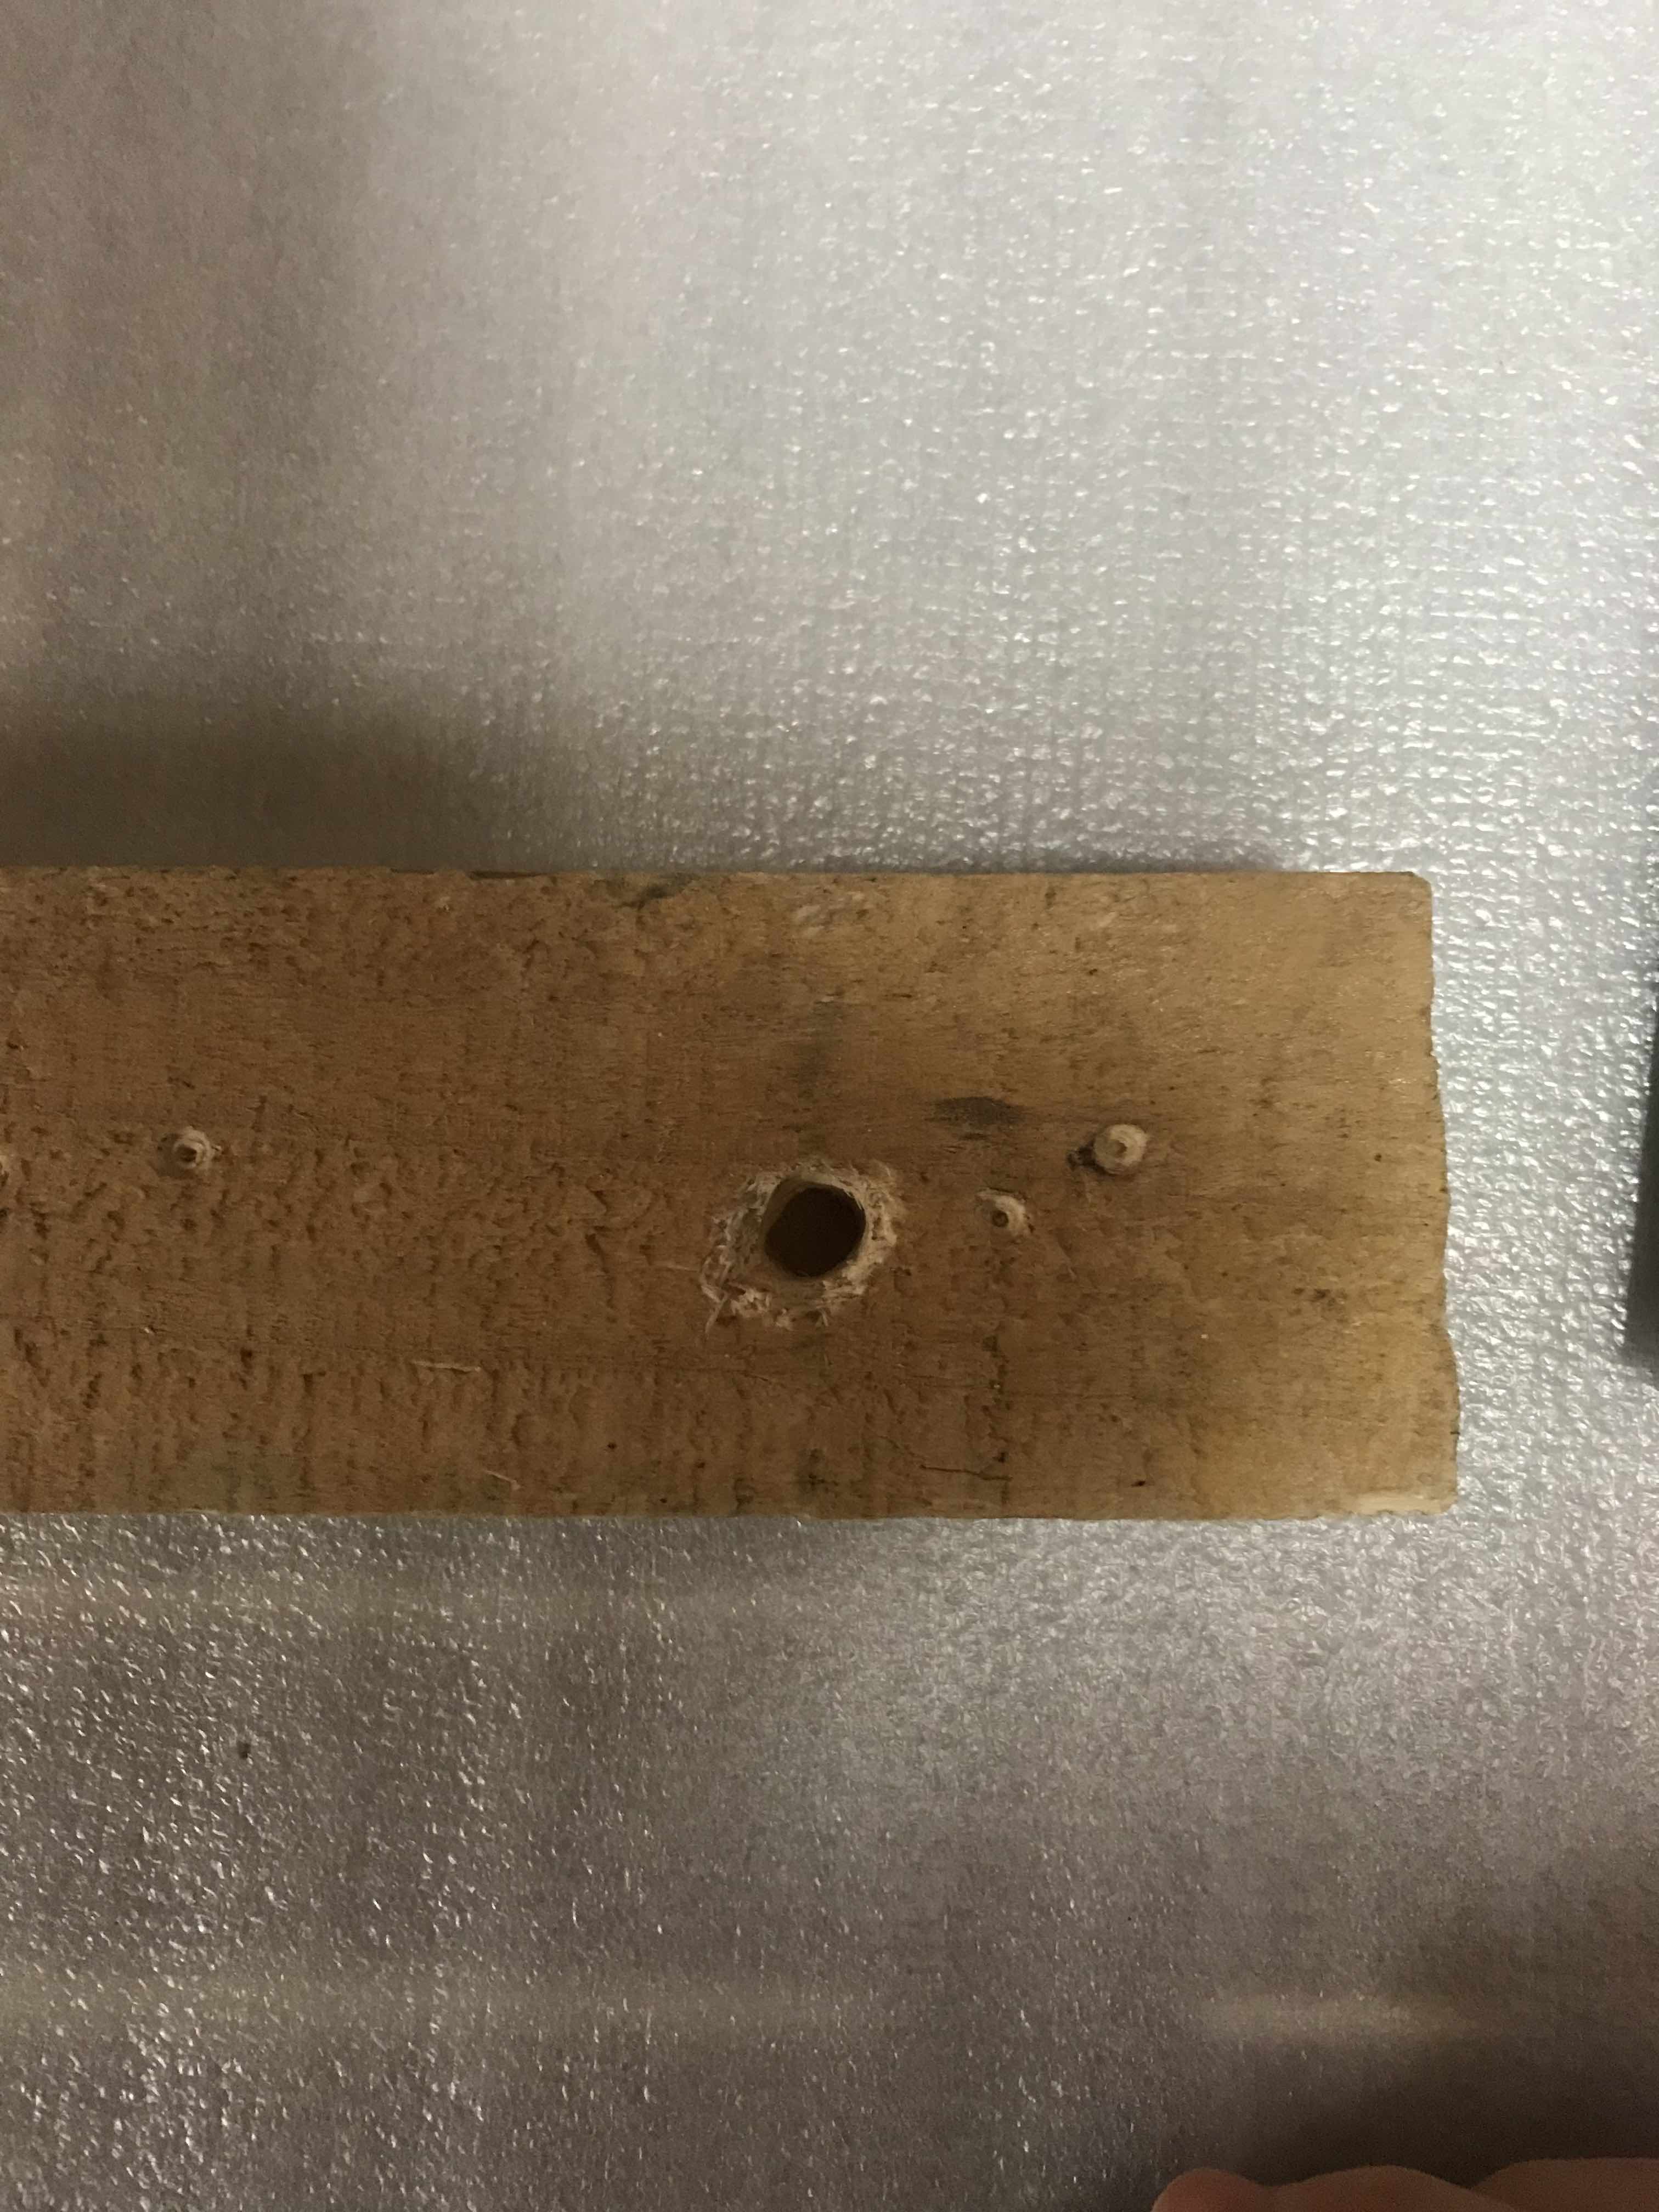
Then I positioned the hub and took the measurements on each side using a square.
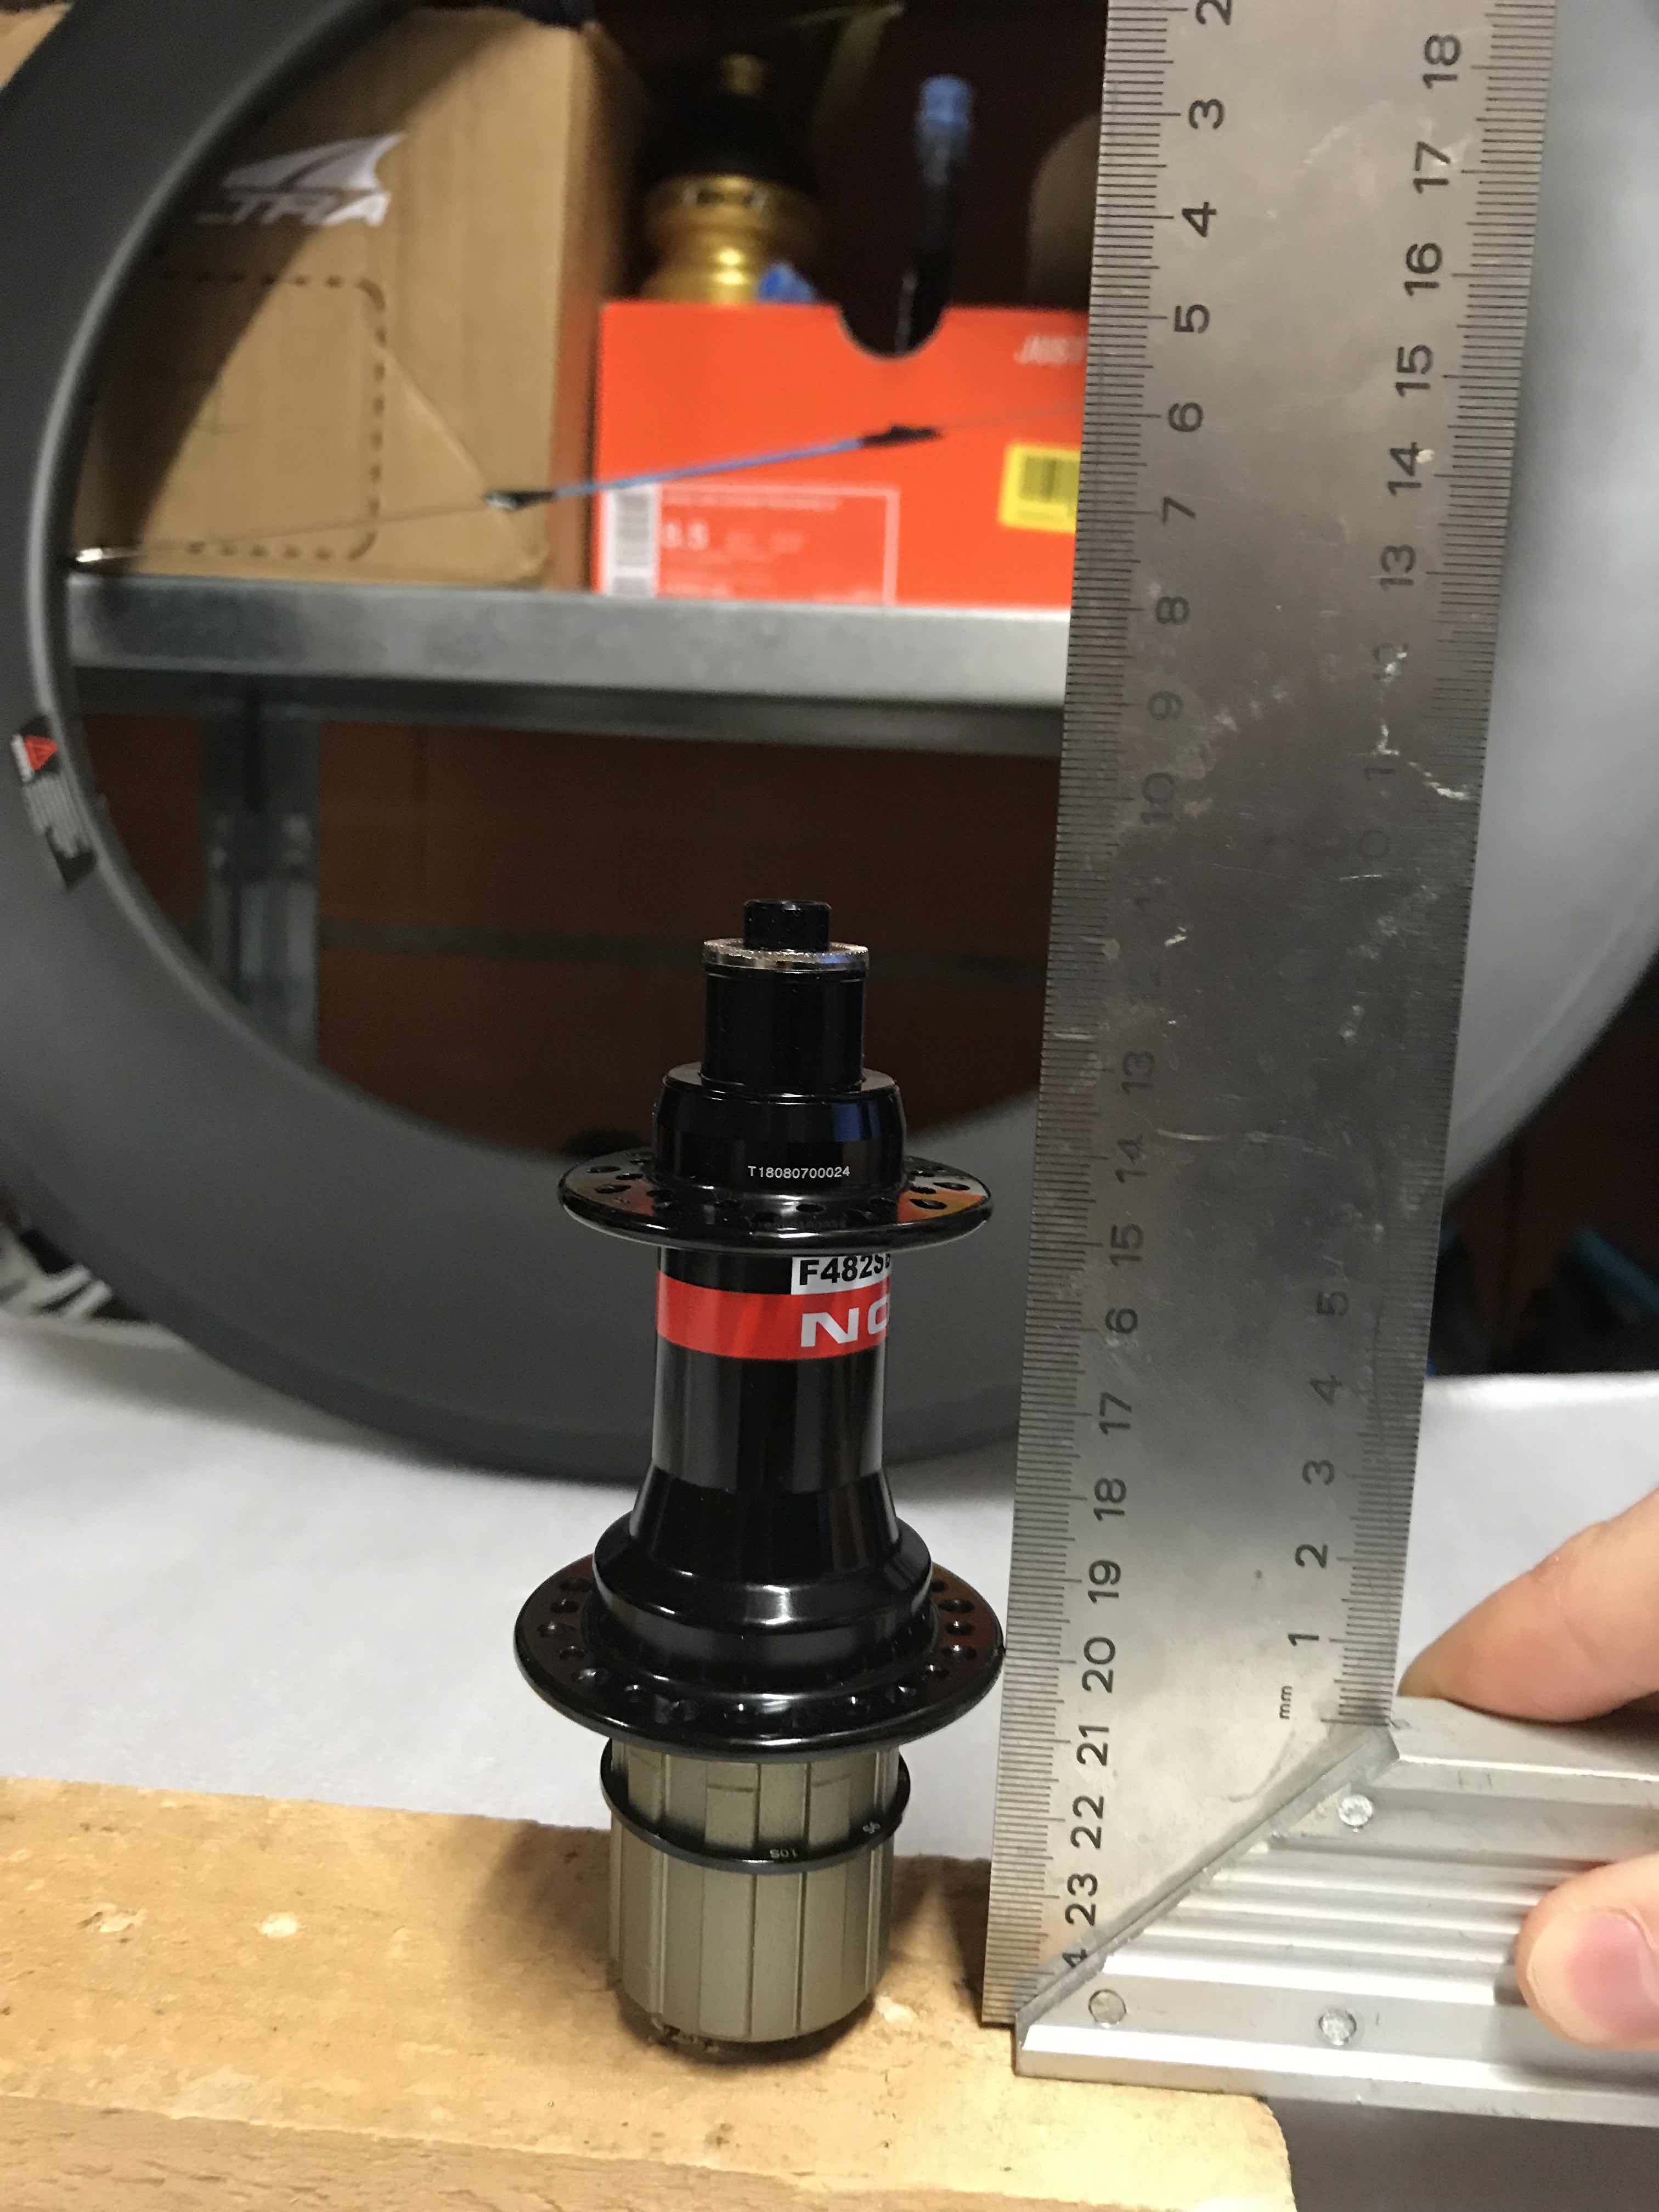
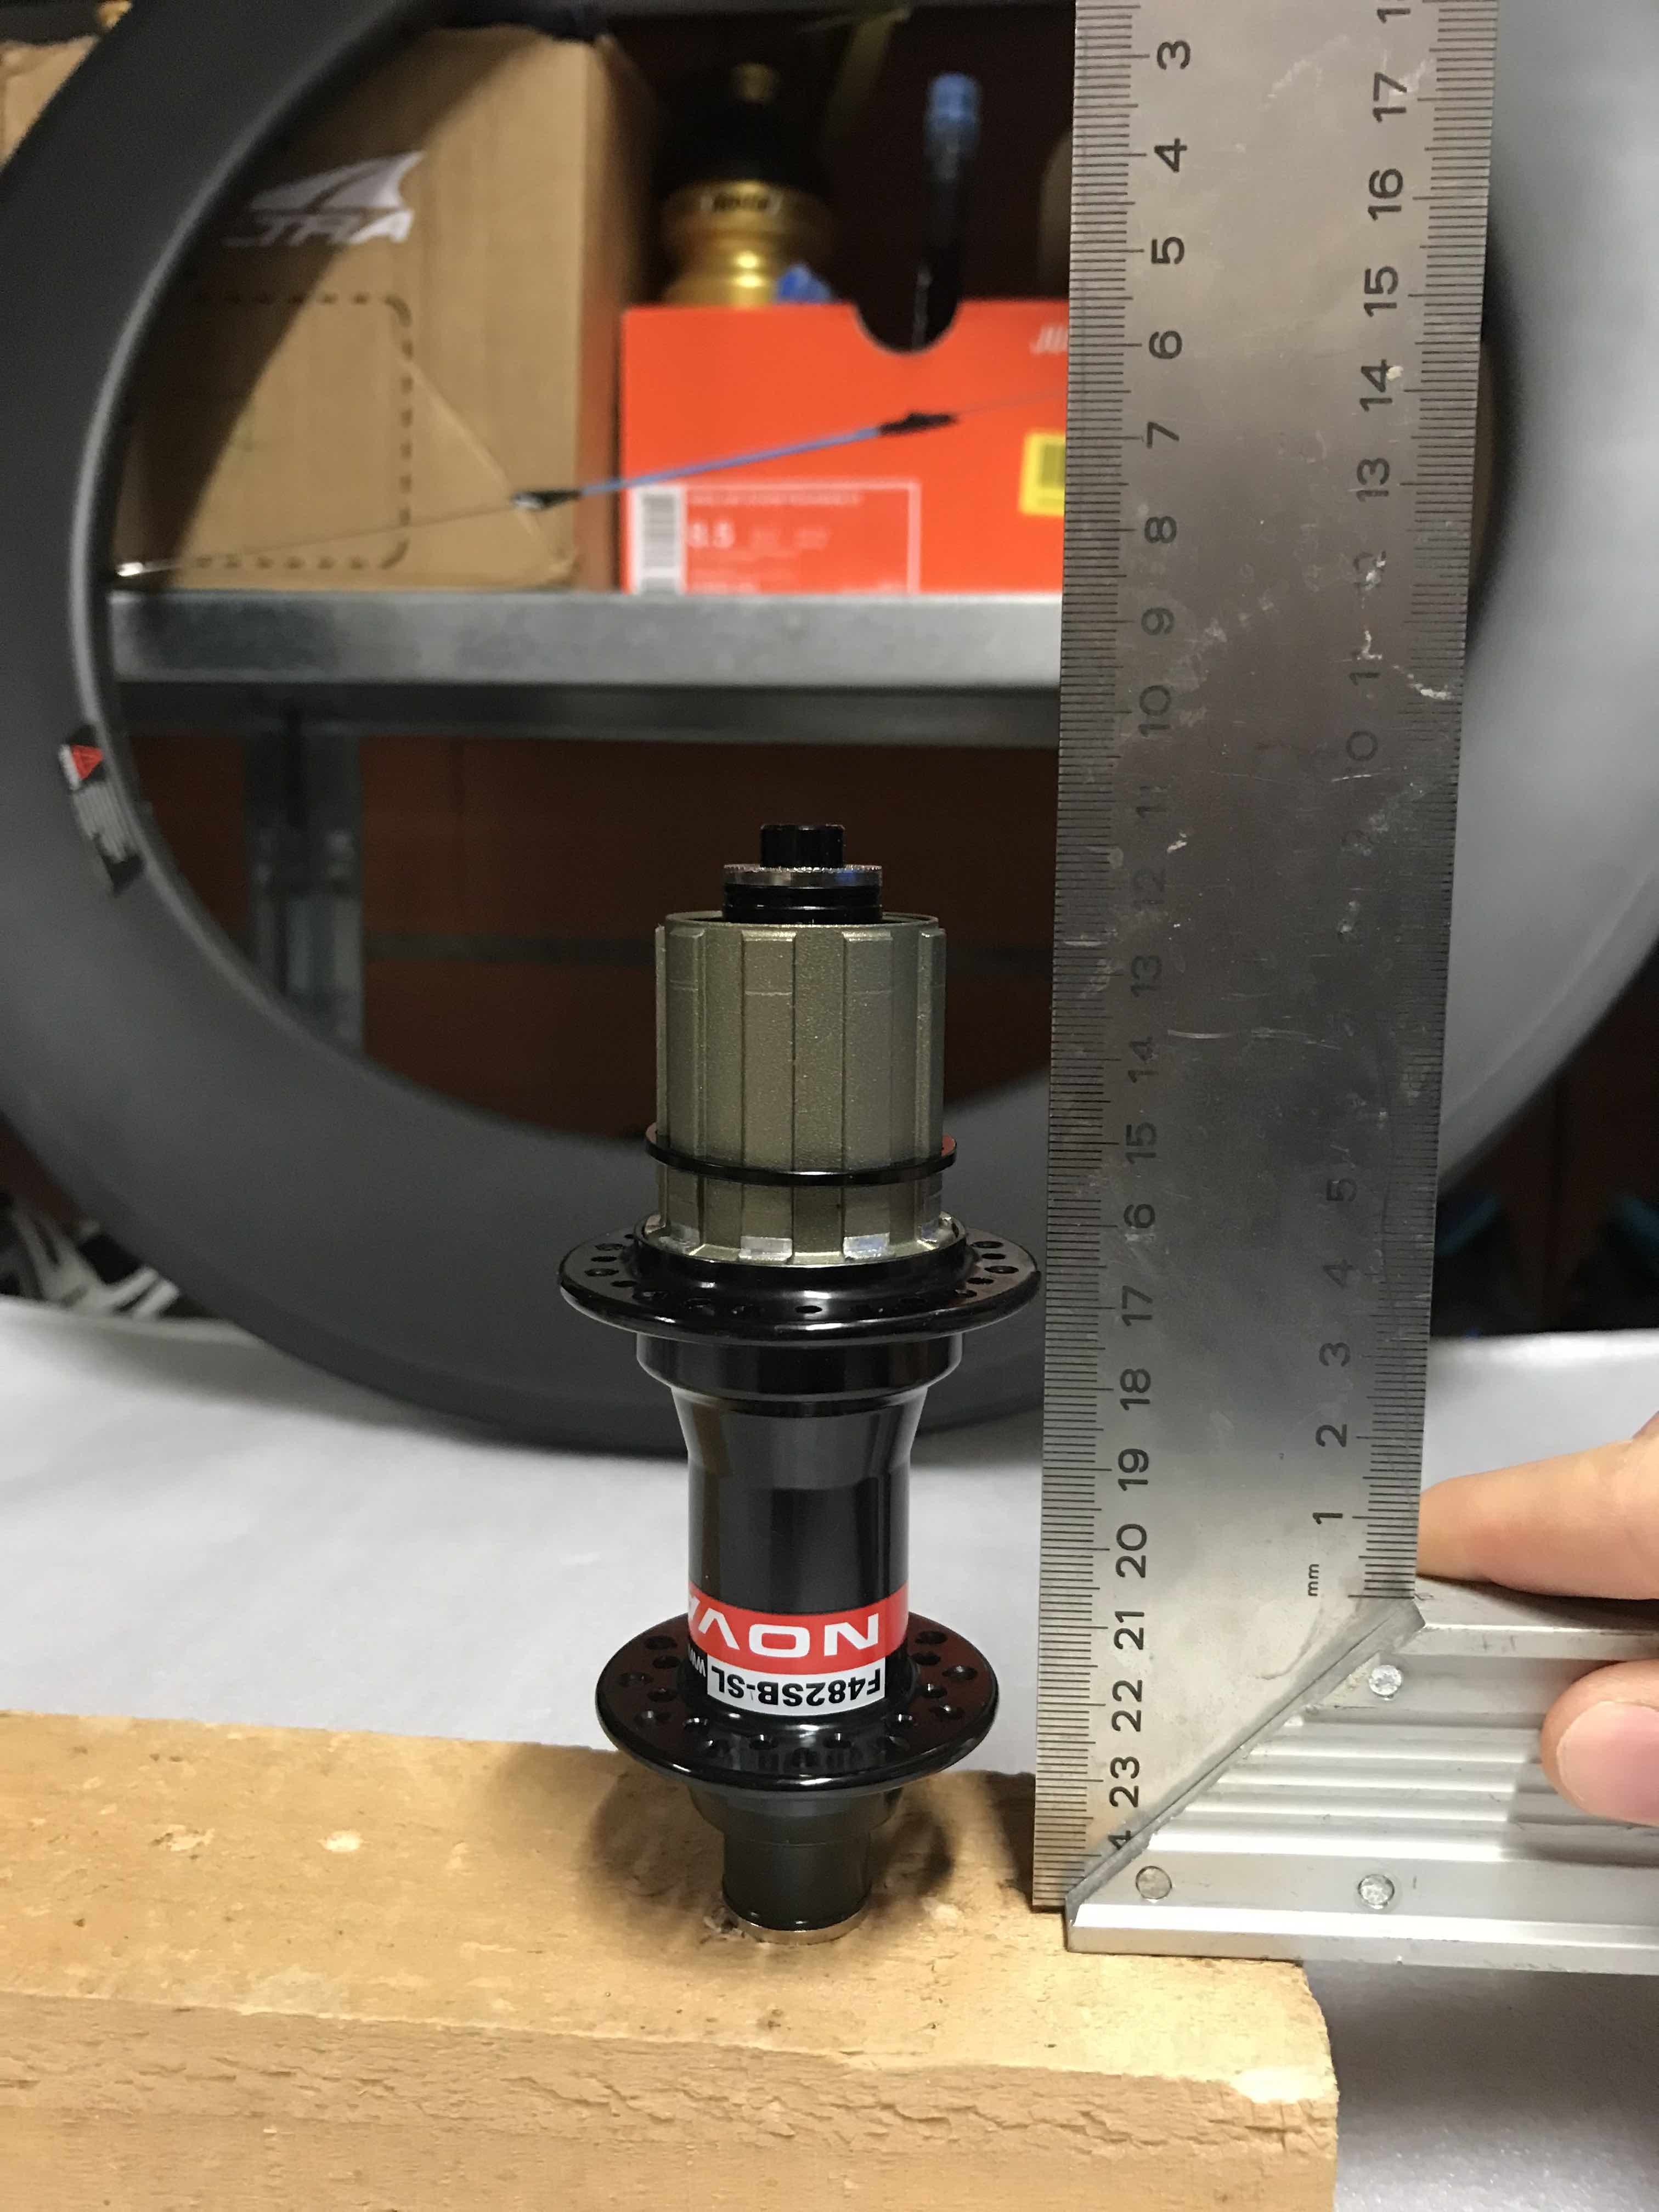
Here are the values.
\[Y = 29mm \\ Z = 48mm\]Since the blue dotted line represents the middle of the hub X/2 we can deduce the value of C and D.
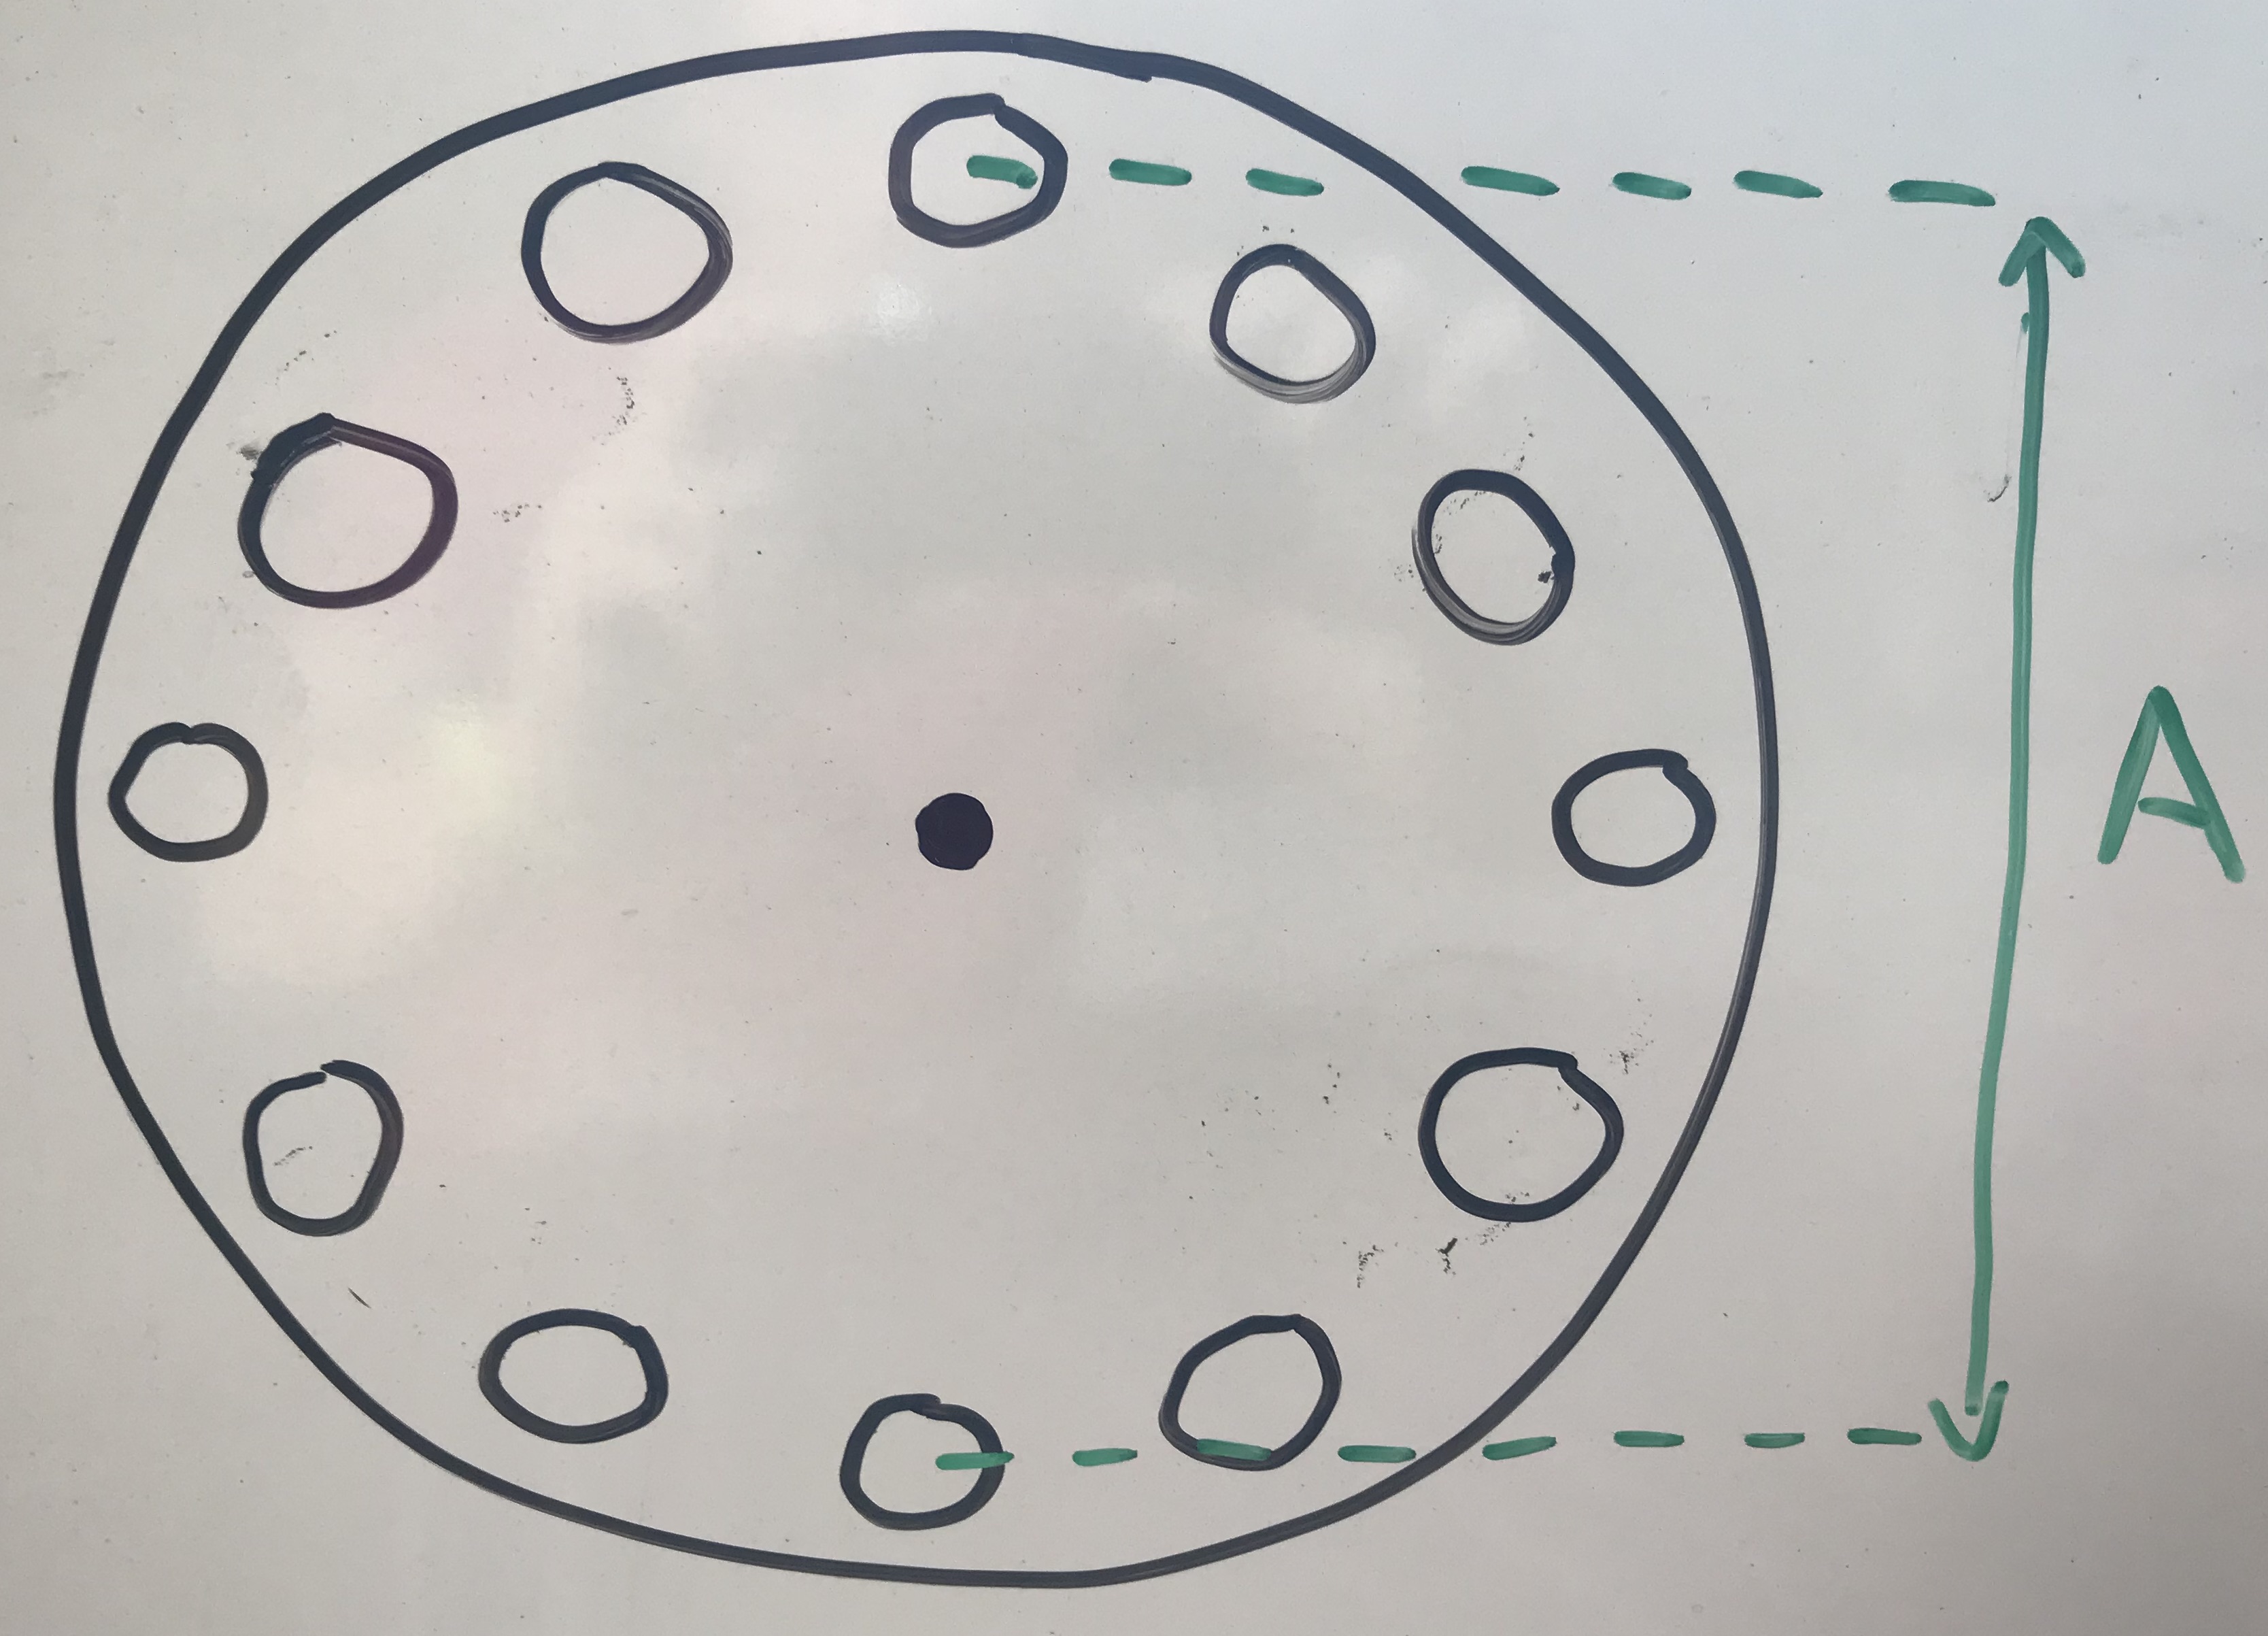
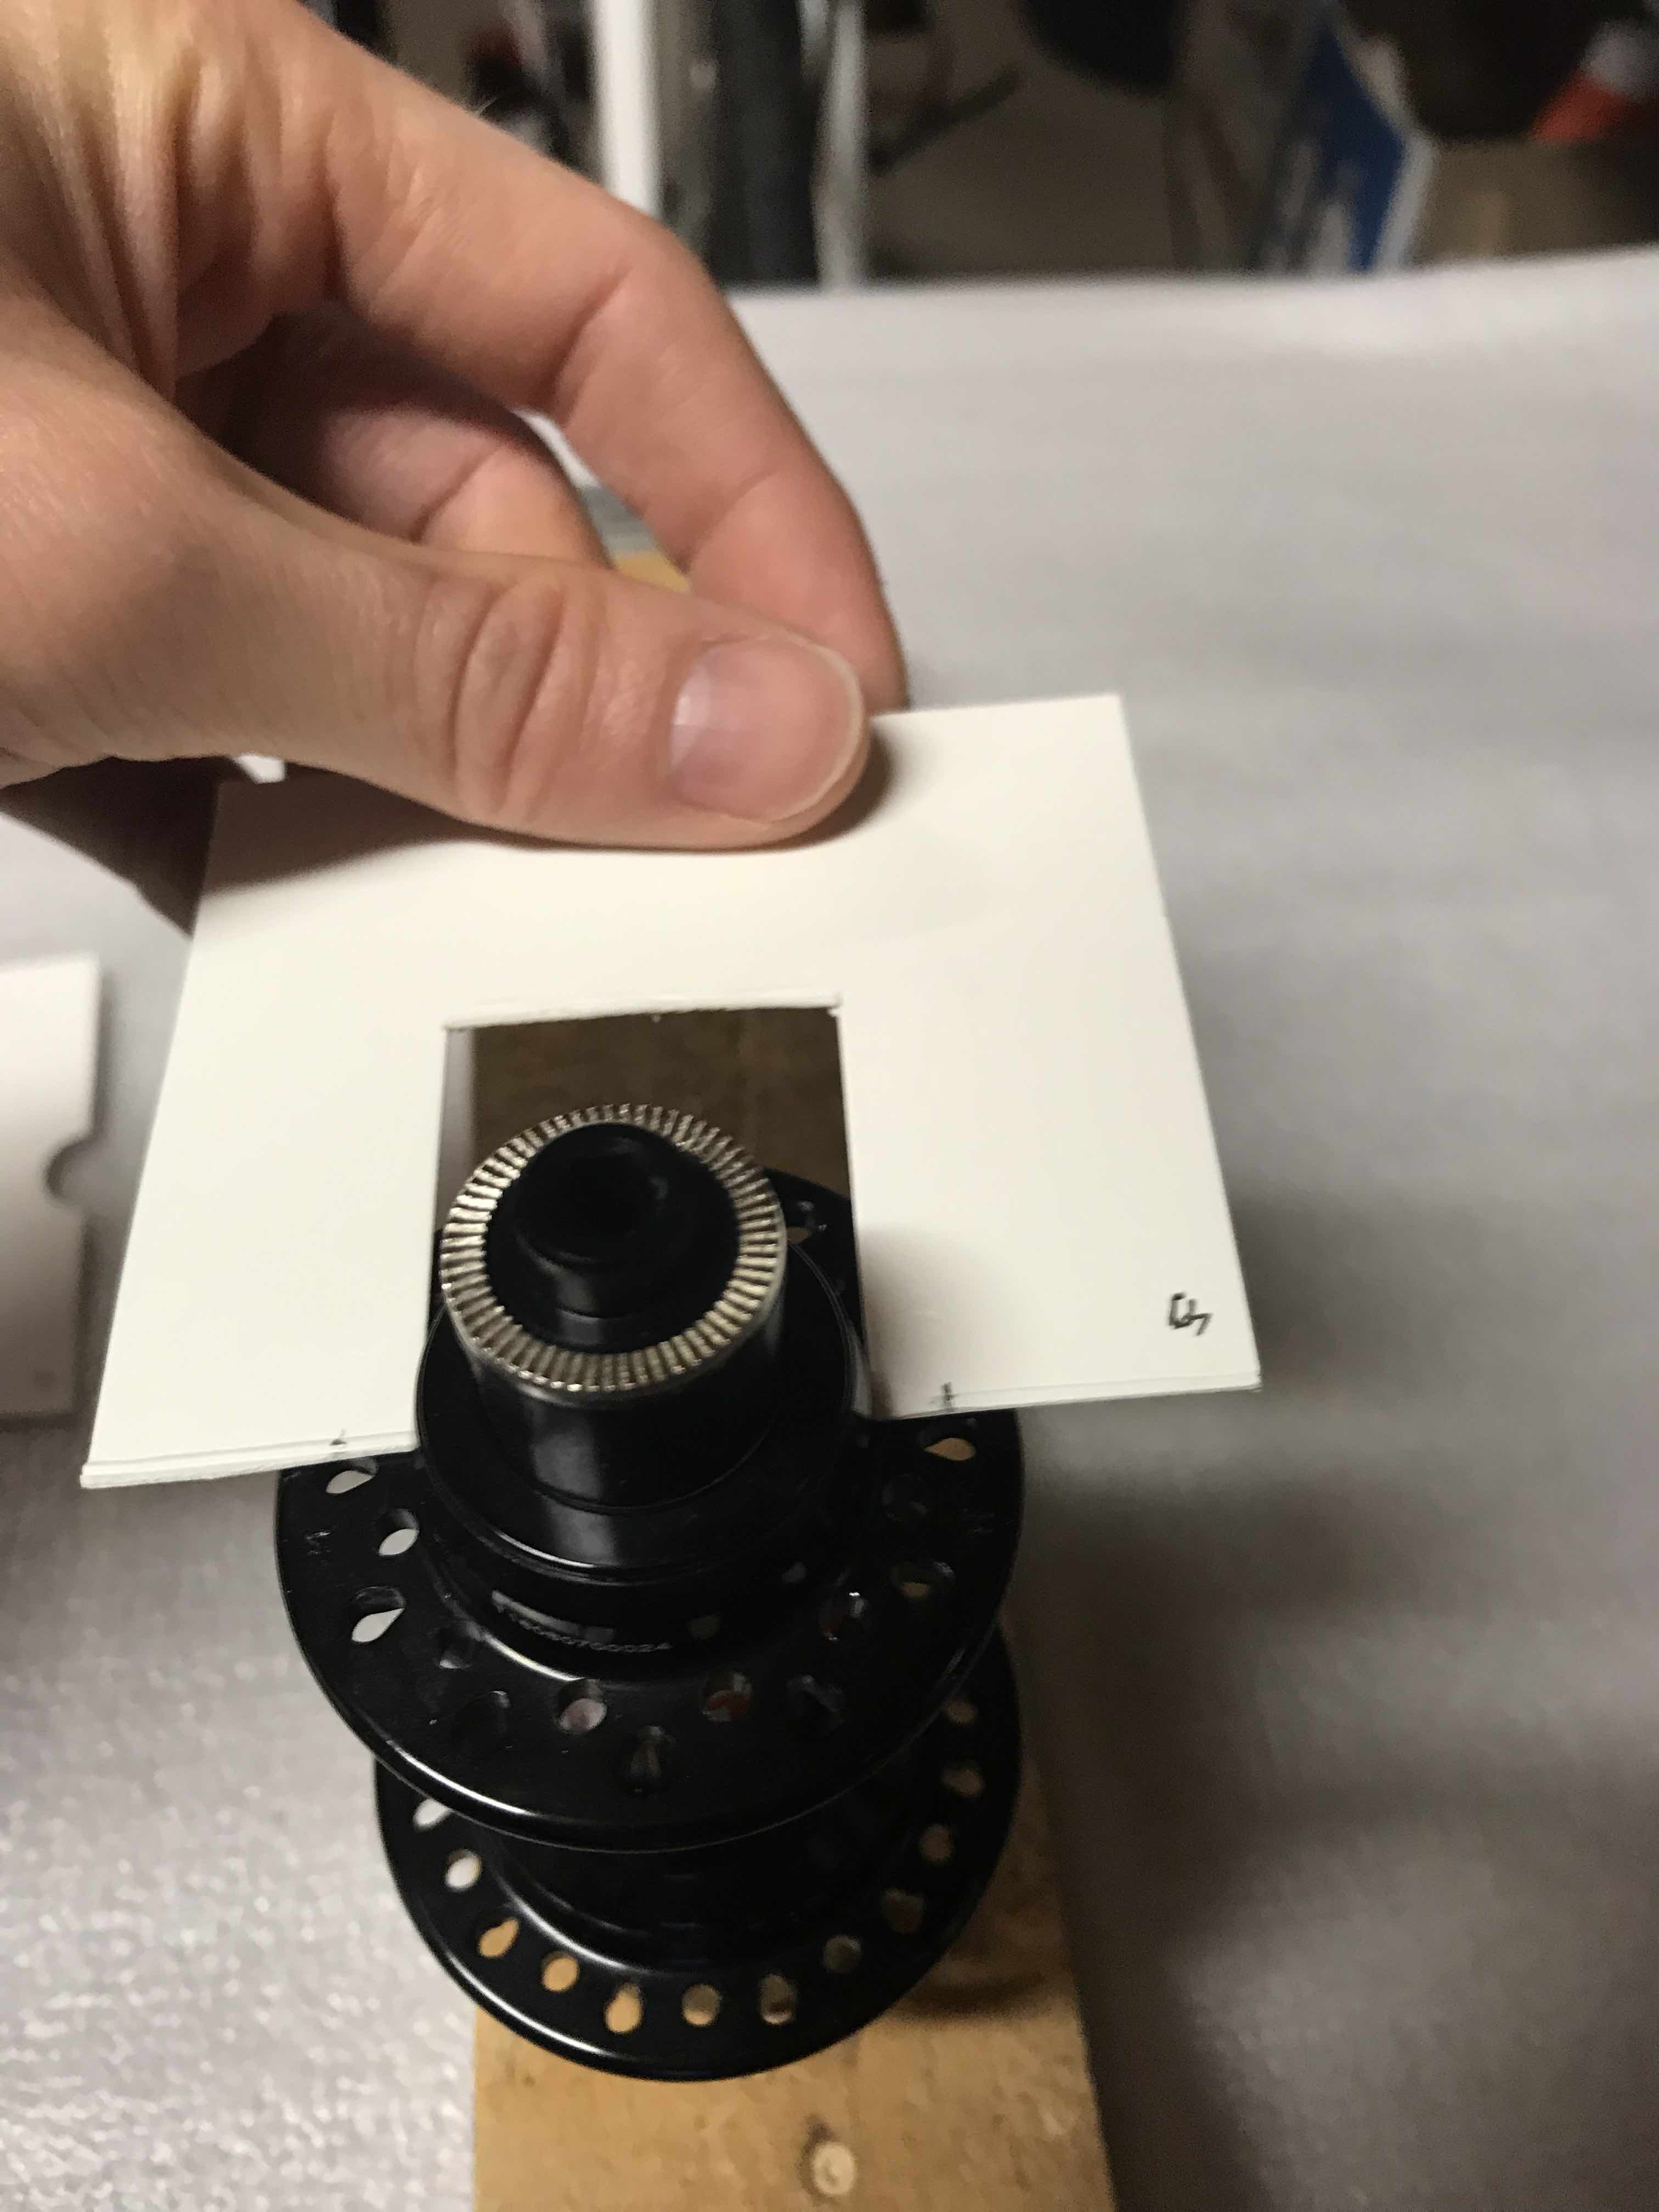
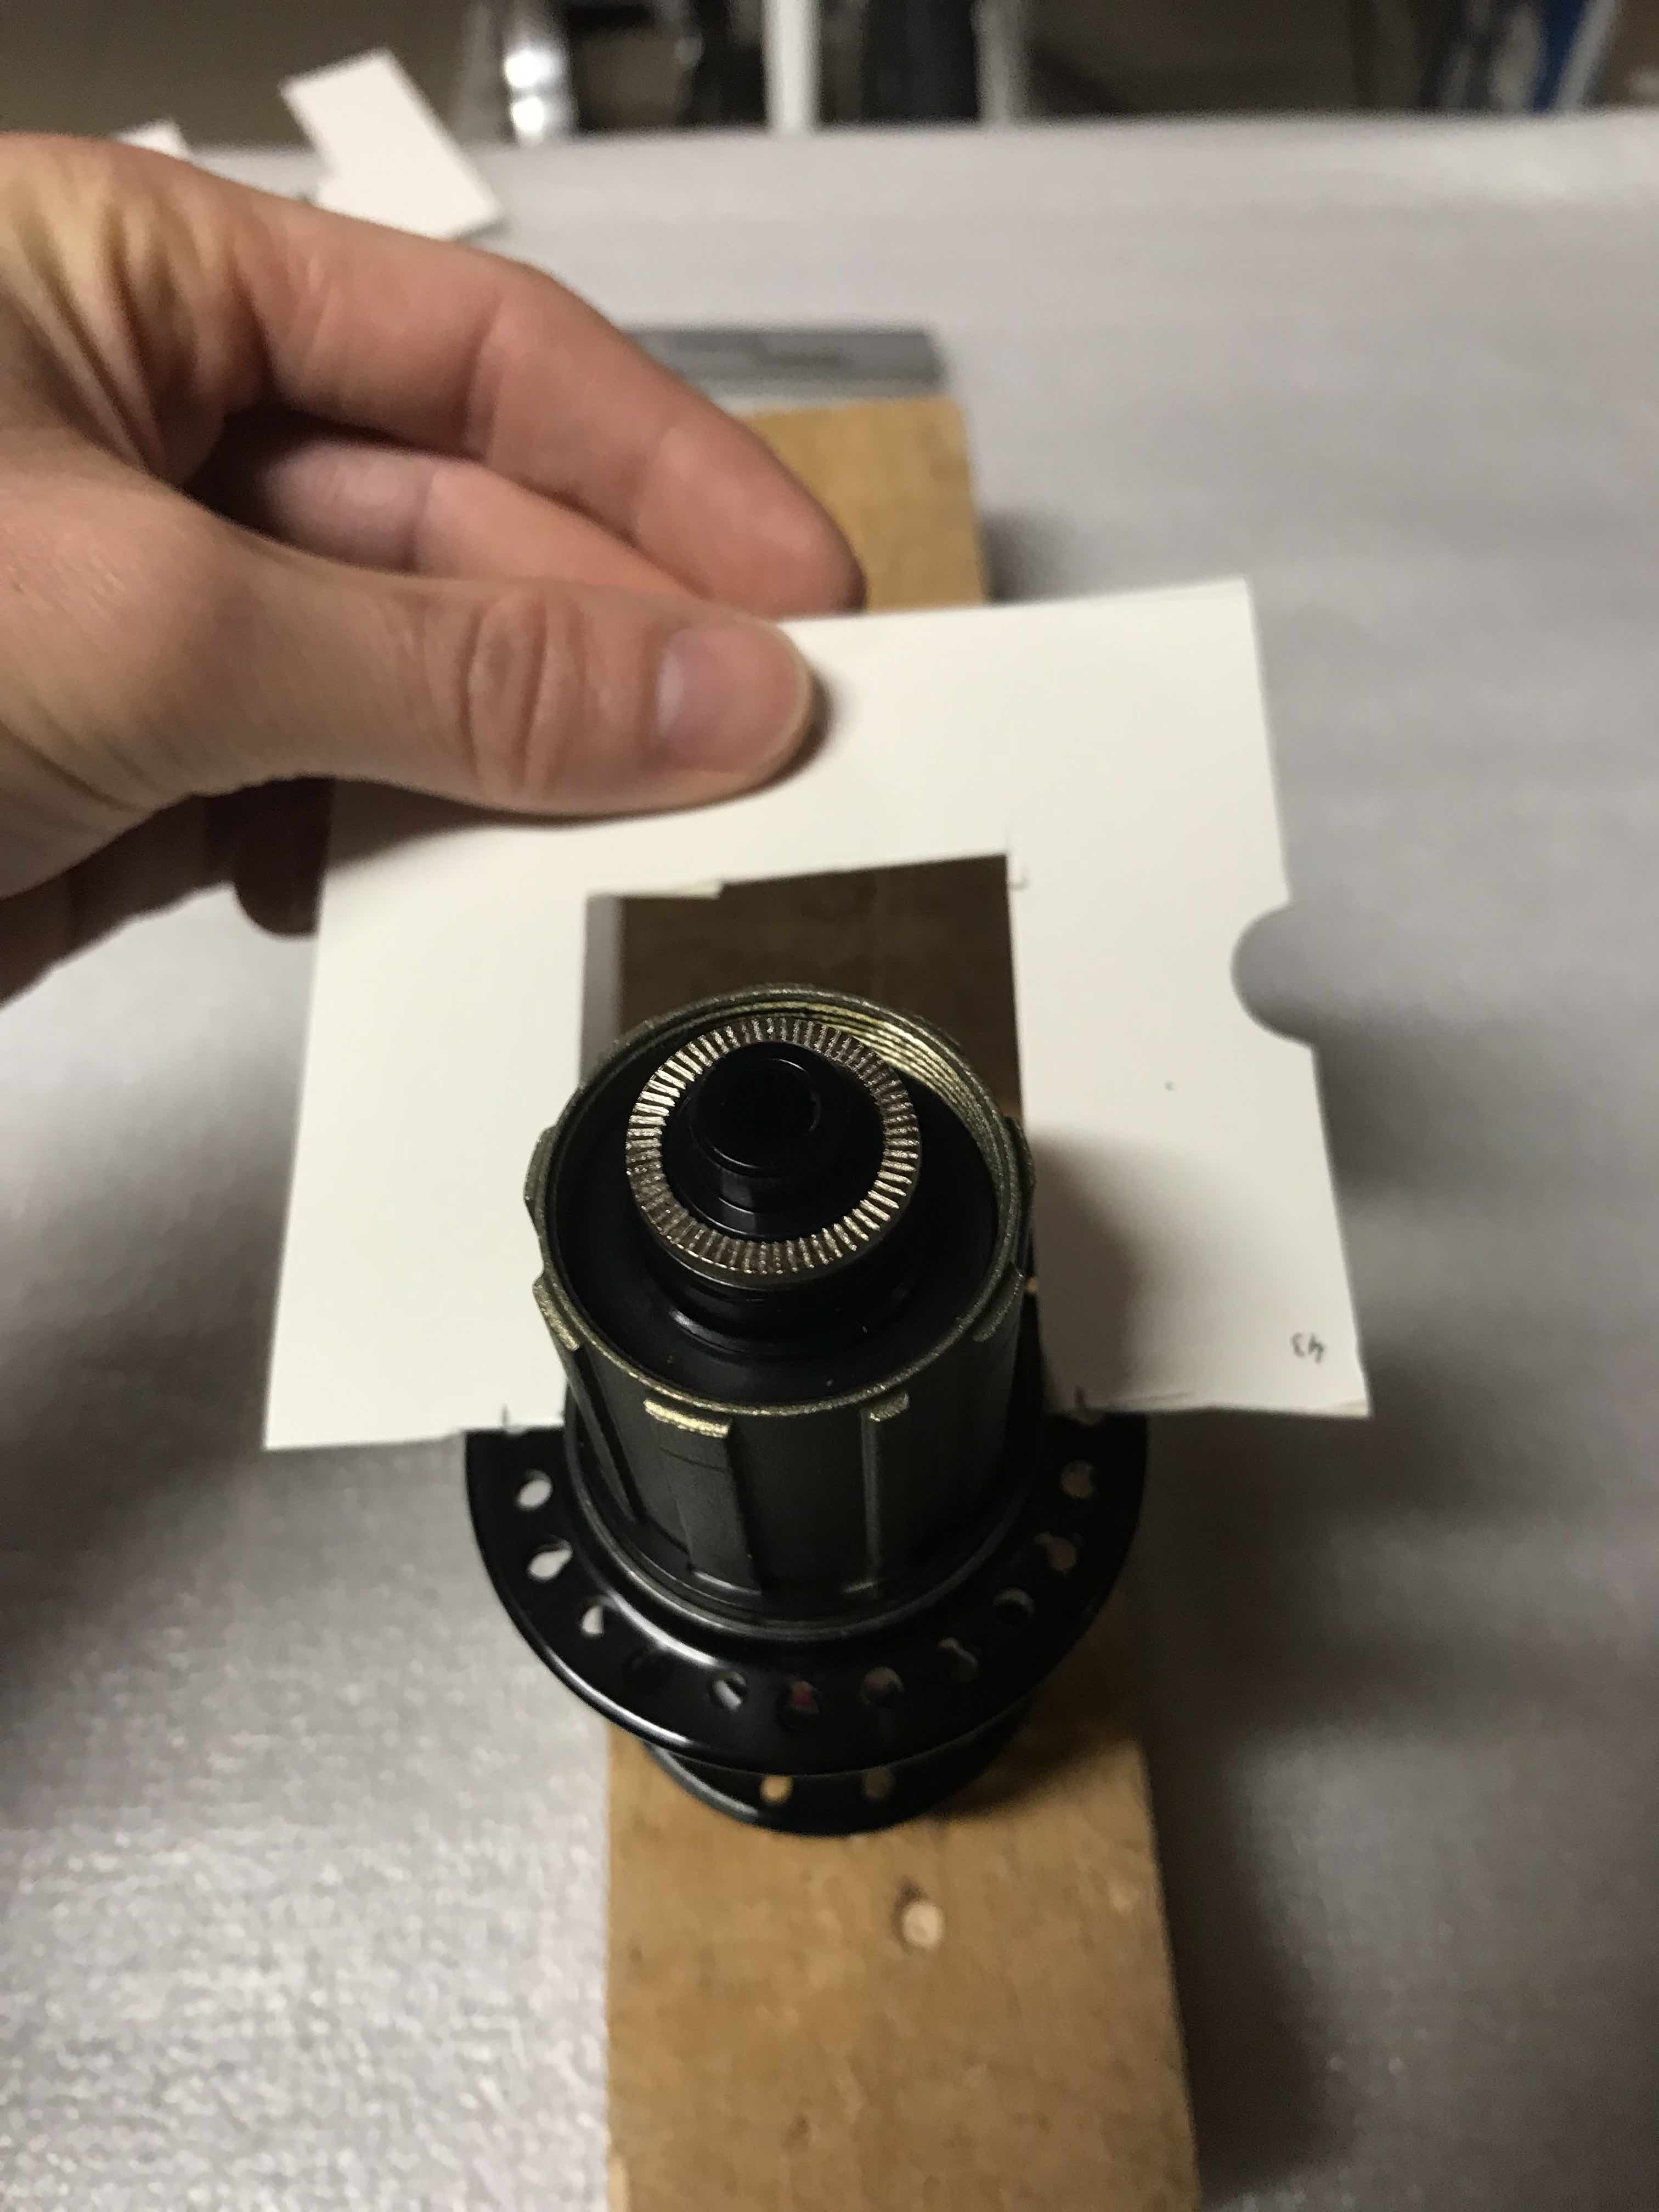
\[C = X / 2 - Y = 130/2 - 29 = \ boxed {36mm} \\ D = X / 2 - Z = 130/2 - 48 = \ boxed {17mm}\]c) Now I’m going to measure A and B to determine the value of H. And so H is neither more nor minus A/2 and B/2. So to measure this diameter, I used 2 pieces of cardboard see diagram below (difficult to use a caliper).
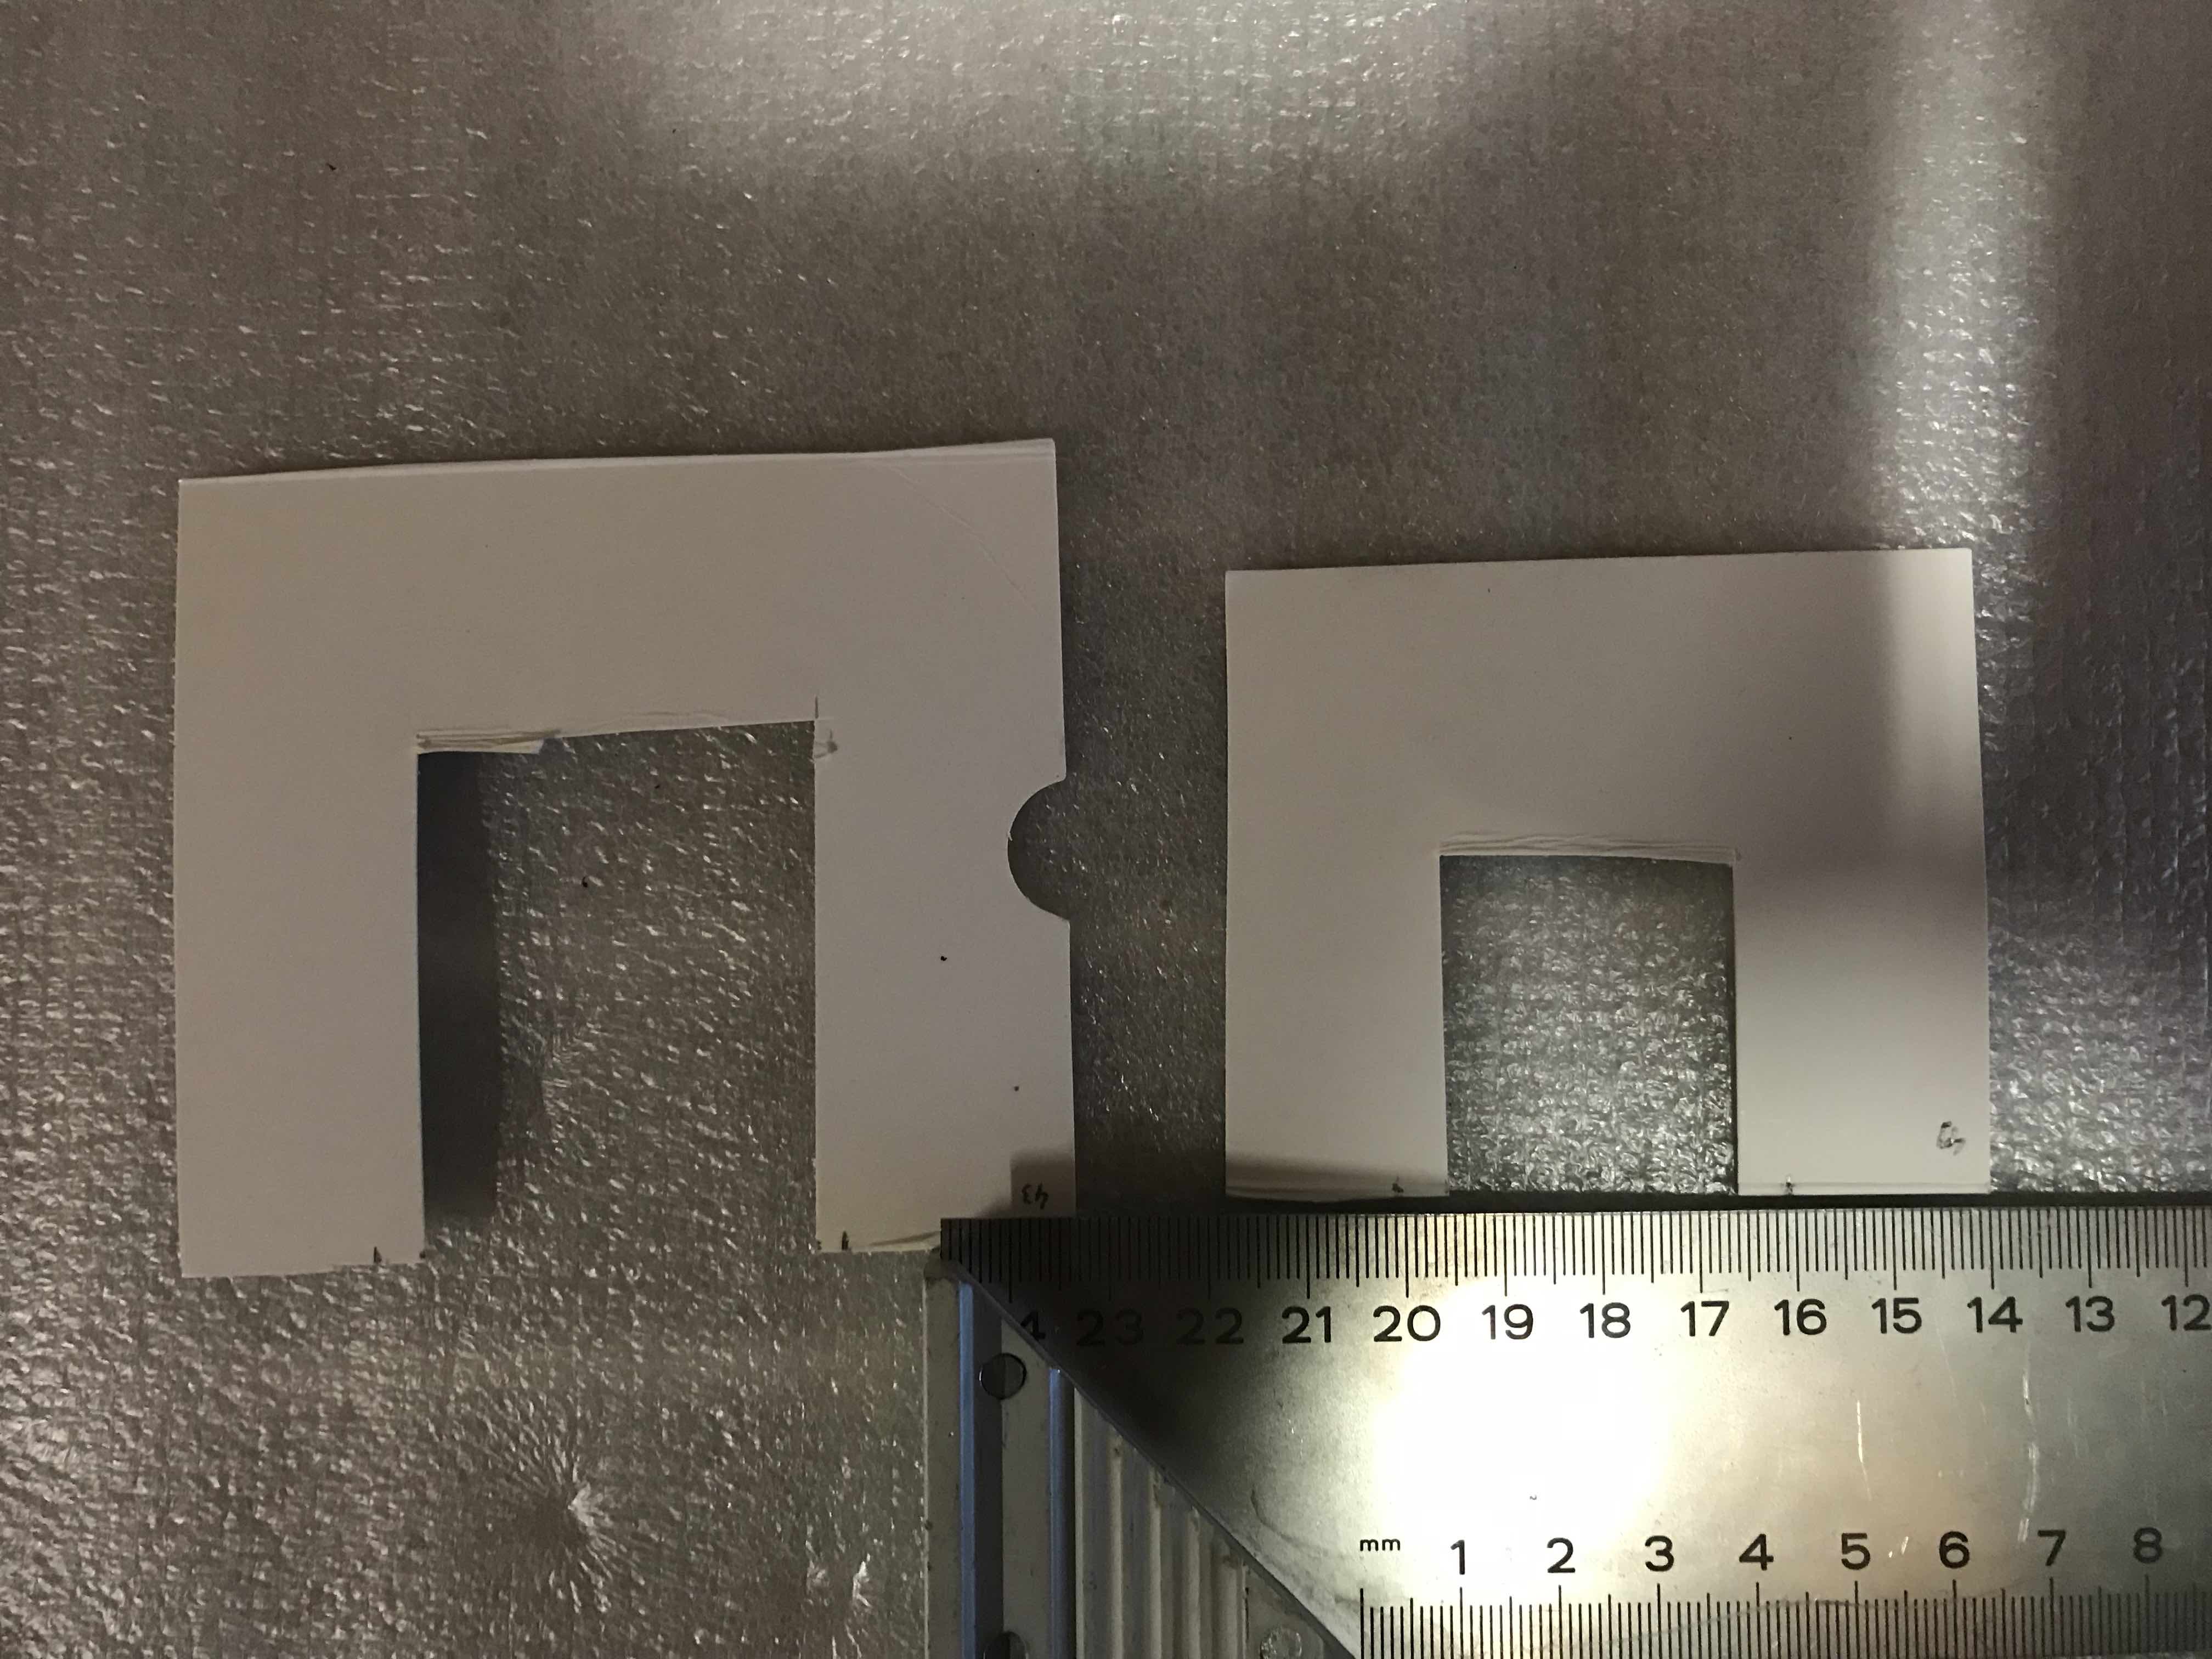
Then, just locate the center of 2 opposite holes on the flange and measure this distance with a ruler.
I get the following values:
\(A = 41mm \\ B = 49mm\) for the left side \(H = A / 2 = 20.5\) for the right part \(H = B/2 = 24.5\)
Calculation of L
So if we go back to triangle 1 HLR. we know H measured previously and the ERD too, we will therefore be able to determine the value of L. The difficulty in this triangle is that it is not a rectangle so you cannot apply a simple Pythagorean theorem. But we can demonstrate the law of the cosine in a triangle with acute angles using the theorem of Pythagoras on a sub-triangle rectangle, taking the foot of the height (see red line). To apply these trigonometric laws, we need to know the value of the angle ϕ, that’s good we can determine! We know the number of holes in the rim (24)! so the angle between each hole is 360 ° / 24 or 15 °. Since I am going to make a lacing with 2 crossings I will have 4 offset holes on each spoke. I will detail all this in the chapter dedicated to lacing.
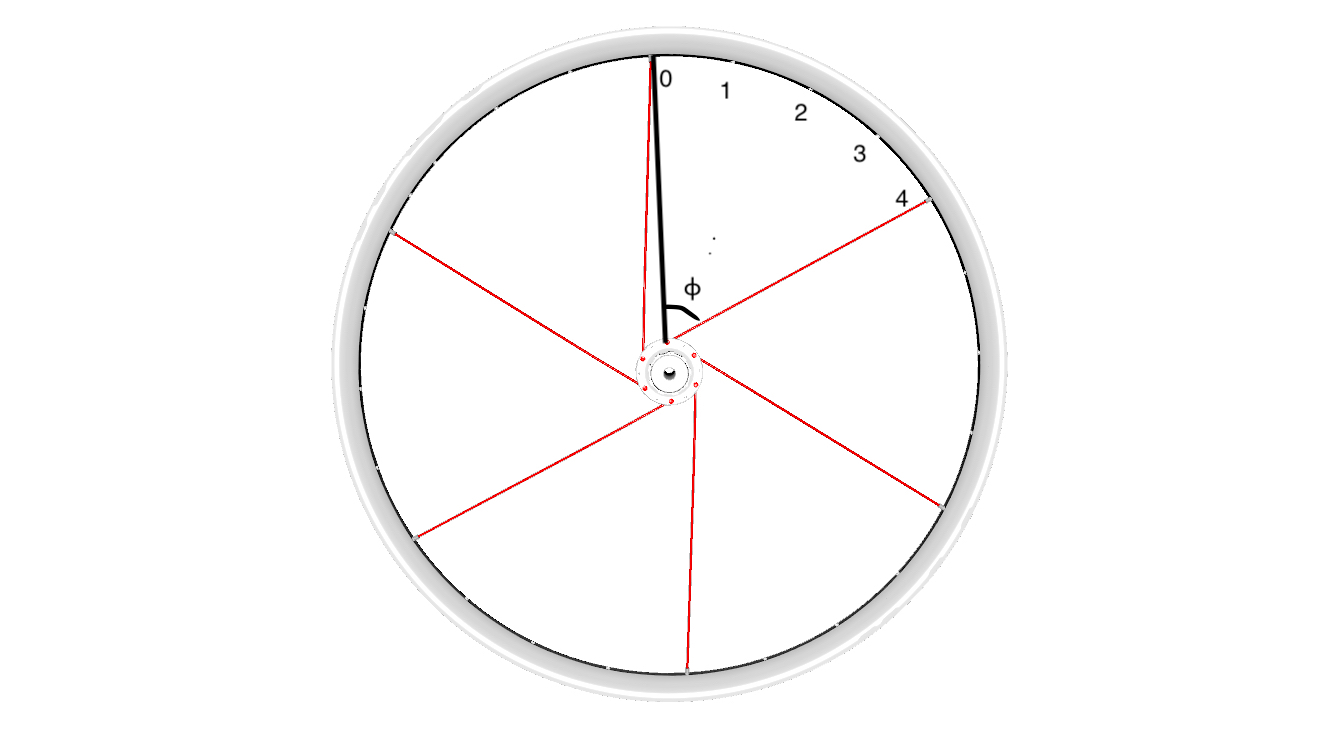
We get an angle 15 ° x 4 = 60 °.
Now I have everything I need to apply the cosine law and get the value of L.
To determine R1 we can easily apply the following trigonometric law:
\[cos\varphi =\frac{R1}{H} \\ R1 = Hcos\varphi\]So by substitution we get
\[R2 = R - Hcos\varphi\]Finally the height H’in red, we can apply the following trigonometric law:
\[H'= H sin \varphi\]We have everything we need to apply Pythagoras’ law on the triangle H’LR2
\[L^2 = H'^2 + R2^2 \\ L^2 = (H sin \varphi)^2 + (R - Hcos\varphi)^2 \\\]Here we have everything we need, I will now factor this equation to facilitate calculations that will follow.
You can easily recognize the remarkable identity \((a - b) ^ 2\)
\[L^2 = (H sin \varphi)^2 + \underbrace { \color{Red} {(R - Hcos\varphi)^2} }_{(a - b)^2 = a^2 -2ab + b^2} \\\]So we can write
\[L^2 = (H sin \varphi)^2 + R^2 - 2RHcos\varphi + (Hcos\varphi)^2 \\\]A small factorization, which allows to apply another remarkable identity \(sin \varphi^2 + cos \varphi^2 = 1\)
\[L^2 = H^2 \underbrace { \color{Red} {(sin \varphi^2 + cos \varphi^2)}}_{sin \varphi^2 + cos \varphi^2 = 1} + R^2 - 2RHcos\varphi \\\]We get a more readable equation.
\[\boxed{ L^2 = H^2 + R^2 - 2RHcos\varphi }\]Calculation of S
Now thanks to the value L, we can apply a simple Pythagorean theorem on the triangle LSF so to determine S.
Pythagorean theorem on LSF with S as hypotenuse. Pythagorean Theorem
\[S^2 = F^2 + L^2\]I substitute the value of \(L^2\), obtained previously
\[S^2 = F^2 + H^2 + R^2 - 2RHcos\varphi\]We get an equation that we can solve.
\[\boxed{ S = \sqrt{F^2 + H^2 + R^2 - 2RHcos\varphi} }\]Calculation of S for the left rays
I take the values previously measured
\[H = A/2 = 41/2 = 20.5mm \\ F = 36mm \\ R = ERD/2 = 471/2= 235.5mm \\ \varphi = 60°\]I replace the variables with the values
\[S = \sqrt{36^2 + 20.5^2 + 235.5^2 - 2*235.5*20.5cos(60°)} \\ S = \sqrt{1296 + 420.25 + 55460.25 - 9655.5*cos(60°)} \\ S = \sqrt{57176.5 - 9655.5*0.5} \\ S = \sqrt{57176.5 - 4827.75} \\ S = \sqrt{52348.75} \\ \boxed{ S = 228.798mm }\]Calculation of S for the right rays
\[H = B/2 = 49/2 = 24.5mm \\ F = 17mm \\ R = ERD/2 = 471/2= 235.5mm \\ \varphi = 60°\]I replace the variables with the values
\[S = \sqrt{17^2 + 24.5^2 + 235.5^2 - 2*235.5*24.5cos(60°)} \\ S = \sqrt{289 + 600.25 + 55460.25 - 11539.5*cos(60°)} \\ S = \sqrt{56349.5 - 11539.5*0.5} \\ S = \sqrt{56349.5 - 5769.75} \\ S = \sqrt{50579.75} \\ \boxed{ S = 224.899mm }\]Adjustment 1
On the diagram below I represent how the spoke will be lodged in the hole of the hub. For all calculations previous I took the measurements at the center of the hub hole, especially for the measurement of A and B. But If we take the documentation of the SAPIM CX-Ray spokes, the length of the spoke starts from the inside of the elbow. So it is necessary to remove the spoke from the hole of the hub to obtain the real size of the spoke (in green on the diagram).
Using the caliper I get a diameter of d=2.6mm, so we get a radius
\[r = d/2 = 2.6/2 = 1.3mm\]If it suffices to subtract this value from the size of the radius previously calculated.
Left side
\[S = 228.798 - 1.3\] \[\boxed{ S = 227.498mm }\]Right side
\[S = 224.899 - 1.3\] \[\boxed{ S = 223.599mm }\]We can update the formula like this:
\[\boxed{ S = \sqrt{F^2 + H^2 + R^2 - 2RHcos\varphi} - r }\]Adjustment 2
Now that I have the theoretical values, I will adjust the formula taking into account the physical forces that will be applied to it. Indeed, the rays under tension will stretch, certainly a little bit, but you will see it could change the choice between 2 sizes of shelves. So for calculate the elongation of the radius I will use the [Hooke’s Law] (https://fr.wikipedia.org/wiki/Loi_de_Hooke).
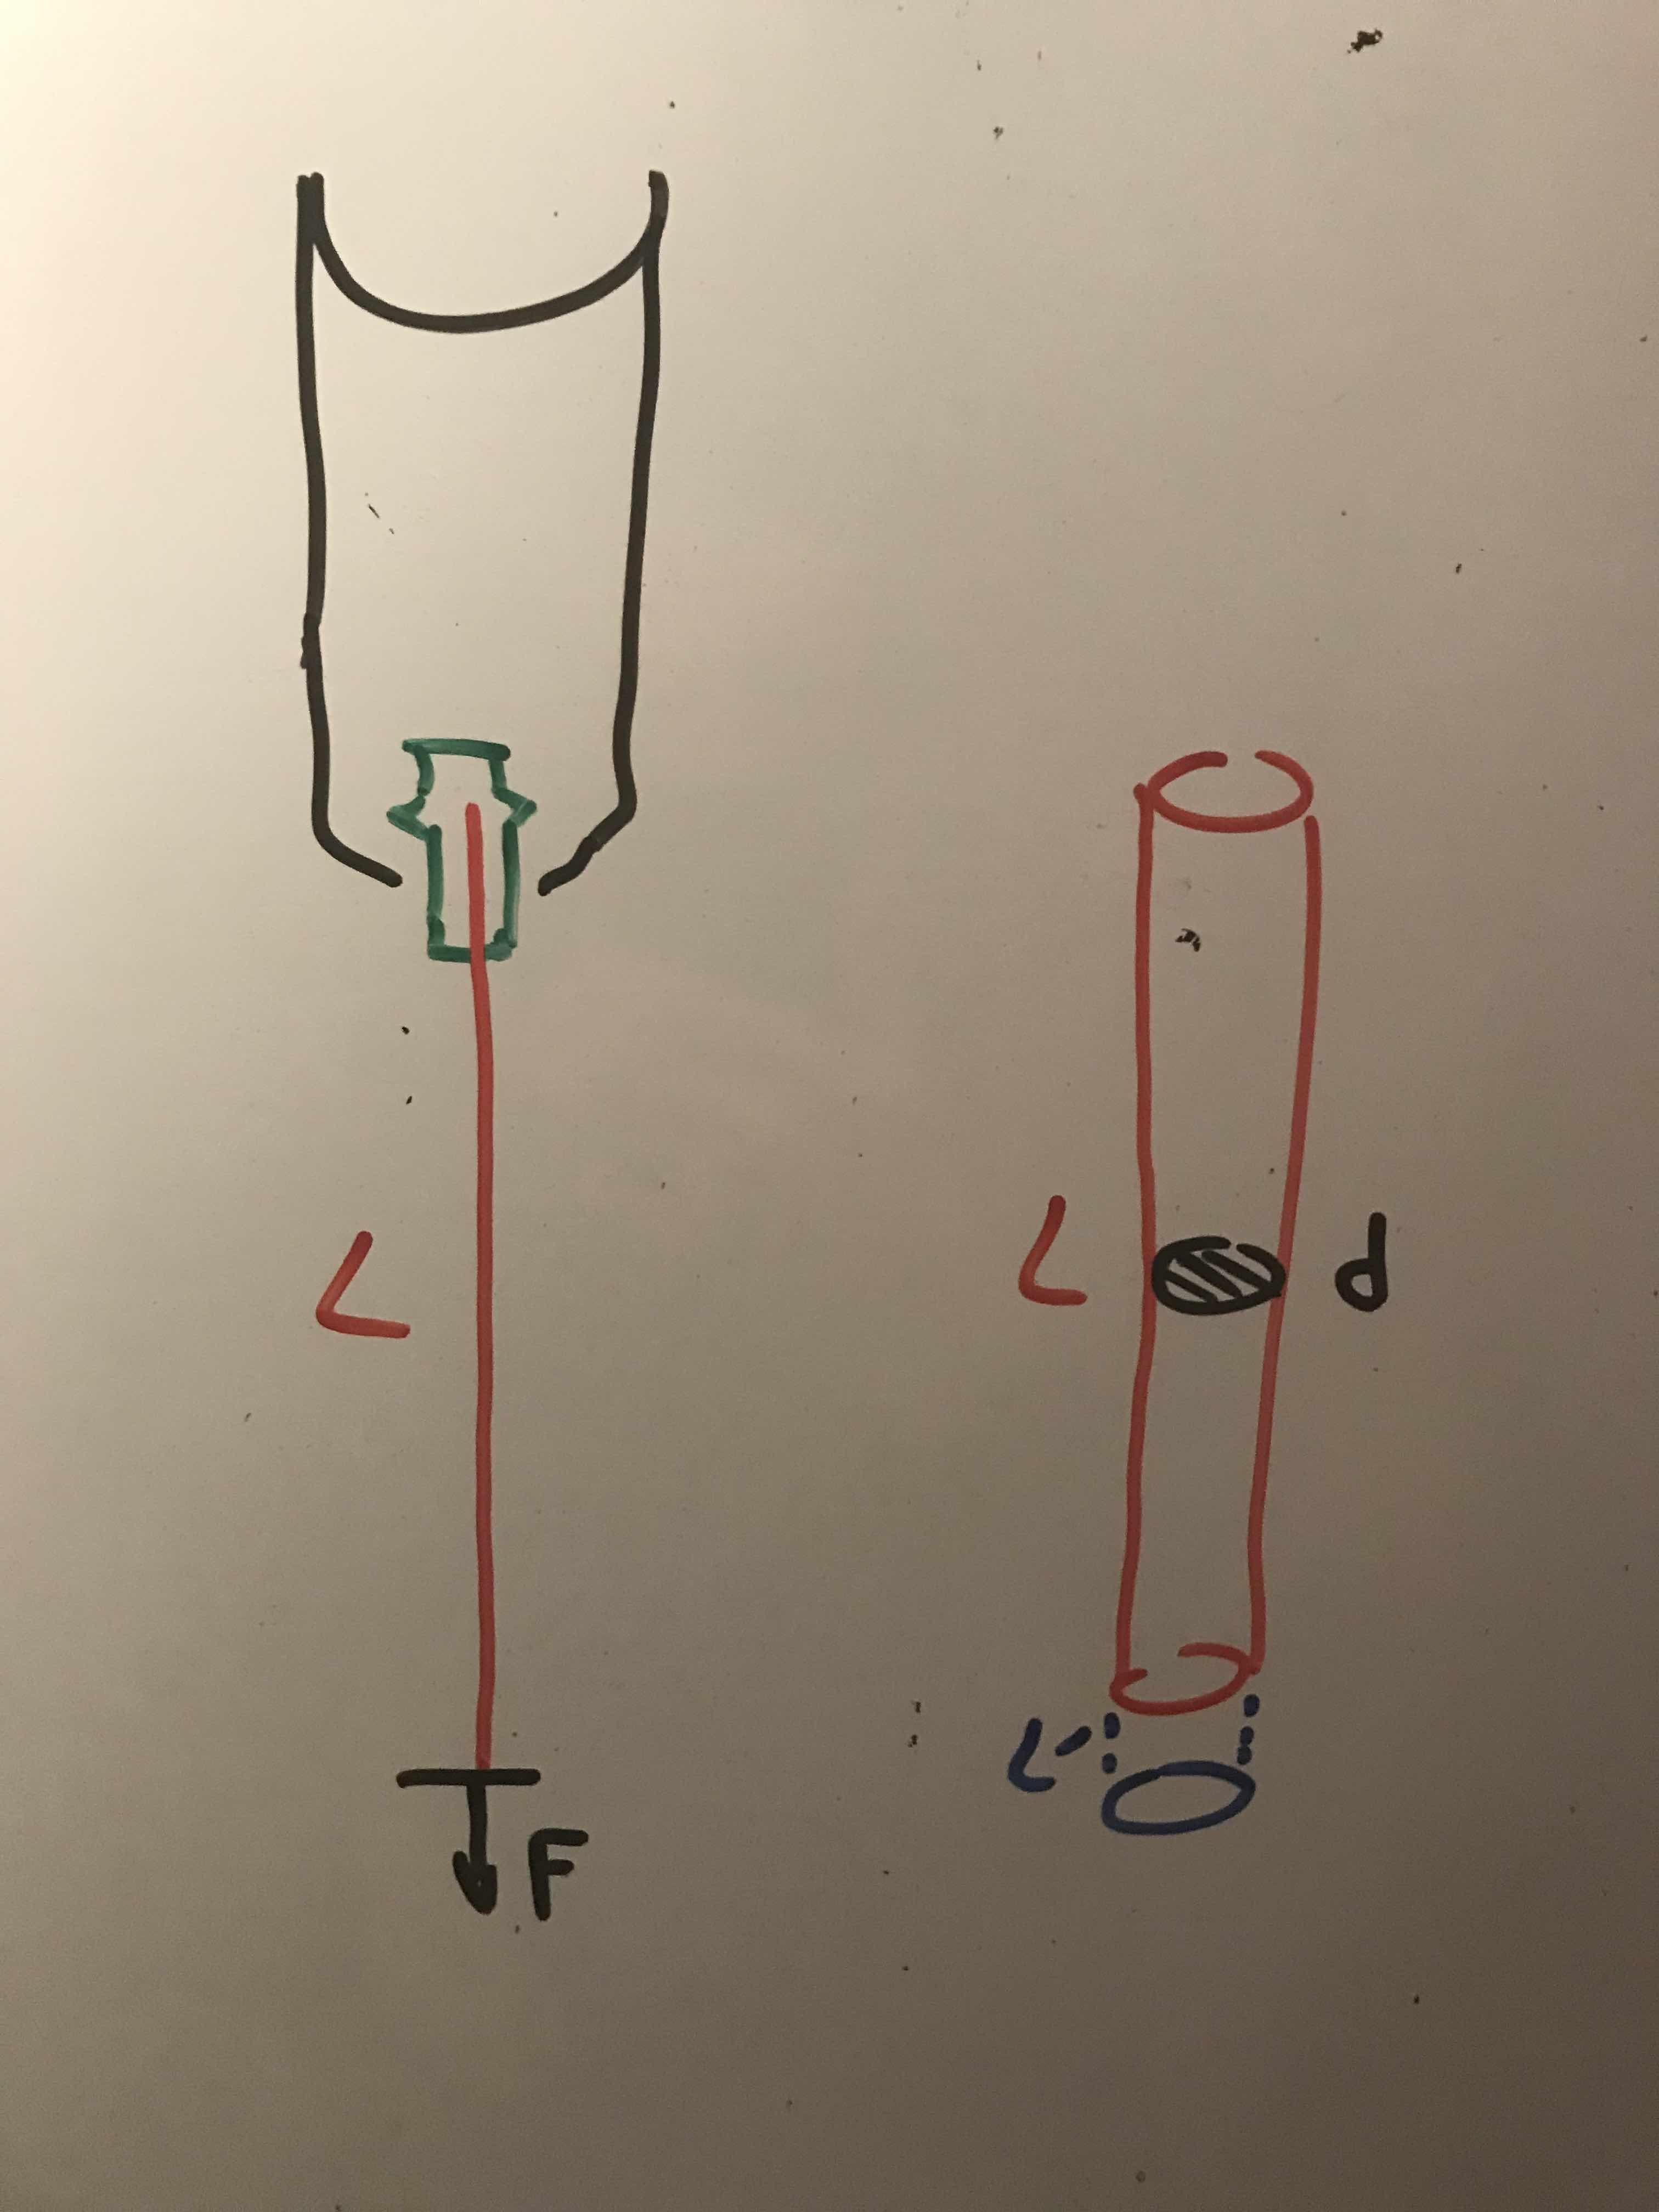
Hooke’s law applied to a cylinder
\[L'/L = 1/E * F/A \\ L' = F/A * L/E\]With
- E = Modulus of Elasticity of steel see [Young’s modulus] (https://fr.wikipedia.org/wiki/Module_de_Young)
Or 210 GPA
- L = Length of the radius previously calculated
- L Left = 227.498mm = 0.227498m
-
L Right = 223.599mm = 0.223599m
- F = Force = Mass * Acceleration = m * a
Maximum mass = 100kg
\[\boxed{ Acceleration = 9.81m/s^2 }\]- A = The area of the section \(π * R^2\)
- R is the radius of the radius before it is forged. Indeed the SAPIM CX-Ray are cylindrical at the ends and flat in the middle. But before transformation the radius was well cylindrical. So we have to do a little or ask the department supplier directly for this information. So the SAPIM CX-RAY is 1.5mm in diameter before being forged.
Is
\[R=d/2=1.5/2=0.075mm=0.000075m\]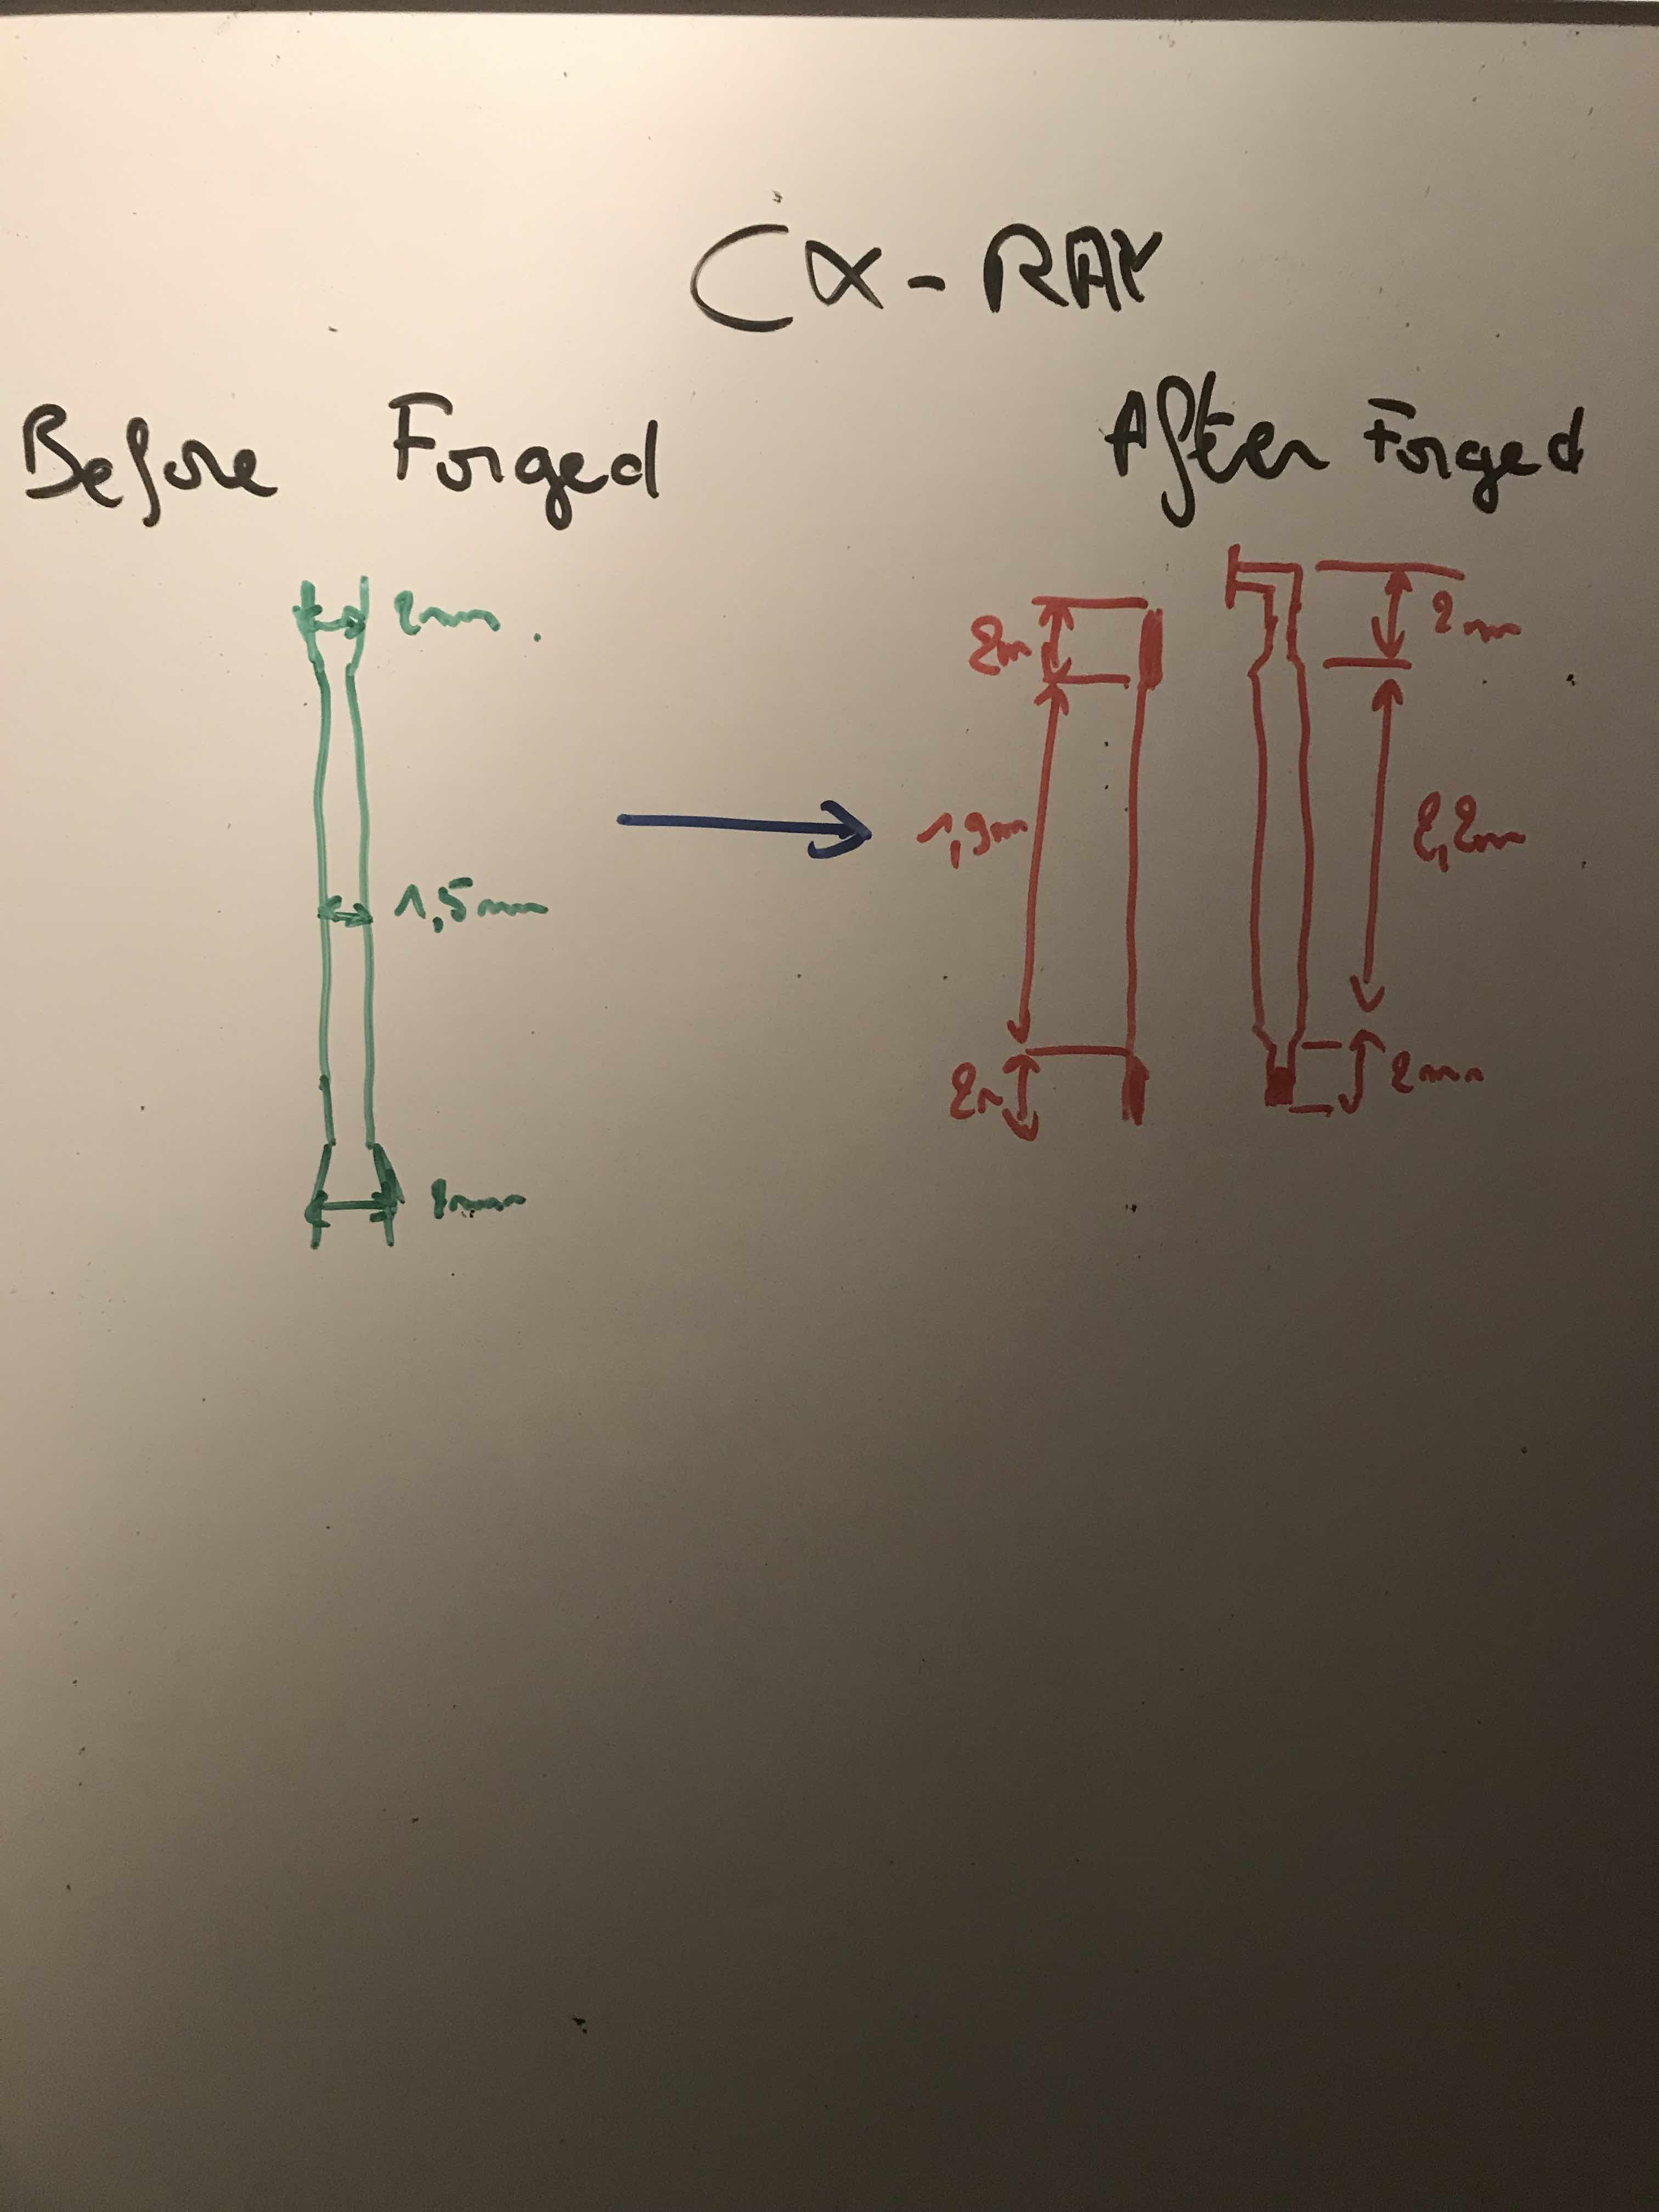
Left side:
\[L' = 981/1.76e^-6 * 0.227498/210e^9 L' = 0.000601m=0.601mm\]Real length of the radius before being stretched:
\[227.498 - 0.601 = \boxed{226.897mm}\]Right side:
\[L' = 981/1.76e^-6 * 0.223599/210e^9 L' = 0.000591m=0.591mm\]Real length of the radius before being stretched:
\[223.599 - 0.591 = \boxed{222.999mm}\]The final formula becomes:
\[\boxed{ S = \sqrt{F^2 + H^2 + R^2 - 2RHcos\varphi} - r - L' }\]
Results
Here I finally have all the elements to finally order my shelves.
I get 226.897mm for the left side and 222.999mm for the right side. But when we want to order the shelves the sizes go from 130-310mm in even number This means that you can buy 220mm-222mm-224mm-226mm… So what to choose, depending on the results obtained. It is quite simple, do not exceed a gap of more than 1mm otherwise it could make it difficult to mounting.
So I ordered 12 spokes 226mm for the left side and 12 spokes 222mm for the right side.
Editing
Now that I have the spokes, the nuts, the hub and the rim. So I have everything I need to attack mounting. Finally, to do this I lack some tools. I invested in tools that will be very fast amortized.
Tools
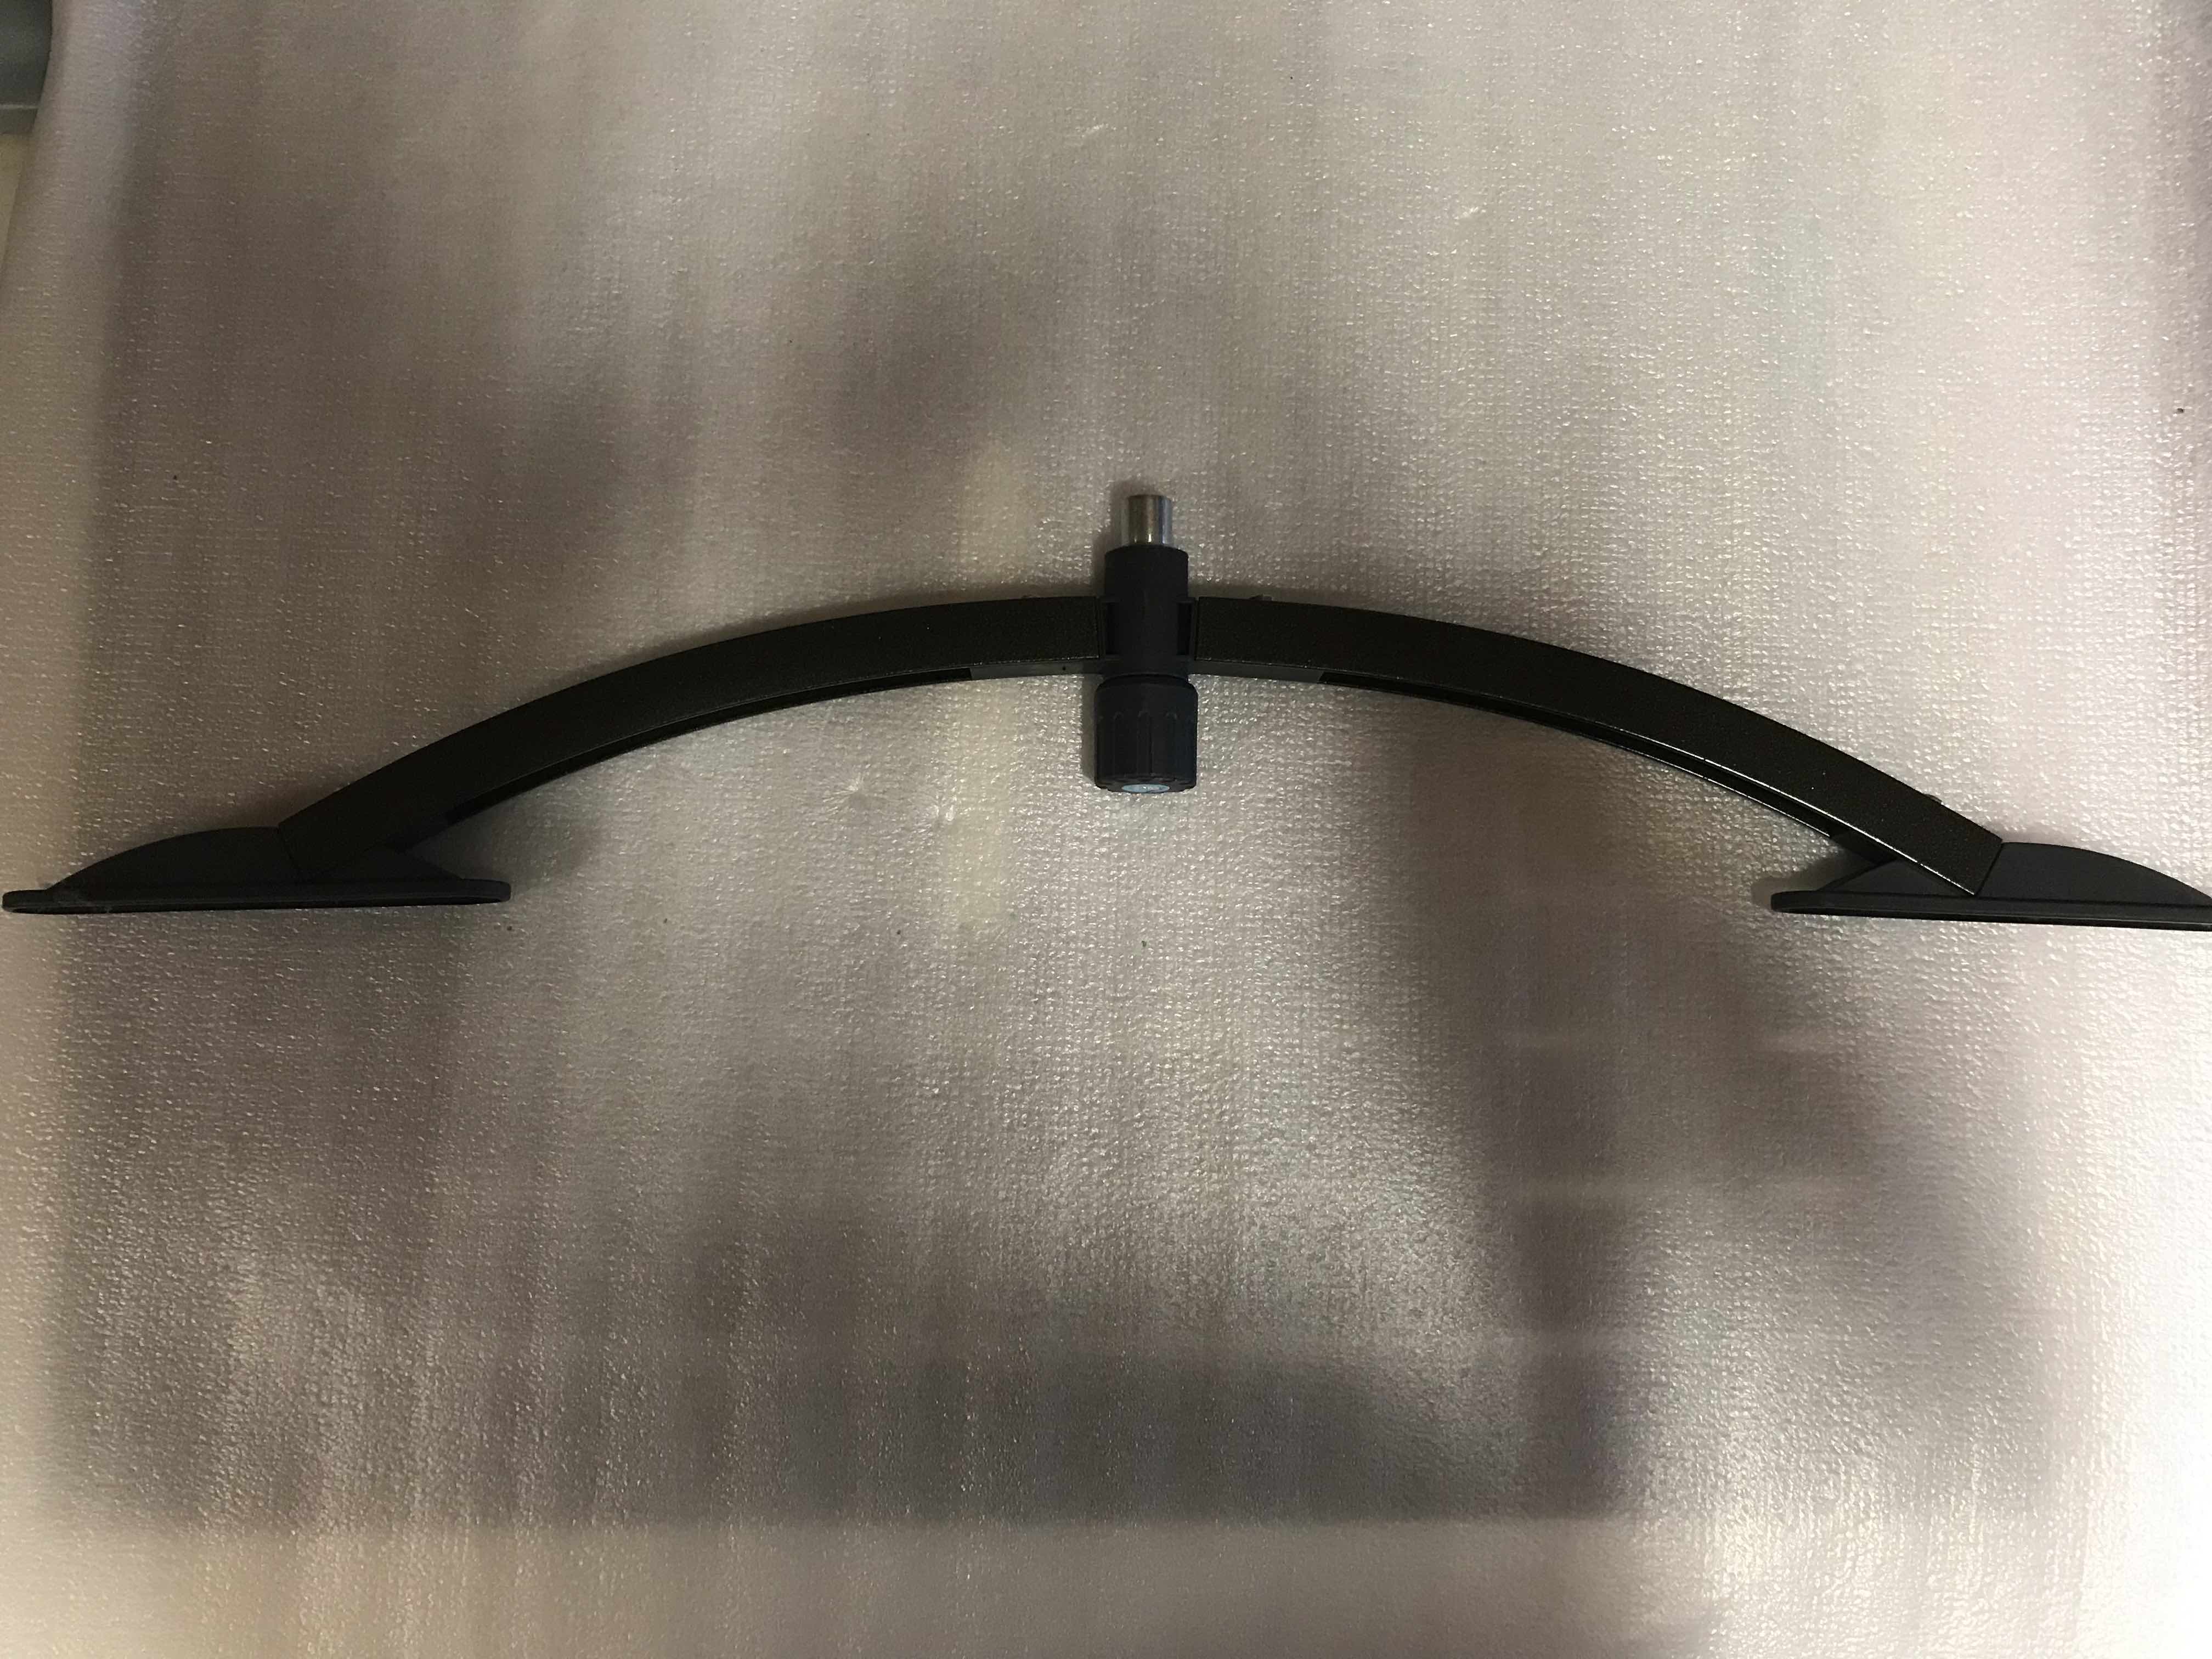
Wheel centering device
The wheel centering tool will allow the wheel to be exposed during power up, until an unveiled wheel is obtained. This tool will be very useful for maintaining its wheels throughout its life cycle. Every cyclist should have one at home to watch these wheels from time to time, too many people roll with veiled wheels …
A centering gauge or alignment comparator
This tool is very important, it will make it possible to verify that the hub is properly aligned with the rim. I will use it as for the wheel centering throughout the power up.
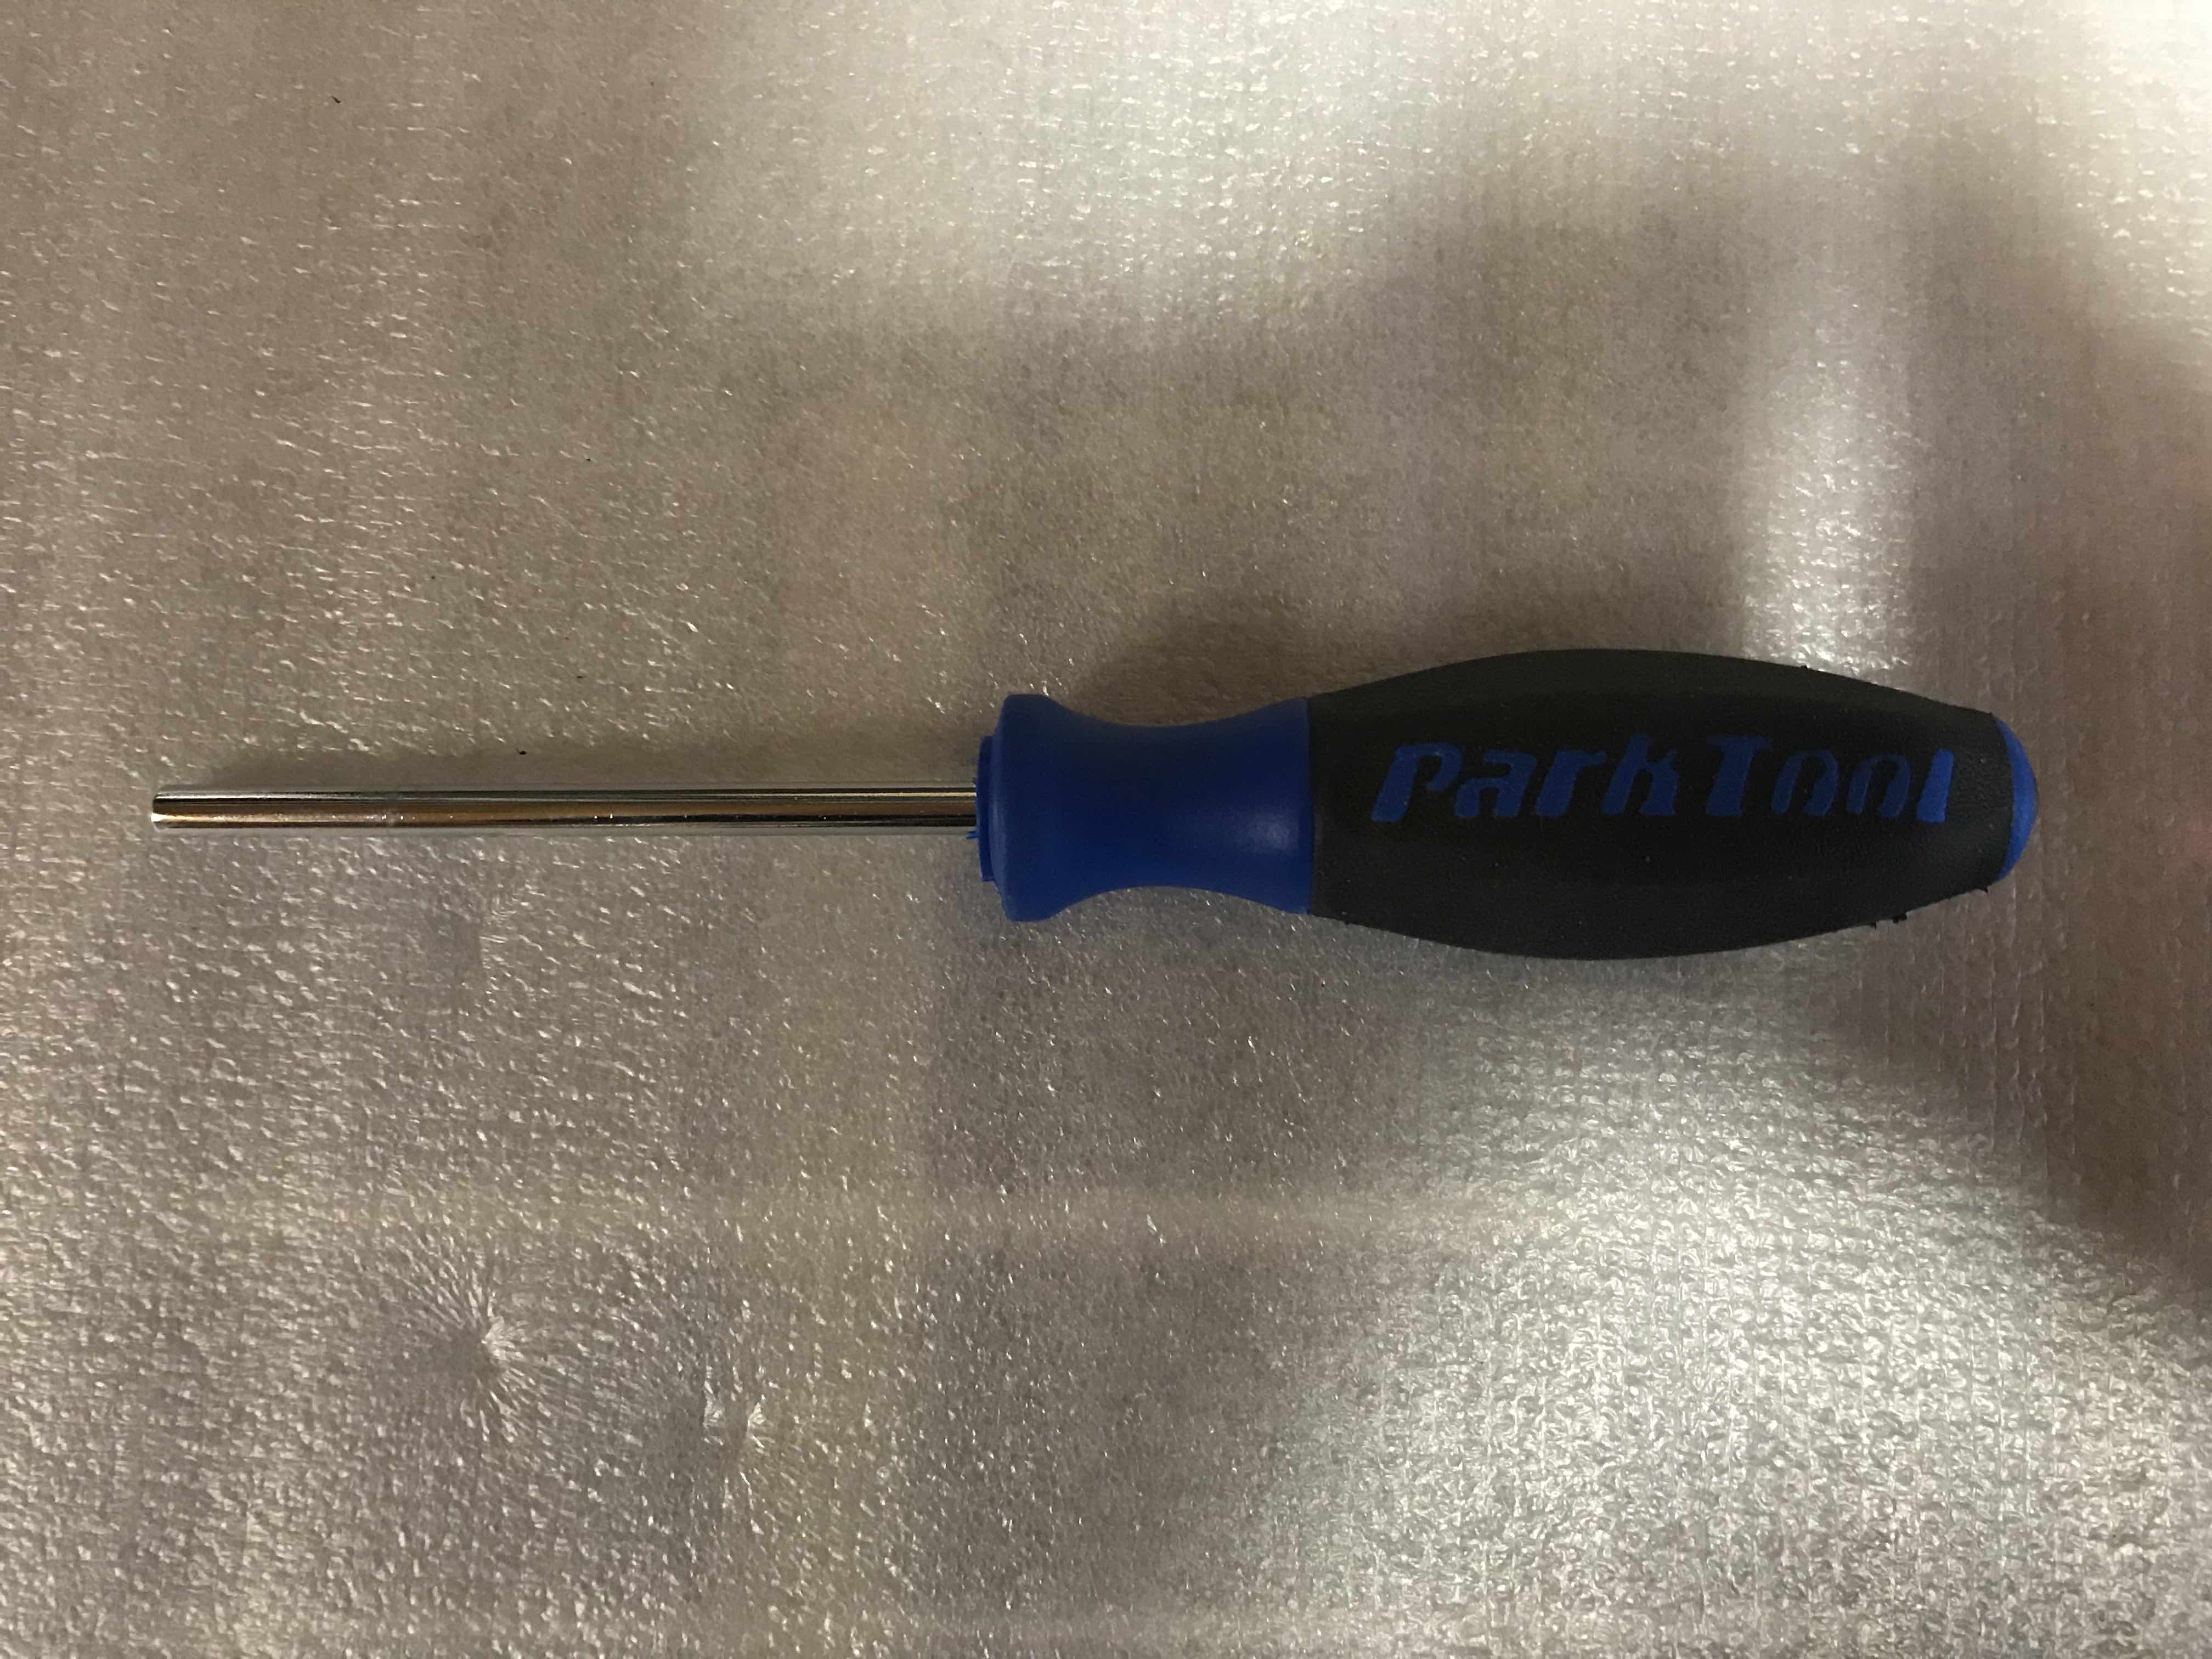
A screwdriver with nuts (hexagonal head)
My choice of Double Square nuts from Sapim was mainly for their hexagonal head which allowed me to use this type of screwdriver which is long enough to work on rims over 80mm high. There are several types of nut head, size and therefore different types of screwdrivers. There are also brands that have their own standard like dt-swiss who has to buy their nuts and use their tools.
Holding key for flat spoke
This tool is specific to the flat spoke, it keeps the spoke in the right direction during tightening of the nut.
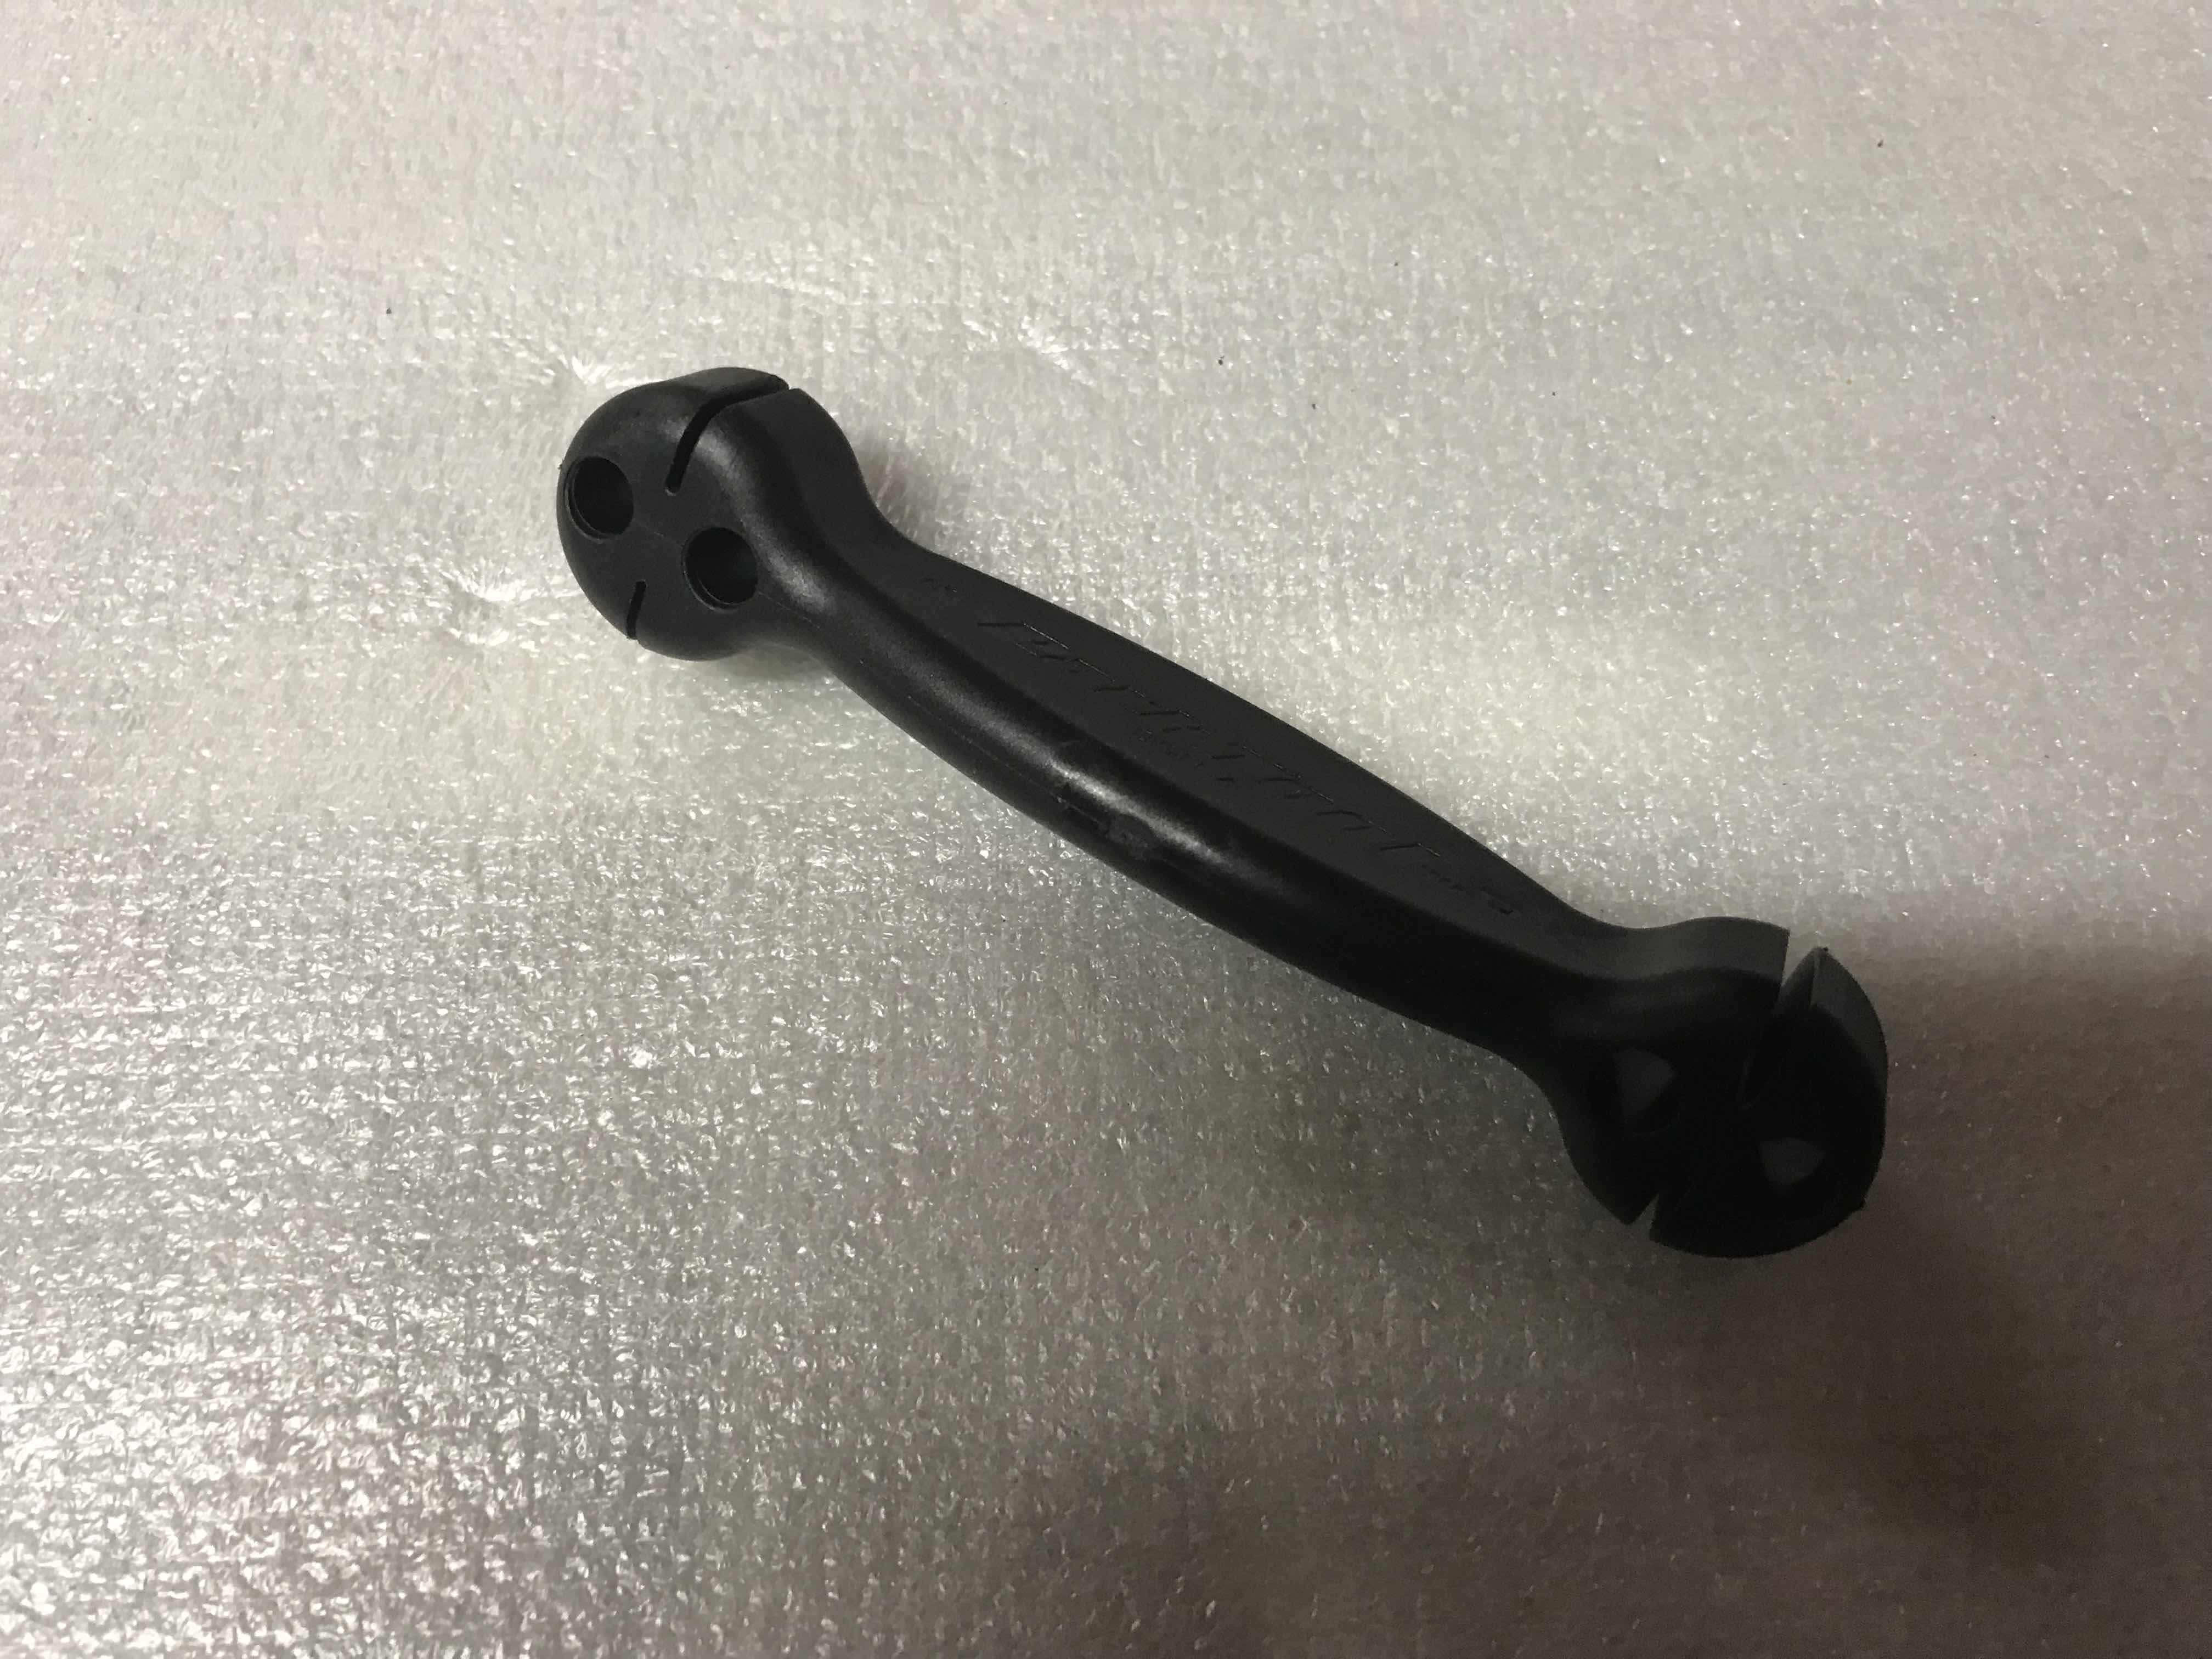
Department key
Unlike the screwdriver which will allow to tighten the spoke from inside the spoke, the spoke wrench will allow to adjust the spoke tension directly from the outer head which will be useful when the hose will be installed. The only downside is that the tool damages the paint of the colored rays.
Tape
The adhesive tape will be very useful for putting marks on the spokes while the wheel is uncovered.
Blood pressure monitor
The blood pressure monitor will allow you to check the correct tension on all the spokes.

Costs
| Description | Price |
|---|---|
| Tacx wheel centering device | 47.90 |
| A Tacx centering gauge | 34.99 |
| Park Tool Nut Driver | 12.85 |
| Park Tool Flat Spoke Holding Key | 13.83 |
| Department key | 6.90 |
| Adhesive tape | 0.96 |
| Sphygmomanometer | 45.79 |
| Total | 163.22 |
The cage
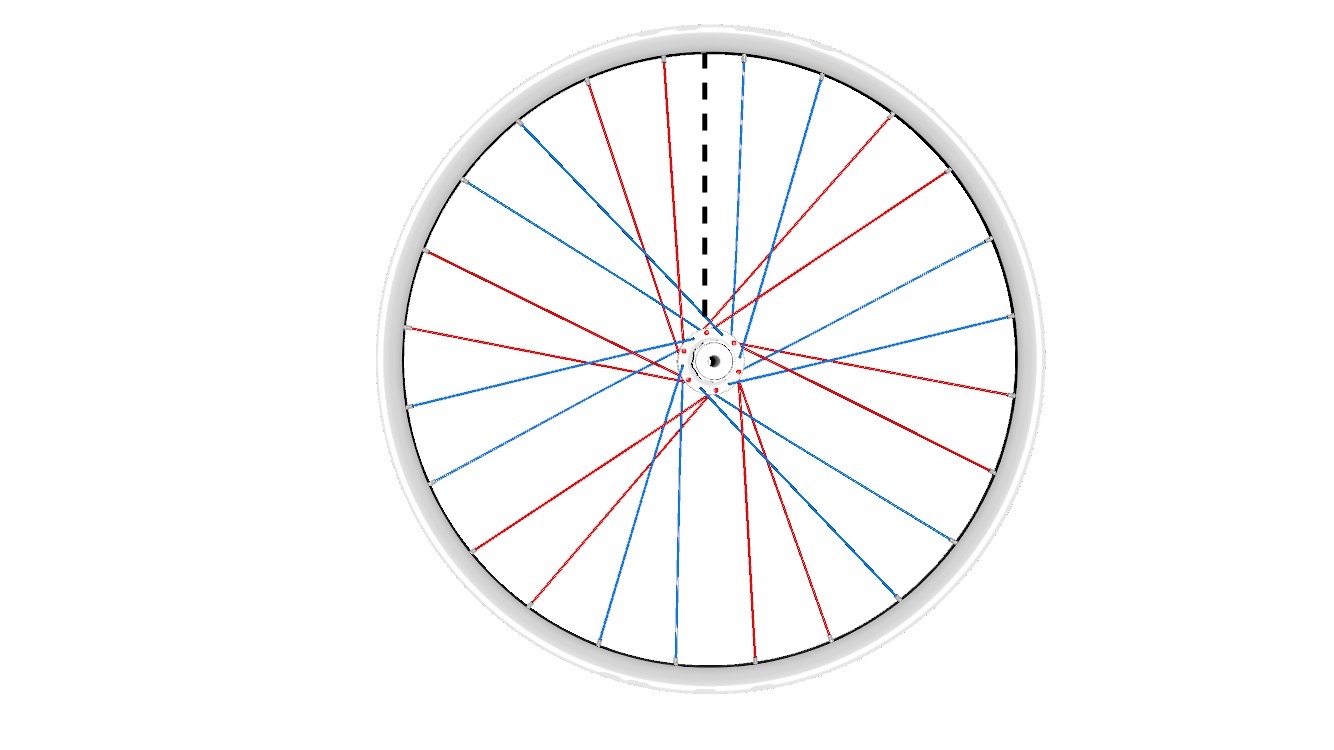
Everything is described in the literature and there are lots of videos on Youtube to help understand , but the best is this application [Rad 3D] (https://appadvice.com/app/rad-3d/1103912788) that I came across. It allows you to have a 360 ° view according to the number of rays and crossings that you wish to make. We go be able to break down each step and be able to look from all angles. I will detail the steps for my type of mounting, in fact, there are several ways of lacing:
- Radial: the rays do not cross. We find this type of mounting on the front wheels, but sometimes on the side left of the hub at the rear which is only of interest in terms of aesthetics. In addition, a radial mounting weakens the wheel especially when braking. My 38mm wheels that I had fitted, at the rear have 8 radial spokes on the left and 16 spokes with 2 crossings on the right. I understand why my wheel drives out when I sprint as a dancer. Indeed the 8 Radial rays are the cause of imbalance.
There are 3 other types of lacing:
- A: Symmetrical lacing on the left and right side (cassette). Spokes coming out of the hub to the outside rays crossing the rays that go out from the inside passing below.
- B: Another symmetrical lacing is to do the opposite of the above.
It is 2 types of assembly does nothing in terms of performance. However, they have a slight difference when braking especially if you have disc brakes. Indeed, during braking the spokes will pull with the first type lacing, the spokes will be pulled inward while in the other case outward which could touch the brake disc. The other difference is that, conversely when pedaling, type A lacing will pull outwards which could touch the cassette… From what I have read, there is often a large enough space not to touch the tape or disc.
- Finally, a last specific Shimano assembly for disc brakes for the rear wheels that we can find on the internet.
So I made the choice to do my type A lacing.
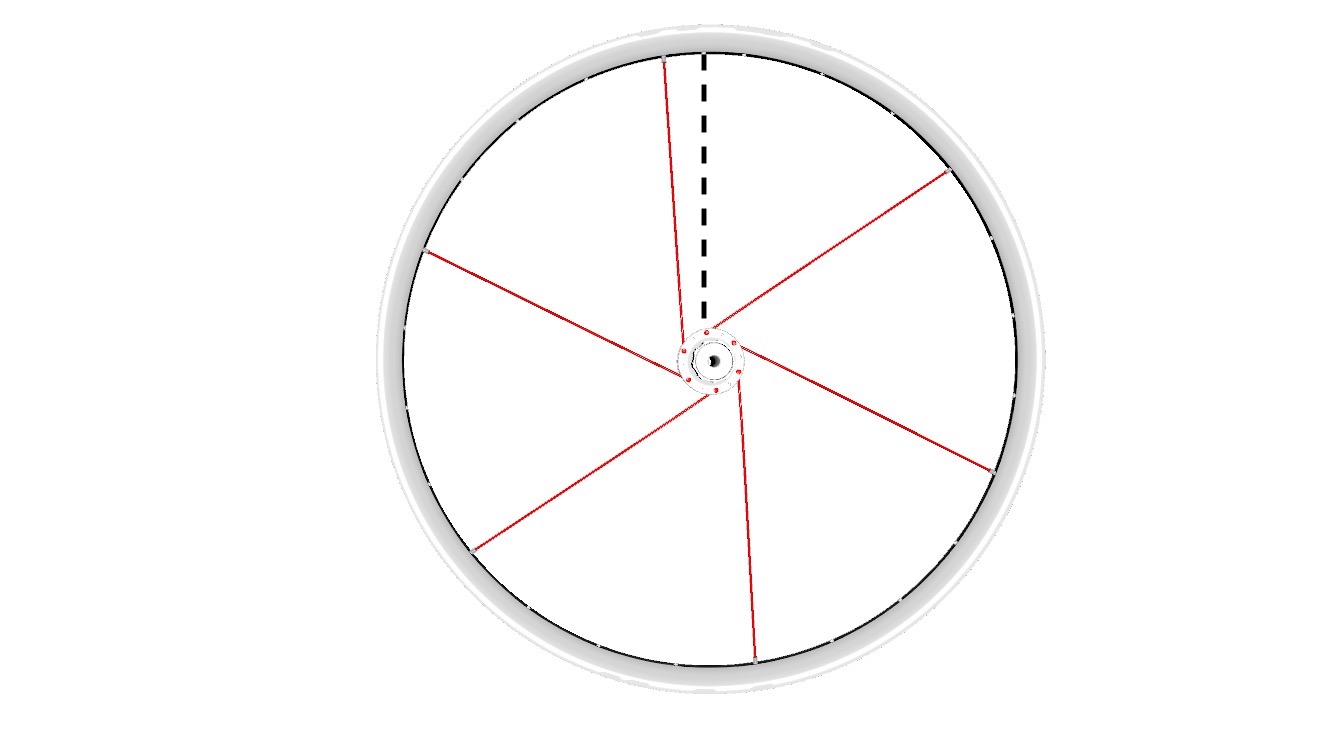
Step 1:
 Cassette side hub in front of me and valve mark aligned perpendicularly. To have a well finished wheel
the best thing is to have the hub logo aligned with the valve. To get there, just think of the angle that
take the spokes when lacing, we will see it in the next step. The technique is just to take the middle
of the hub logo and count 3 holes to the left, we will see then why 3. But simply when lacing
with a cross by 2, it will fall right in front of the valve.
Cassette side hub in front of me and valve mark aligned perpendicularly. To have a well finished wheel
the best thing is to have the hub logo aligned with the valve. To get there, just think of the angle that
take the spokes when lacing, we will see it in the next step. The technique is just to take the middle
of the hub logo and count 3 holes to the left, we will see then why 3. But simply when lacing
with a cross by 2, it will fall right in front of the valve.
Step 2:
 I start on the cassette side so take the right shelves. Especially separate them well so as not to mix them …
From this stage, you have to take your time. So I take 6 spokes of 222mm (cassette side) and I start from
center of the hub, coming in from the outside and I insert the spoke in the first hole to the left of the valve. I take
a nut and I tighten it slightly precisely so that it stands alone. Then I alternate every 2 holes on the hub side
and all 4 holes on the rim side.
I start on the cassette side so take the right shelves. Especially separate them well so as not to mix them …
From this stage, you have to take your time. So I take 6 spokes of 222mm (cassette side) and I start from
center of the hub, coming in from the outside and I insert the spoke in the first hole to the left of the valve. I take
a nut and I tighten it slightly precisely so that it stands alone. Then I alternate every 2 holes on the hub side
and all 4 holes on the rim side.
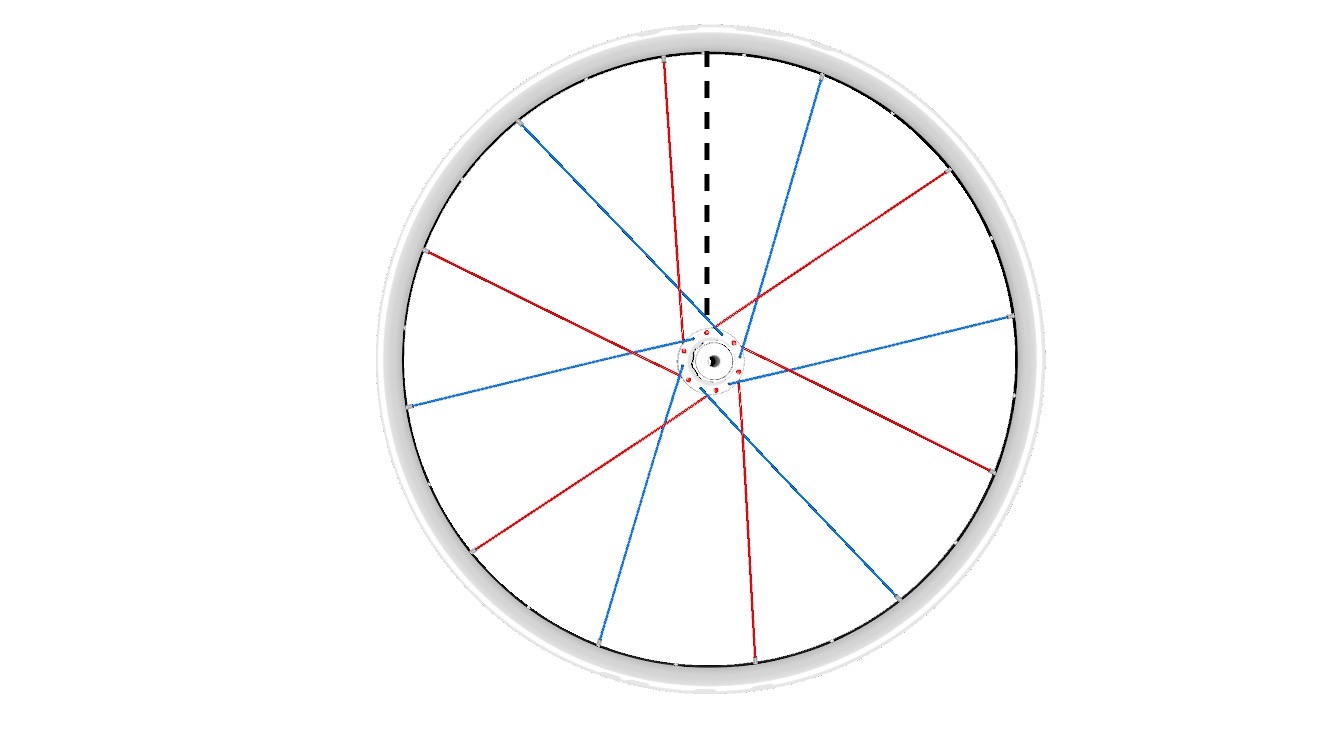
Step 3:
 I did not display the shelves in step 2 for better readability. We turn the rim, I do the same operation, but in
taking the 226mm spokes (left side). I took nuts of different colors just for the style, so
to get an alternation I used reds,
cassette side and blacks, left side. In addition, it helped me as a benchmark when uncovering.
I did not display the shelves in step 2 for better readability. We turn the rim, I do the same operation, but in
taking the 226mm spokes (left side). I took nuts of different colors just for the style, so
to get an alternation I used reds,
cassette side and blacks, left side. In addition, it helped me as a benchmark when uncovering.
Step 4:
 Idem que
previously I omitted the spokes on the other side for better readability.
I take the hub on the cassette side and turn it counterclockwise until it
blocked. The desired angle is reached in all the previous calculations. And it is with this rotation that we will refocus the logo
of the hub in front of the valve. We understand why I shifted the hub in step 1.
Idem que
previously I omitted the spokes on the other side for better readability.
I take the hub on the cassette side and turn it counterclockwise until it
blocked. The desired angle is reached in all the previous calculations. And it is with this rotation that we will refocus the logo
of the hub in front of the valve. We understand why I shifted the hub in step 1.
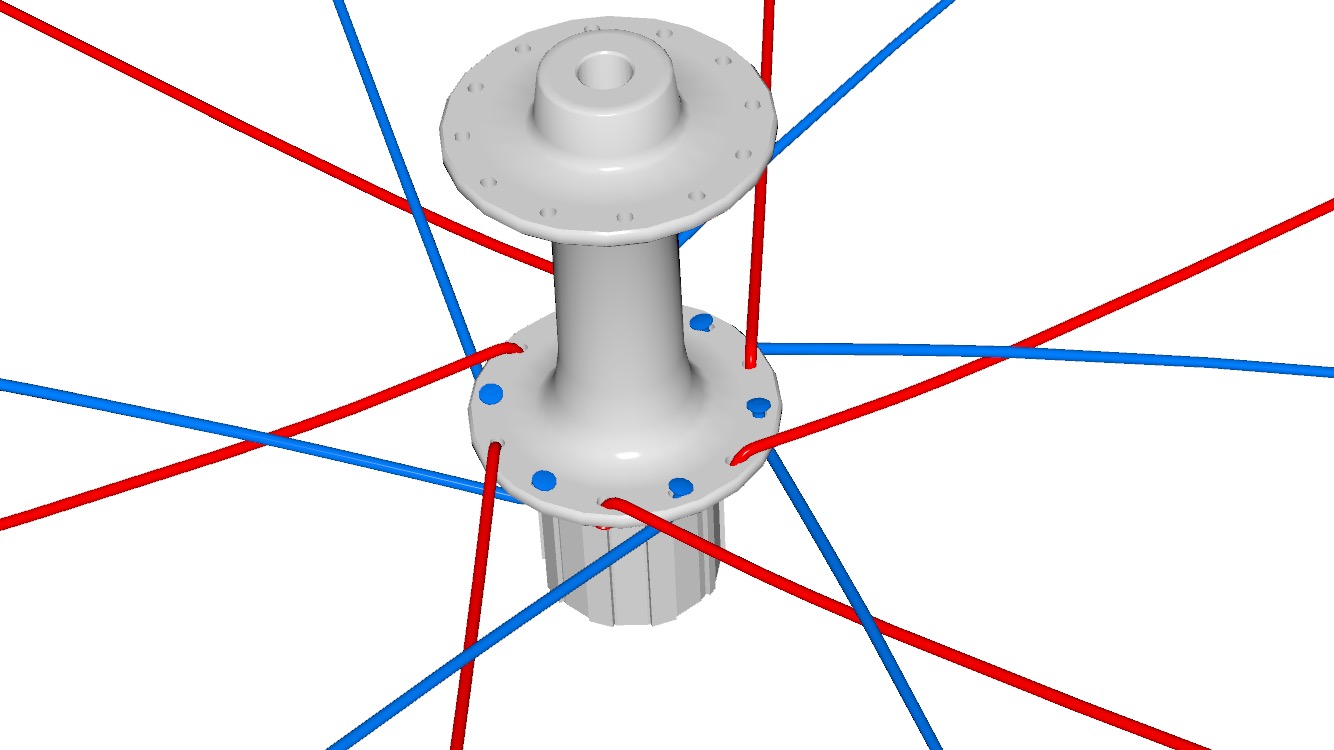
Step 5:
 I only display the shelves on the cassette side to make it easier to read. So I take again 6 rays of 222m
(cassette side) and I insert the spokes into the remaining holes, but this
this time I’m going to go inside, then make a crossing by passing below the adjacent radius to
reach (see diagram below). The spoke must join the hole in the rim as in the diagram opposite.
Now do not hesitate to bend the spoke to reach the hole. Finally always the same you just have to
tighten enough for the spoke to hold.
I only display the shelves on the cassette side to make it easier to read. So I take again 6 rays of 222m
(cassette side) and I insert the spokes into the remaining holes, but this
this time I’m going to go inside, then make a crossing by passing below the adjacent radius to
reach (see diagram below). The spoke must join the hole in the rim as in the diagram opposite.
Now do not hesitate to bend the spoke to reach the hole. Finally always the same you just have to
tighten enough for the spoke to hold.
Here is the result if I display the radii on both sides.
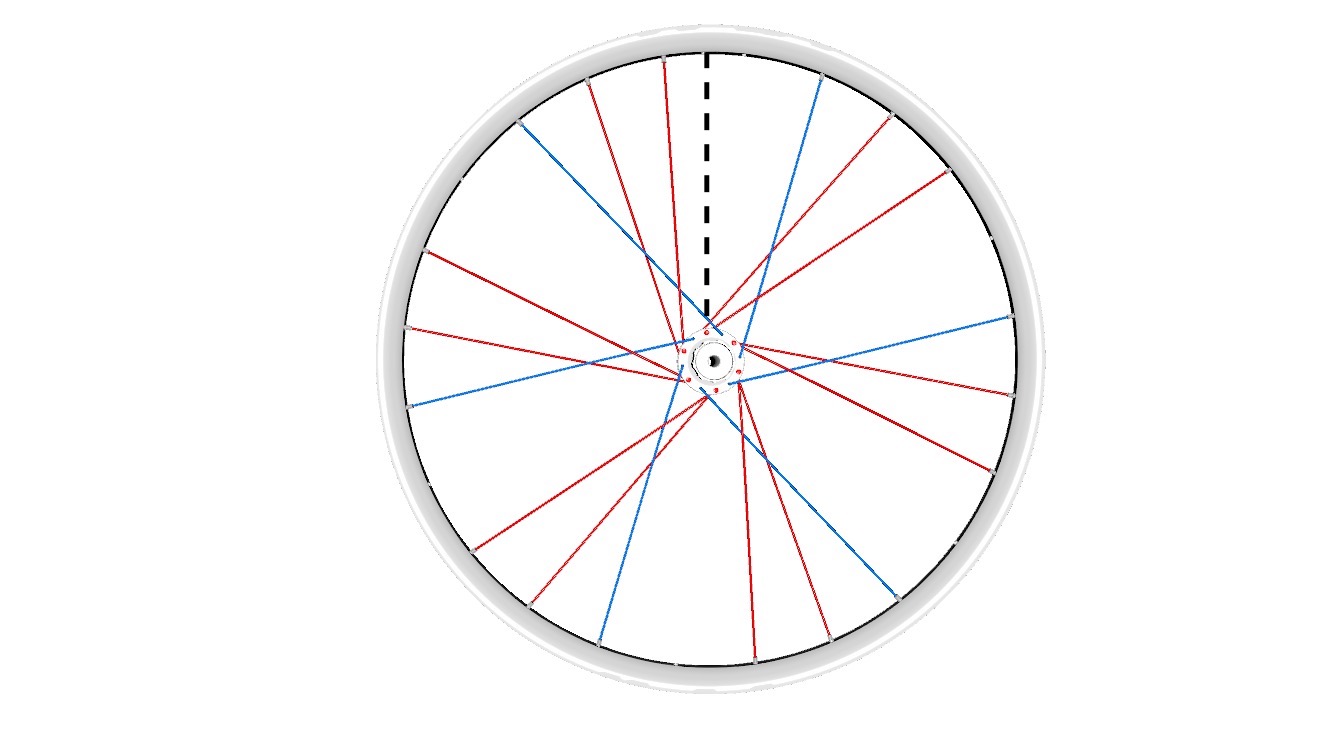
Step 6:
 Now just put the last 6 spokes in the same way, but on the left side. Here is the
wheel fully laced on each side.
Now just put the last 6 spokes in the same way, but on the left side. Here is the
wheel fully laced on each side.
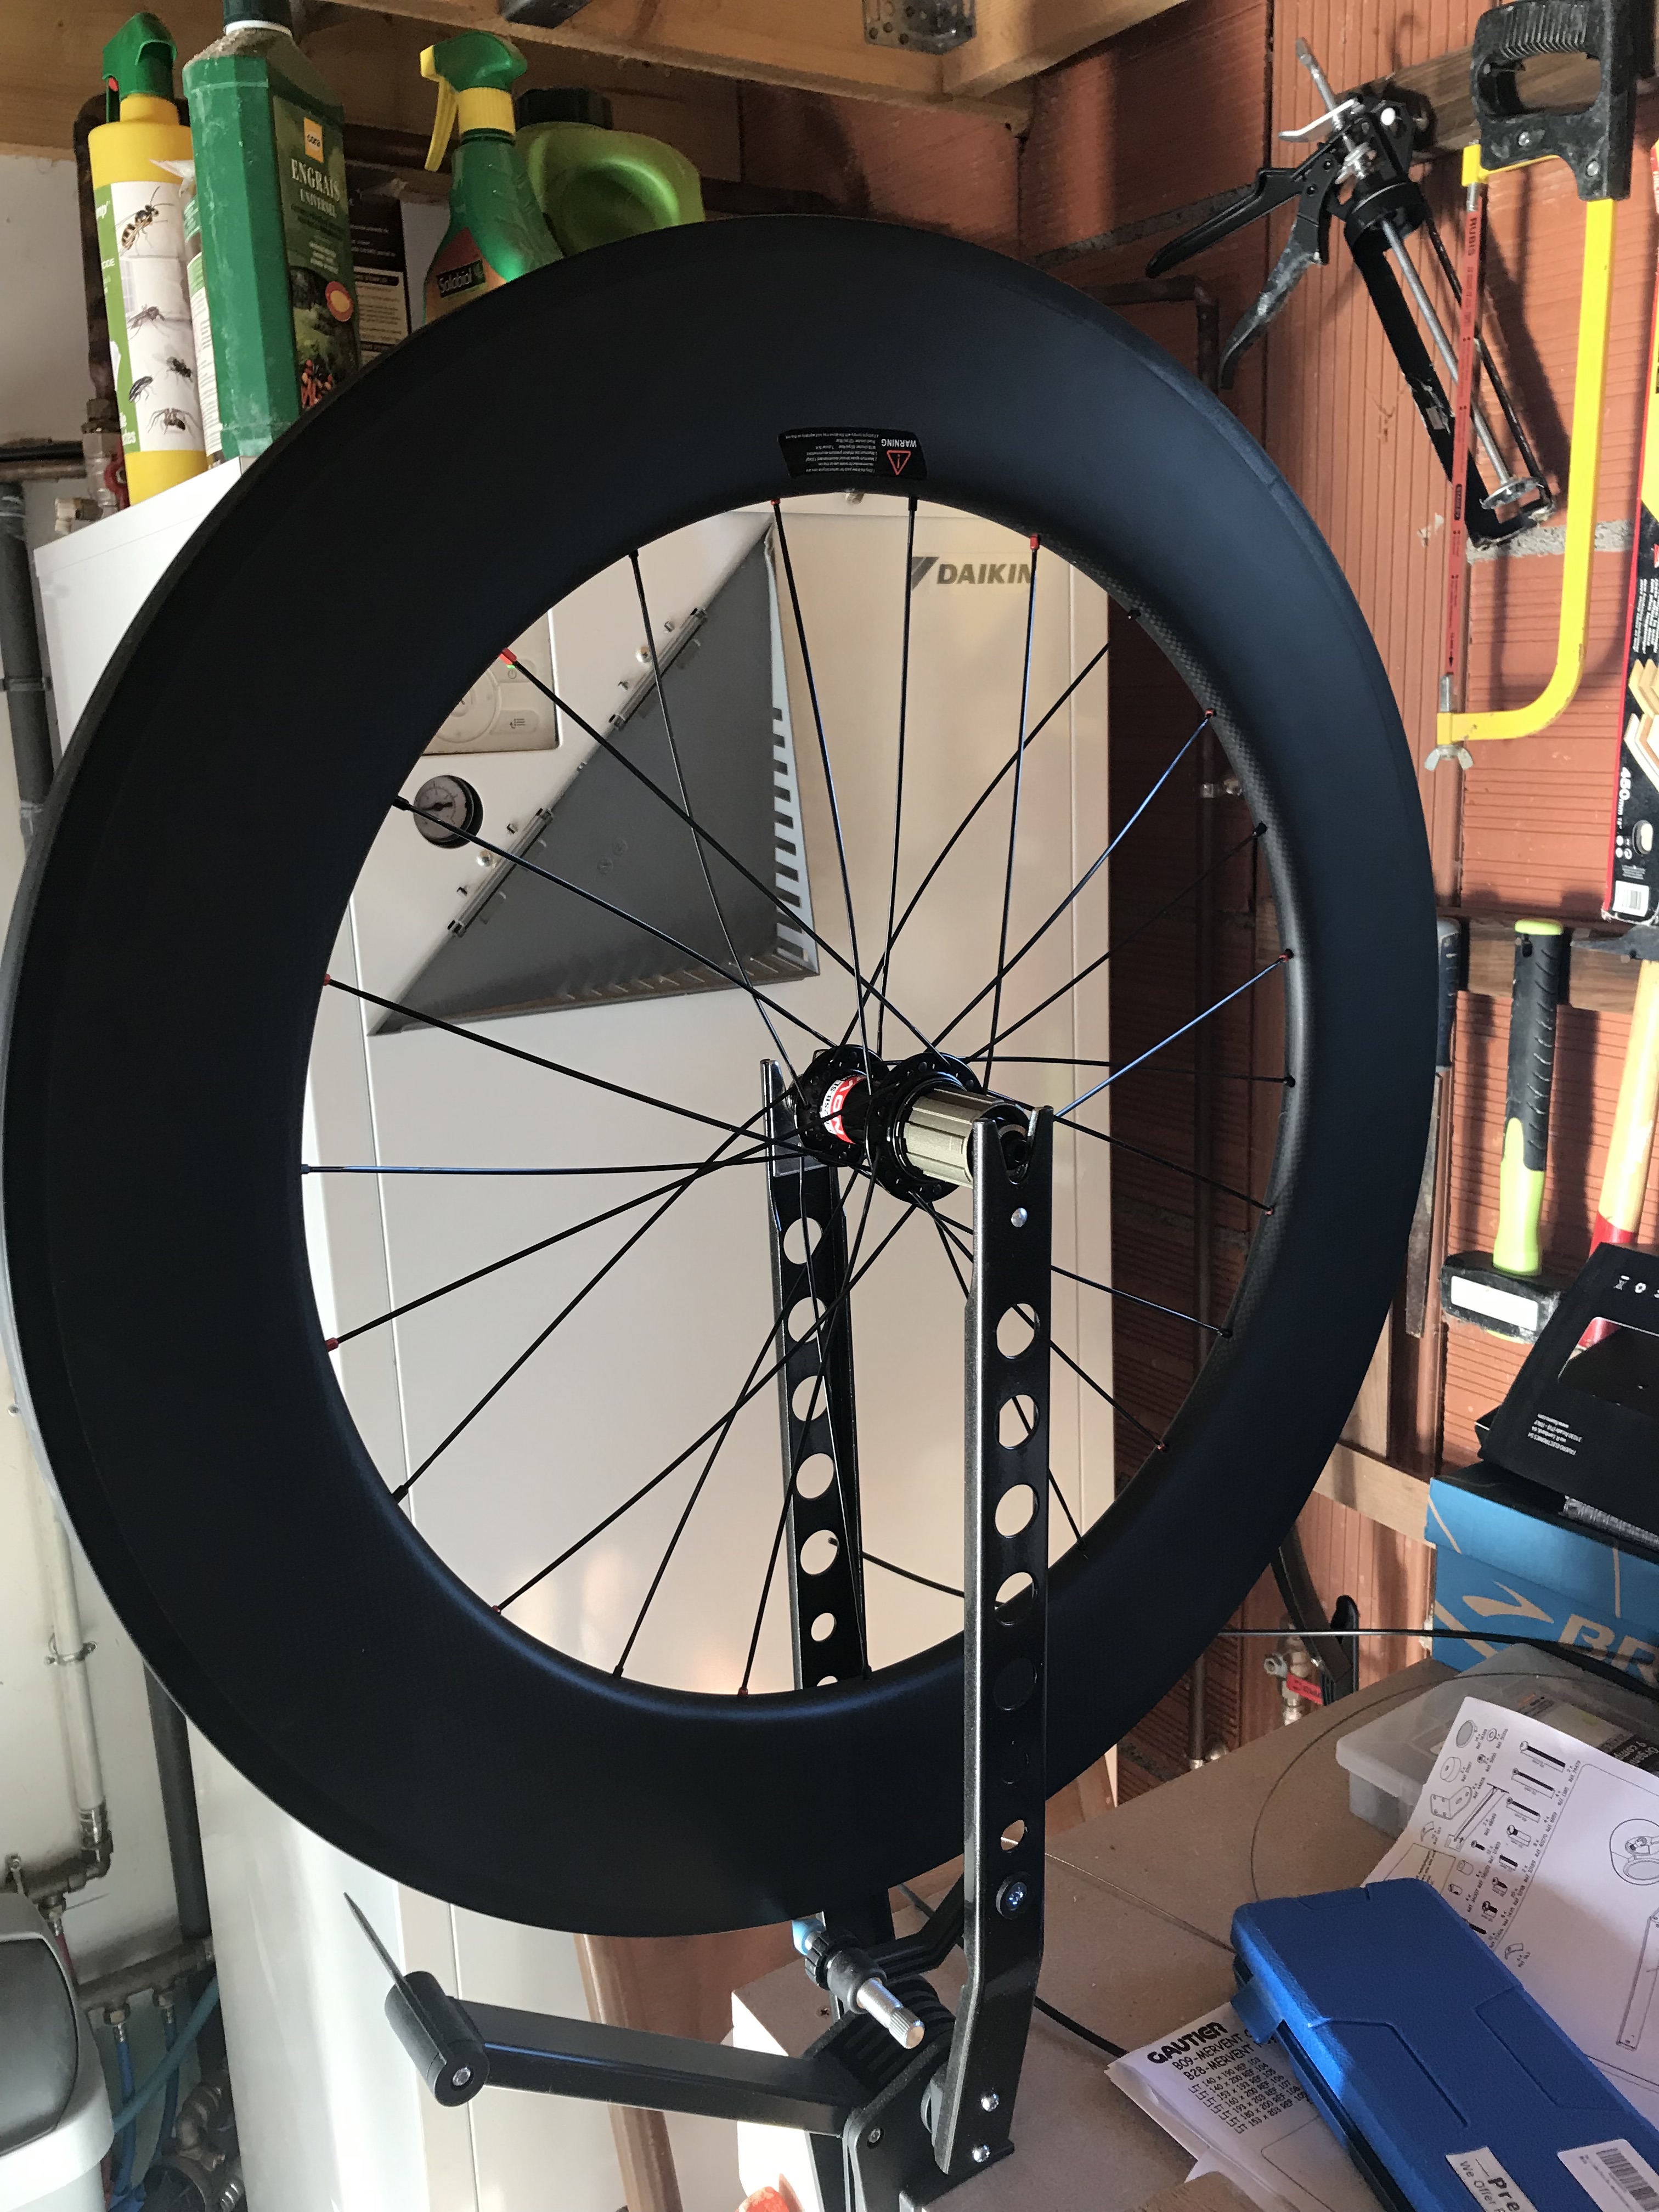
Power on and de-veiling
The wheel is ready to be unveiled and energized. I install the wheel on the center of wheel and off you go. For this part, I once again take my time, because I have no experience in this area unlike a professional who can do this very quickly. It’s a helping hand by dint of doing it. I had to start over several times before arriving at the final result, but we learn from its errors as they say. So it took me several hours to get there, but it was worth it.
Step 1
I first tightened all the spokes to the same level, I took as a reference the thread of the spoke. So I have screwed on each spoke until the thread is no longer visible.
Step 2
Using the centering gauge I check the state of my alignment. For the moment it is completely false which normal. But we can see that it will bring the hub back to the center of the rim. For this we will have to screw more the spokes on one side. So to put it simply, if I screw the spokes on the cassette side this will bring the rim back to the right (when serving the spokes it should be understood that it is the rim which moves and not the hub) and vice versa if I squeeze this from the left. So depending on the state of the alignment you have to play on the left and right spokes. So, I tighten by 2 turns of screwdriver on each spoke on the right and 1 turn for the spokes on the left side. You have to know that the more we will advance in the tensioning the more it will be necessary to limit the number of turns until making quarters for the last adjustments. If we don’t do it gradually, it will be impossible to reveal the wheel in the following steps.
Step 3
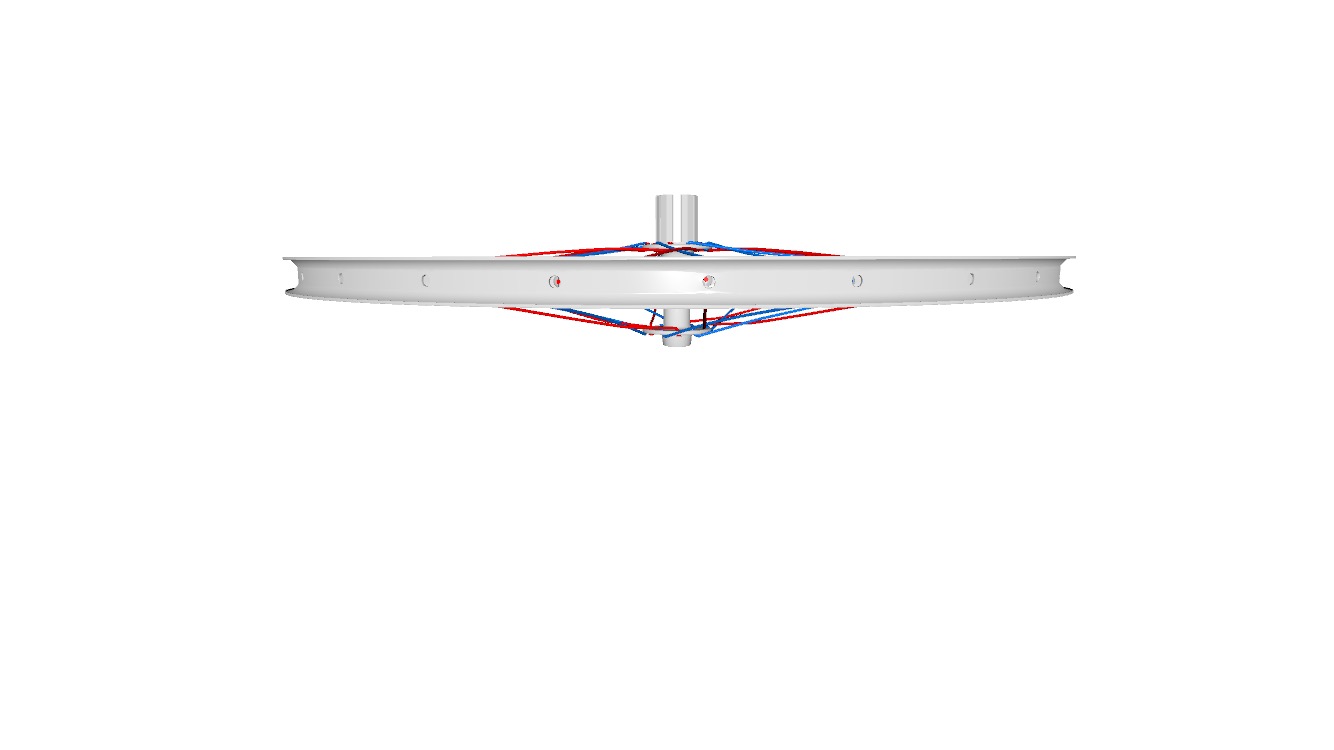
I tightened my spokes on the 2 sides in a balanced way in order to arrive at an almost correct alignment, I have 2mm error which is normal at this stage. But it is not worth continuing if the error is greater, because more the spokes will be under tension the more difficult it will be to correct an alignment error. So i checked alignment frequently throughout power up. We can see the alignment to get in the diagram below.
Here are some interesting links:
Step 4
The wheel now has a correct alignment, I will be able to continue powering up. I’m going in this step reveal the wheel. So with the centering device it’s quite simple, but you have to take your time. I used tape adhesive to put marks on the shelves that cause problems. Then like I said before if I want to bring my rim to the right, I tighten the spokes which are attached to the right part of the hub and vice versa for the other side. This also means that it is possible at this stage to have to loosen a certain radius. I do quarter turns and look at the result and iterate until I get an unveiled wheel. We can feel if some spokes are less taut than others you have to try to get a uniform tension, you can do it easily to the touch, just pressing on the spokes between them.
Step 5
The wheel is revealed and aligned, it is now necessary to finalize the tensioning. I do quarter turns on all the spokes while checking to keep the alignment and not veiling the wheel. I feel like my wheel is starting to be well, just by touch you feel they are good. It is normal for the spokes on the right side to be more tense than this left by the geometry of the hub. It is especially important that the tension, cassette side is good on all the rays, because it is on this side that the forces will be the most stressed. I finally use a blood pressure monitor to check that I have an equivalent tension for all the spokes on each side. For the voltage level there there are several schools, some people just use touch or sound, when you pinch the shelves and others use the voltage value. I admit that the touch method is enough, because you have to know that too tight rays will not bring no more rigidity and on the contrary tired the radius more quickly. Obviously a radius that is not tight enough will also have consequences on the longevity of the spokes and resistance to the weight of the cyclist and to the constraints of the road. So you have to find the right compromise, I made the touch and then check with the blood pressure monitor to see what it was worth. But I did not put the exact tension indicated for my weight.
Assembly
The bare wheel is ready, it is now possible to assemble the elements so that it can join the road and attach it to the frame of the bike. I’m not going to detail what I did, because it would be “reinventing the wheel”, here are Youtube videos that correspond to what I did.
Installation of the valve extension.
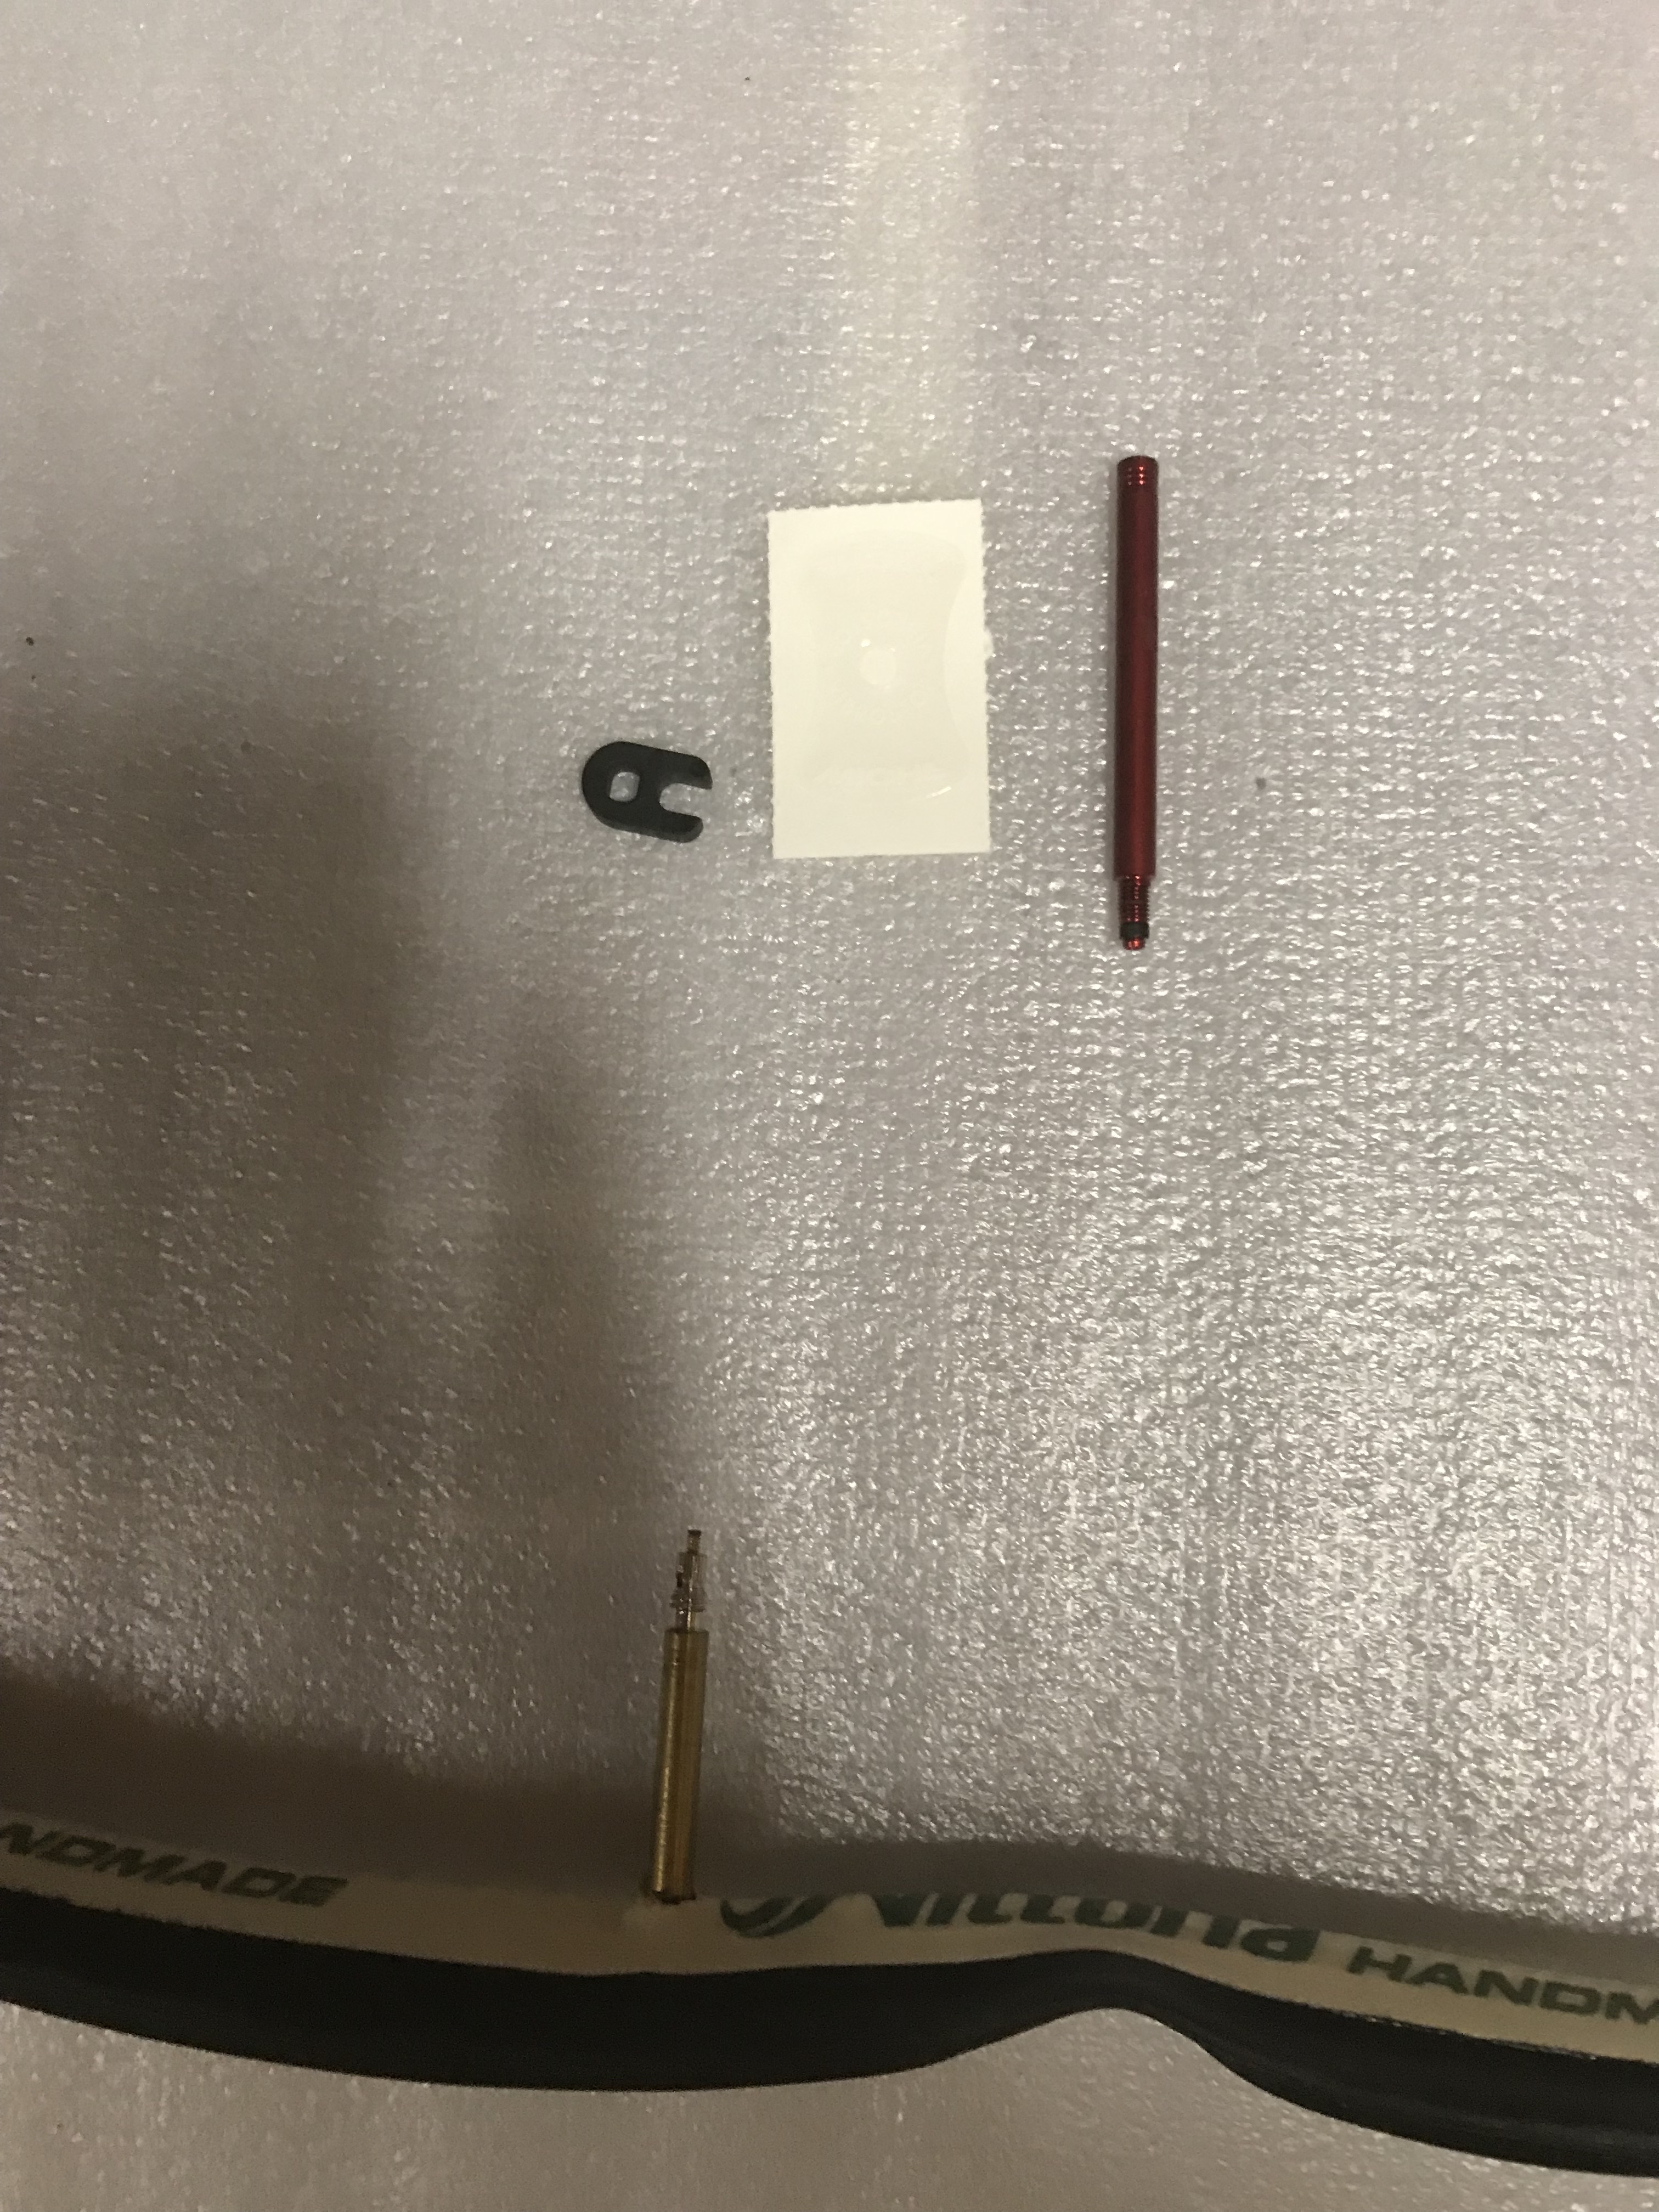
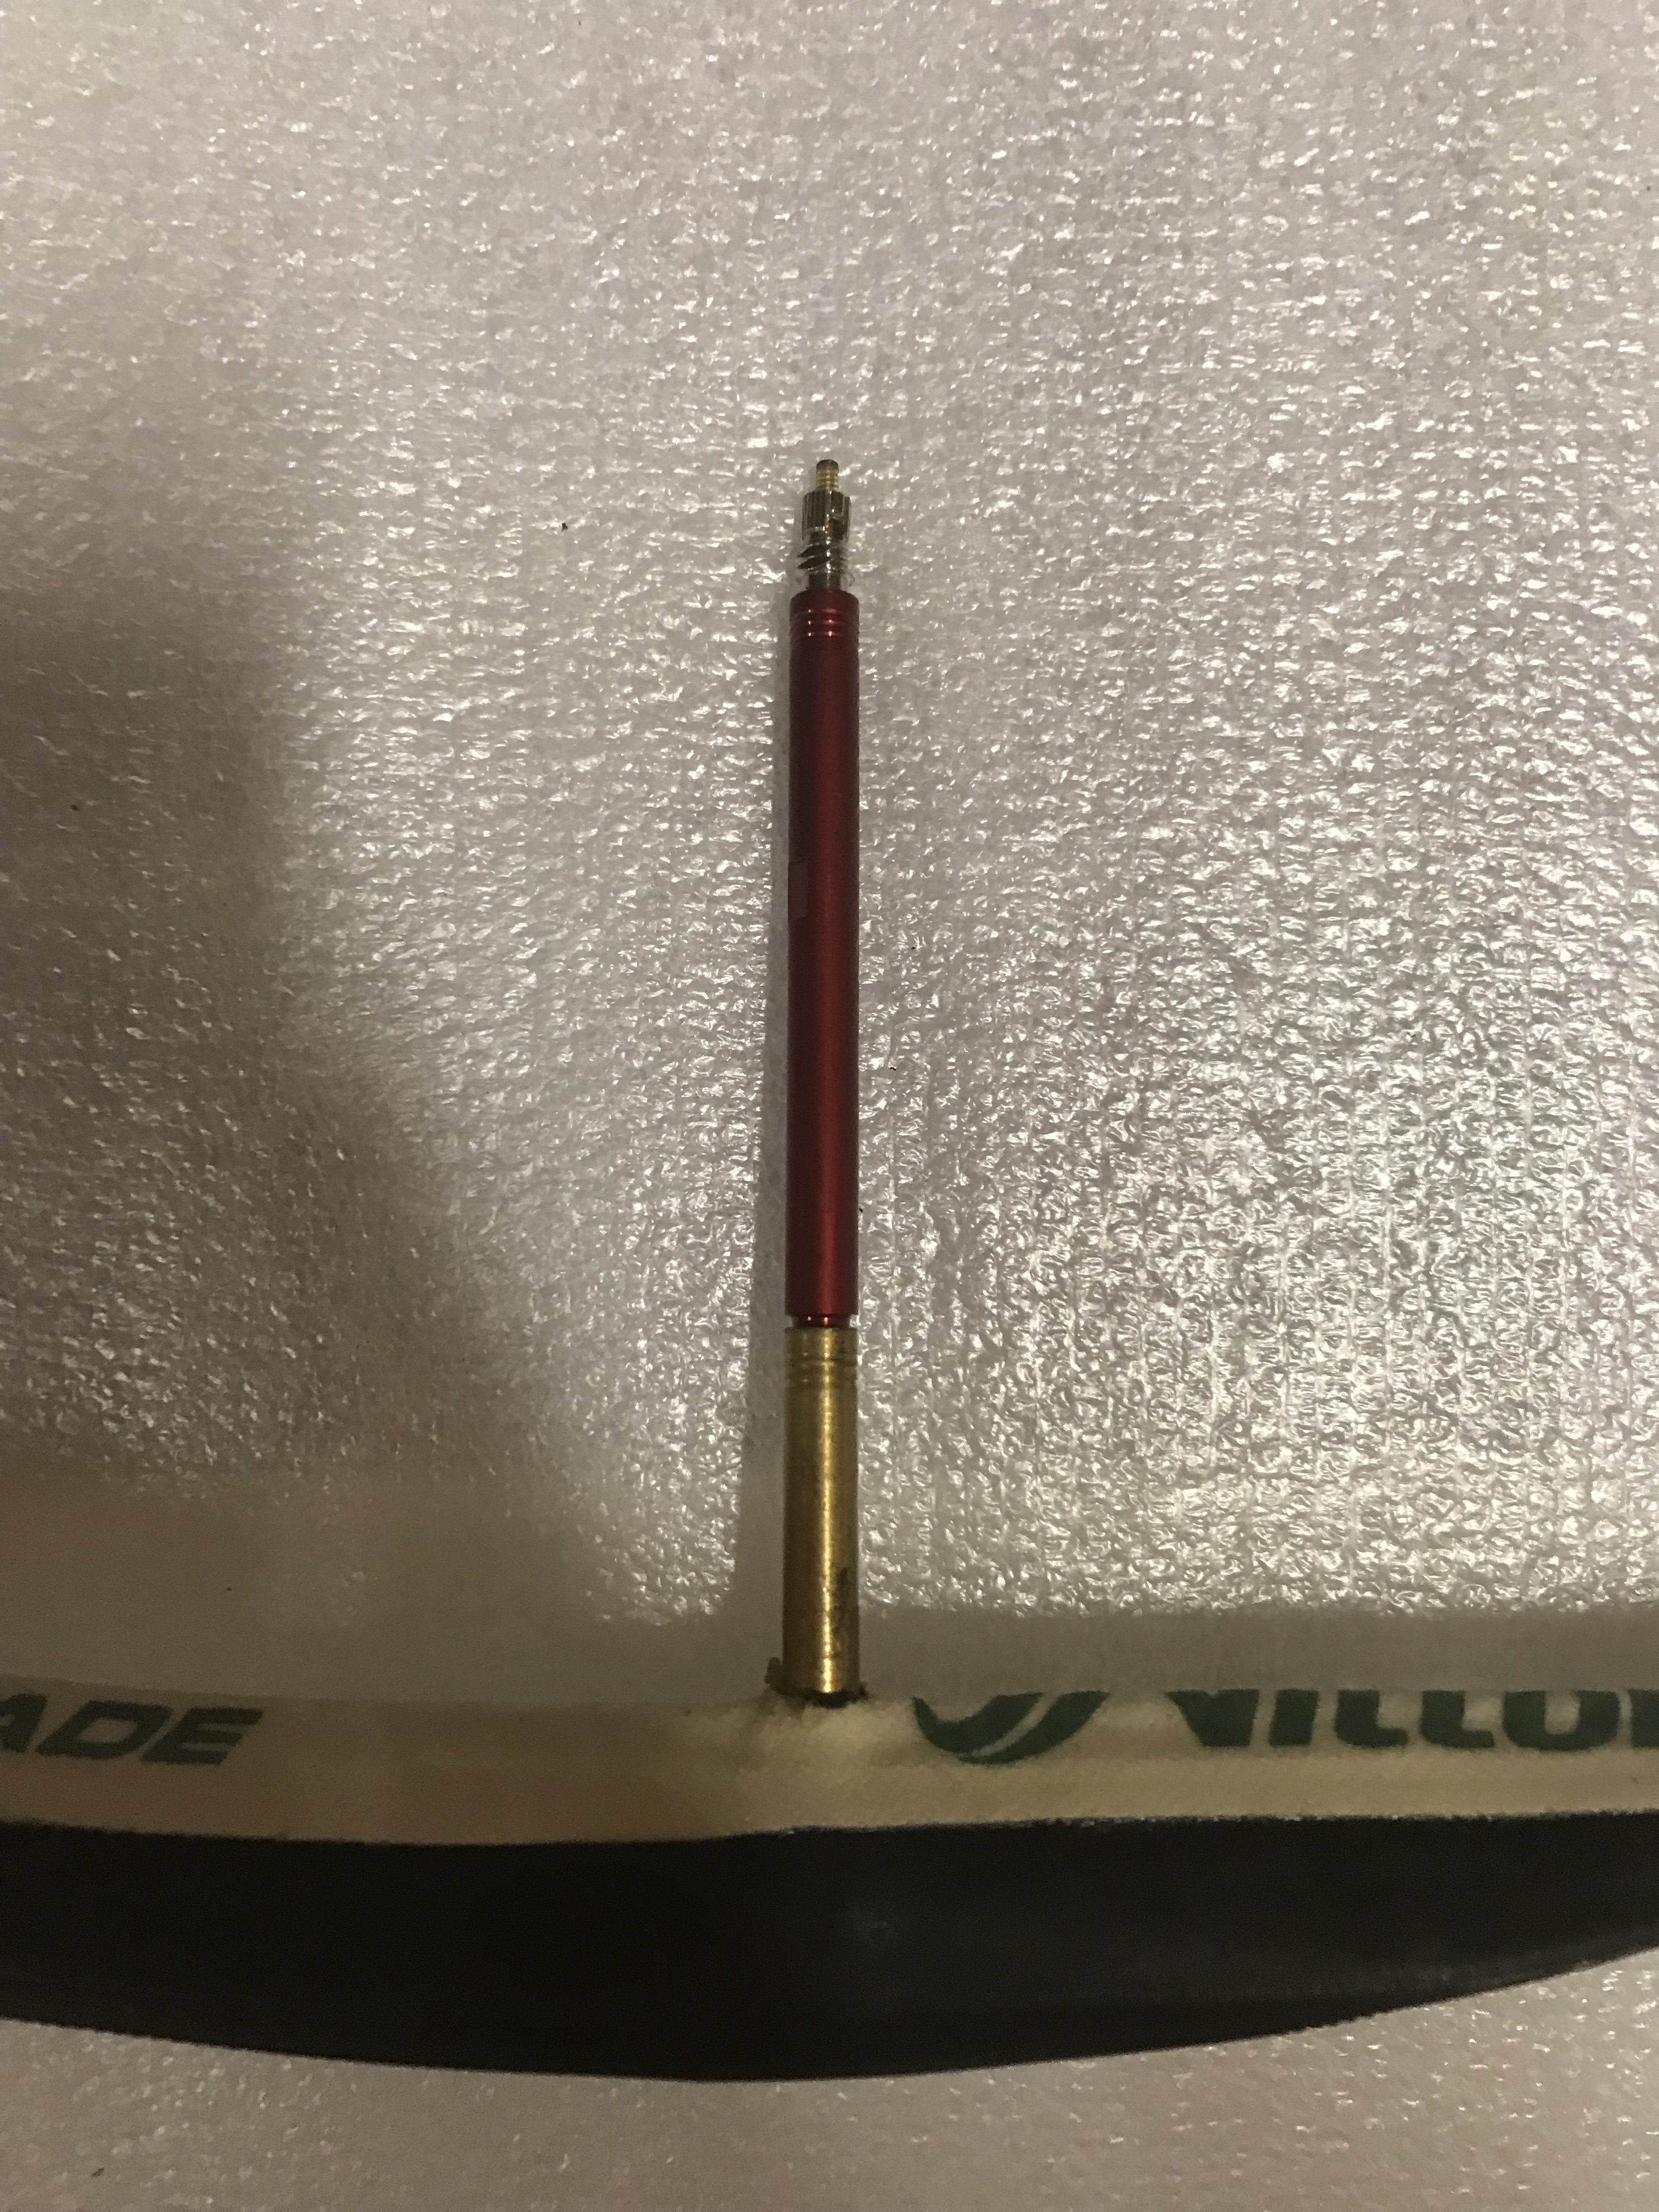
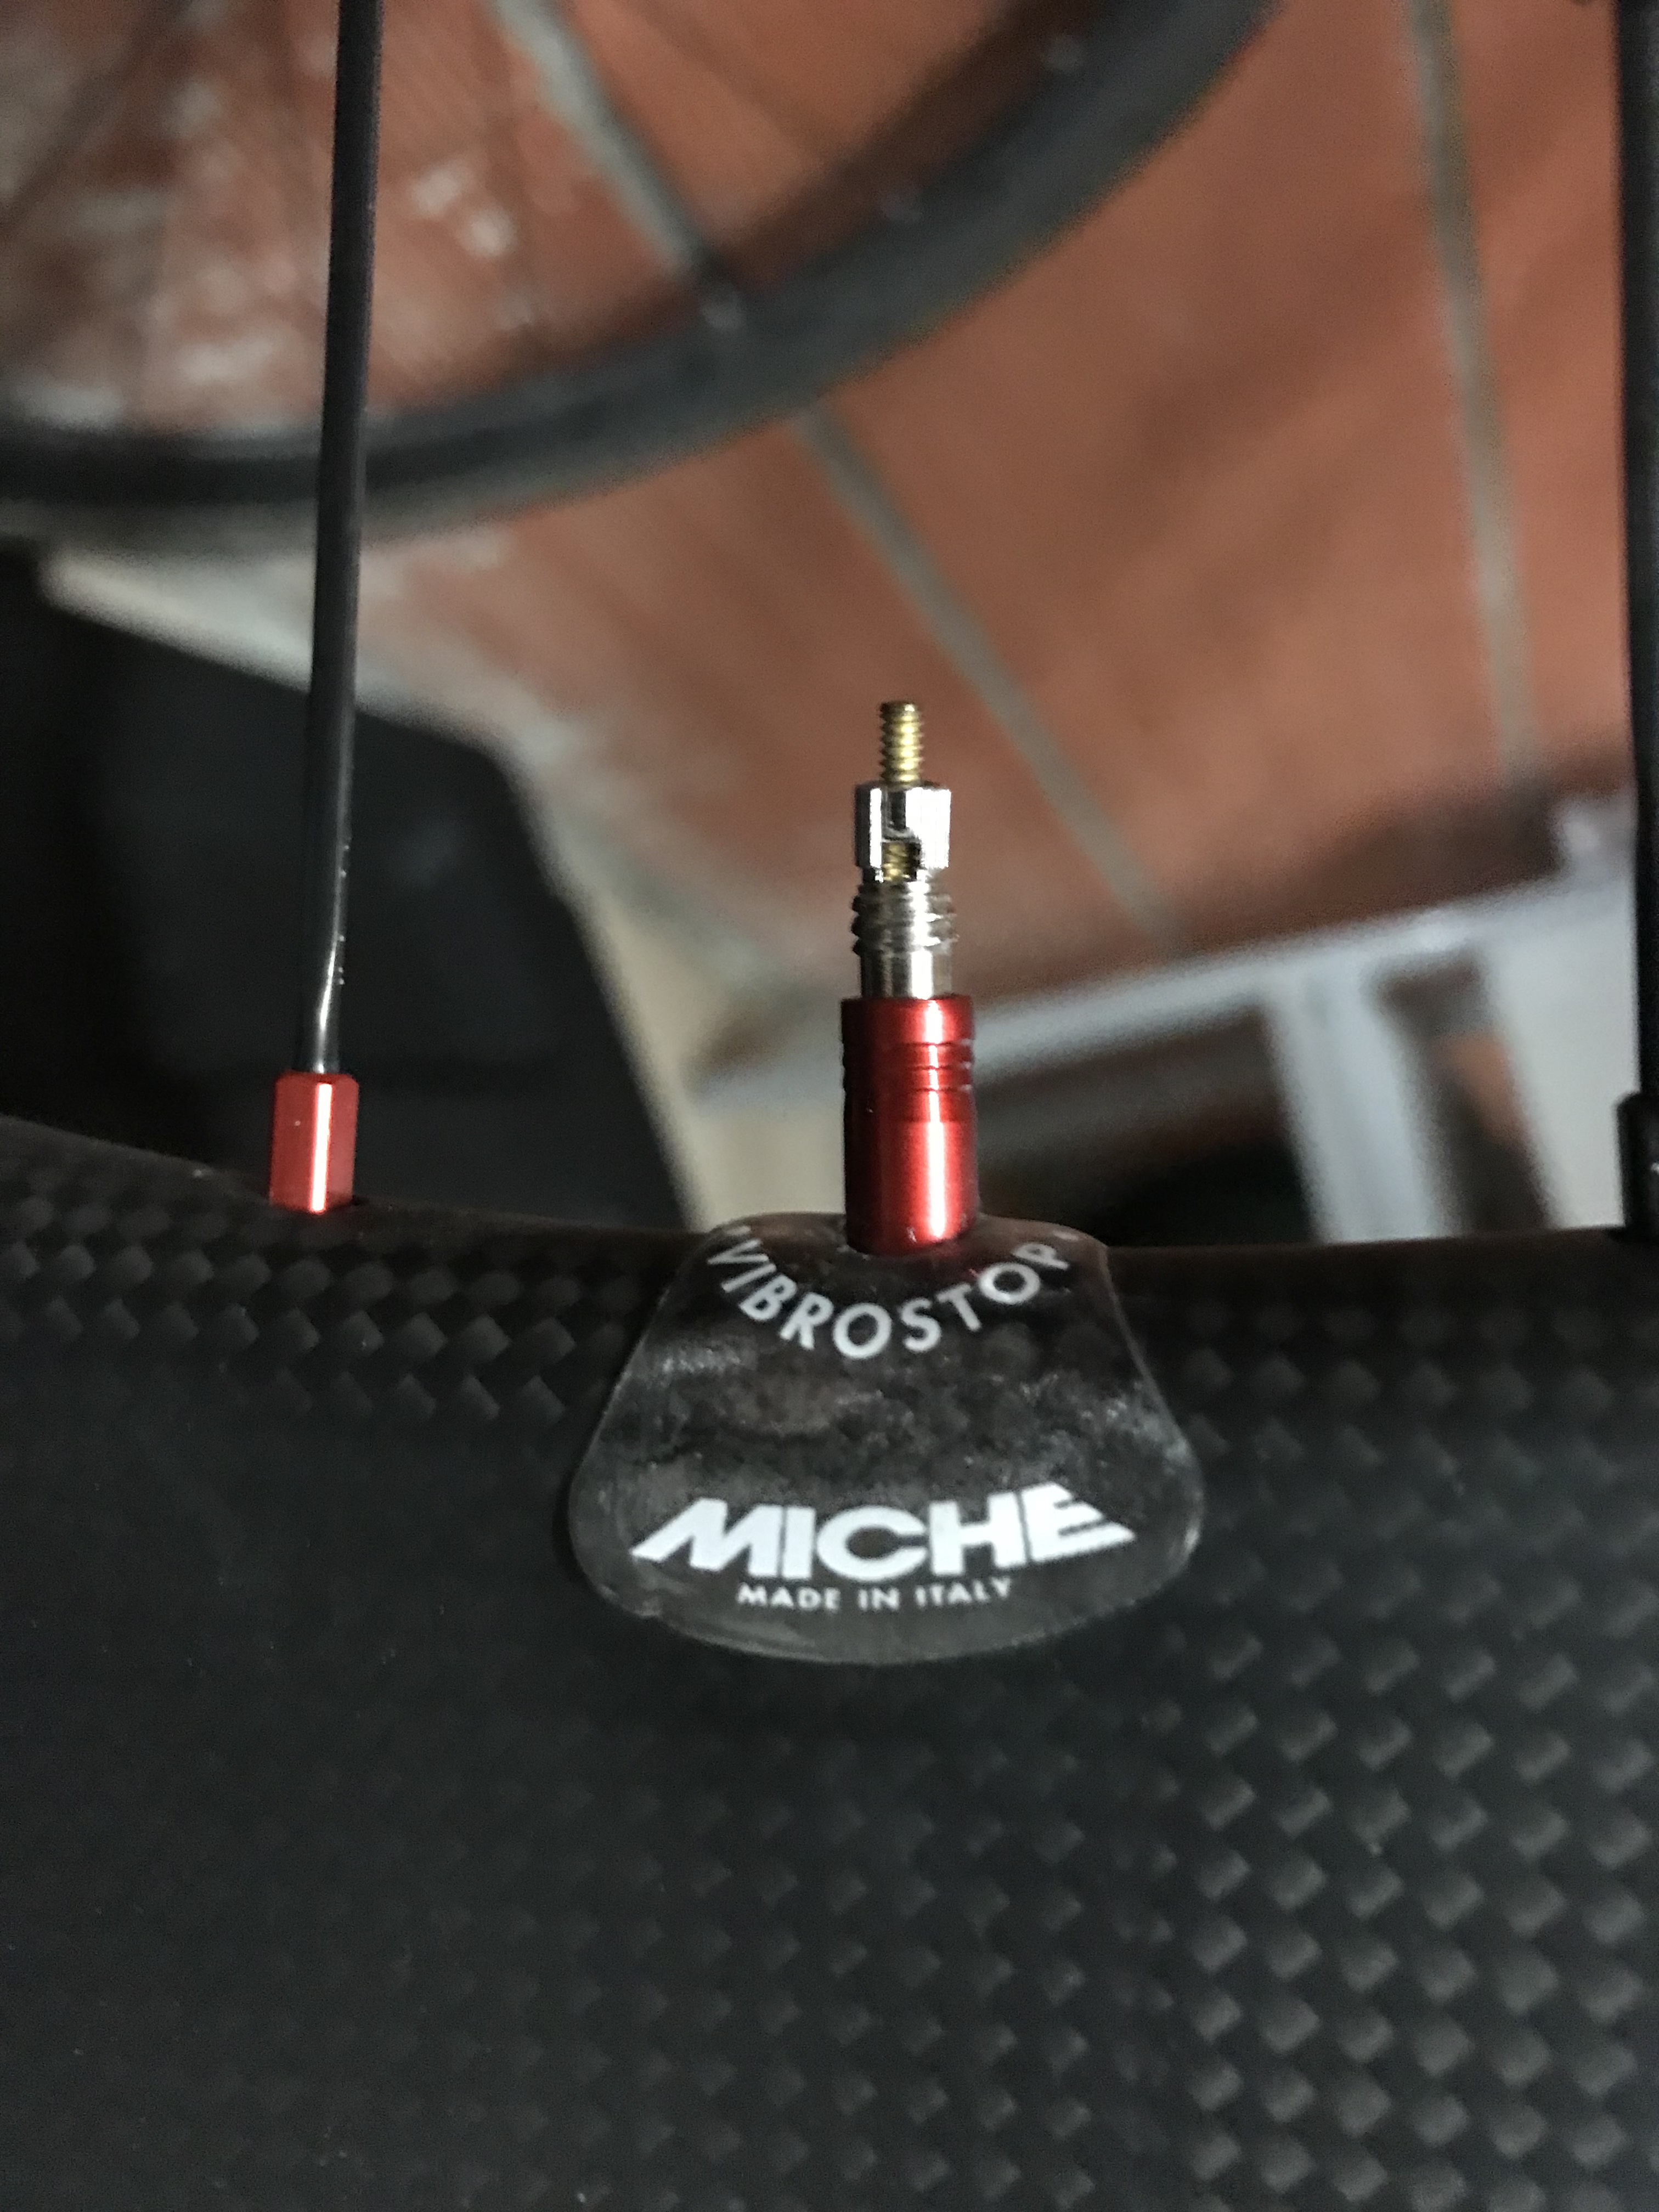
- A small key is often delivered with the valve extenders in order to remove the obu easily
- There are anti-vibrators to stick on so that the valve does not vibrate on the rim while driving. Indeed, unlike an inner tube valve which will not move when pressurized, on a hose it is different the more rigid hose does not allow this. Miche valve extenders directly contain their anti-vibrators who are top. Otherwise it is possible to put on just a free adhesive tape, but less aesthetic.
Gluing the hose
[Hose bonding] (https://www.youtube.com/watch?v=R7_9_BGsdGo)
- I have an old rim that I collected in a recycling center that I mainly use to spread my casings before gluing.
- I sand the rim to remove the old glue or when the rim is new to make it a little rough so that the glue sticks more easily.
- I use gasoline F to clean my rim to remove all the excess glue residue.
Cassette
[Installation of a cassette] (https://www.youtube.com/watch?v=9KAaP7pbFV0)
 {: .align-center: height = “320px” width = “320px”}
- I take advantage of the change of cassette to properly clean and degrease it.
Pressurization
It is time to inflate the hose, I put 9-10Bars in general. It all depends on the limit indicated by the brand and what is recommended by the rim. But the more pressure we can put, the less grip the hose will have with the ground therefore less friction and therefore more speed for the same effort provided. The only compromise is that the more pressure you have the more you lose comfort, because the slightest shock will be passed on to the cyclist. With less than pressure shock is more absorbed by the hose. Again, a compromise to be made.
Quick hitch
For quick couplers, I did not buy new ones, I use the same for all my wheels it is not binding to interchange. It is still important to have a good pair of quick couplers especially in terms lightness, because it is easy to weigh down the wheel by taking the low end, it would be a shame to lose grams gained on the hub and rim …
Brake pad
Since on a tubular rim the braking will be done directly on the tubular unlike on rims tire where an Alu circle is added. So you need special brake pads, I use SwissStop Flash Pro that works on all types of rims, which is handy when I put my wheels on tires.
First test and adjustments
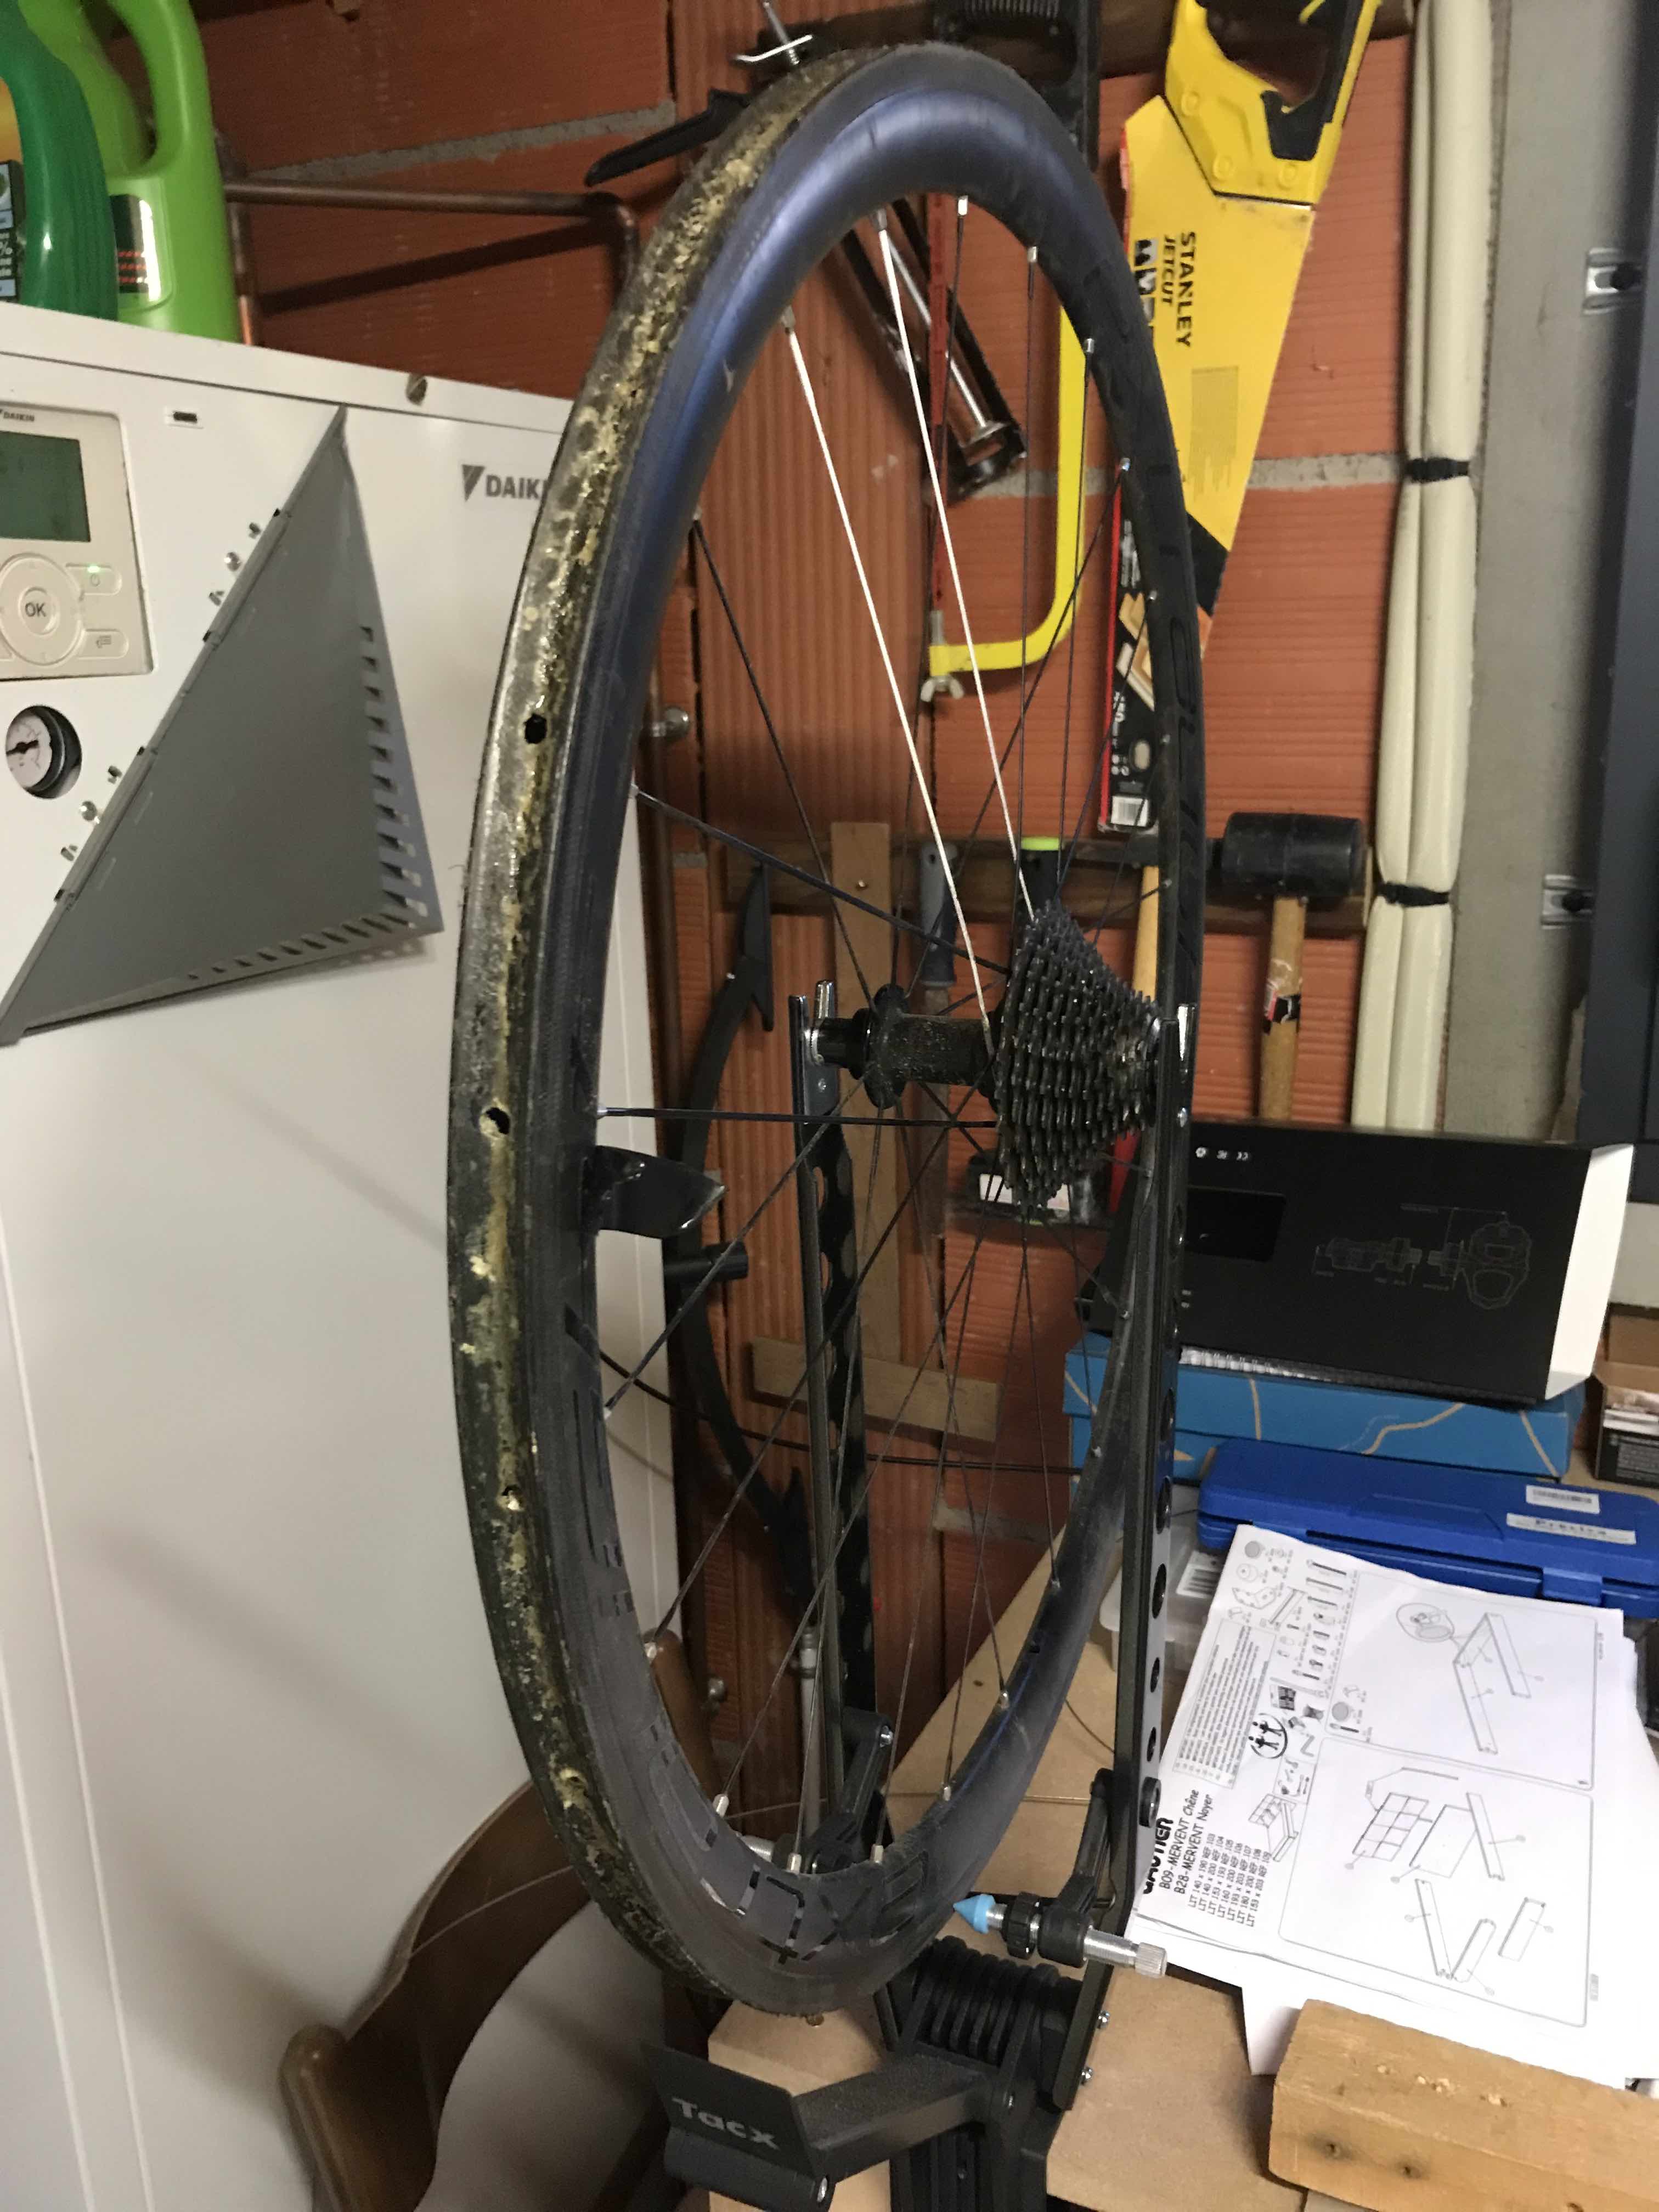
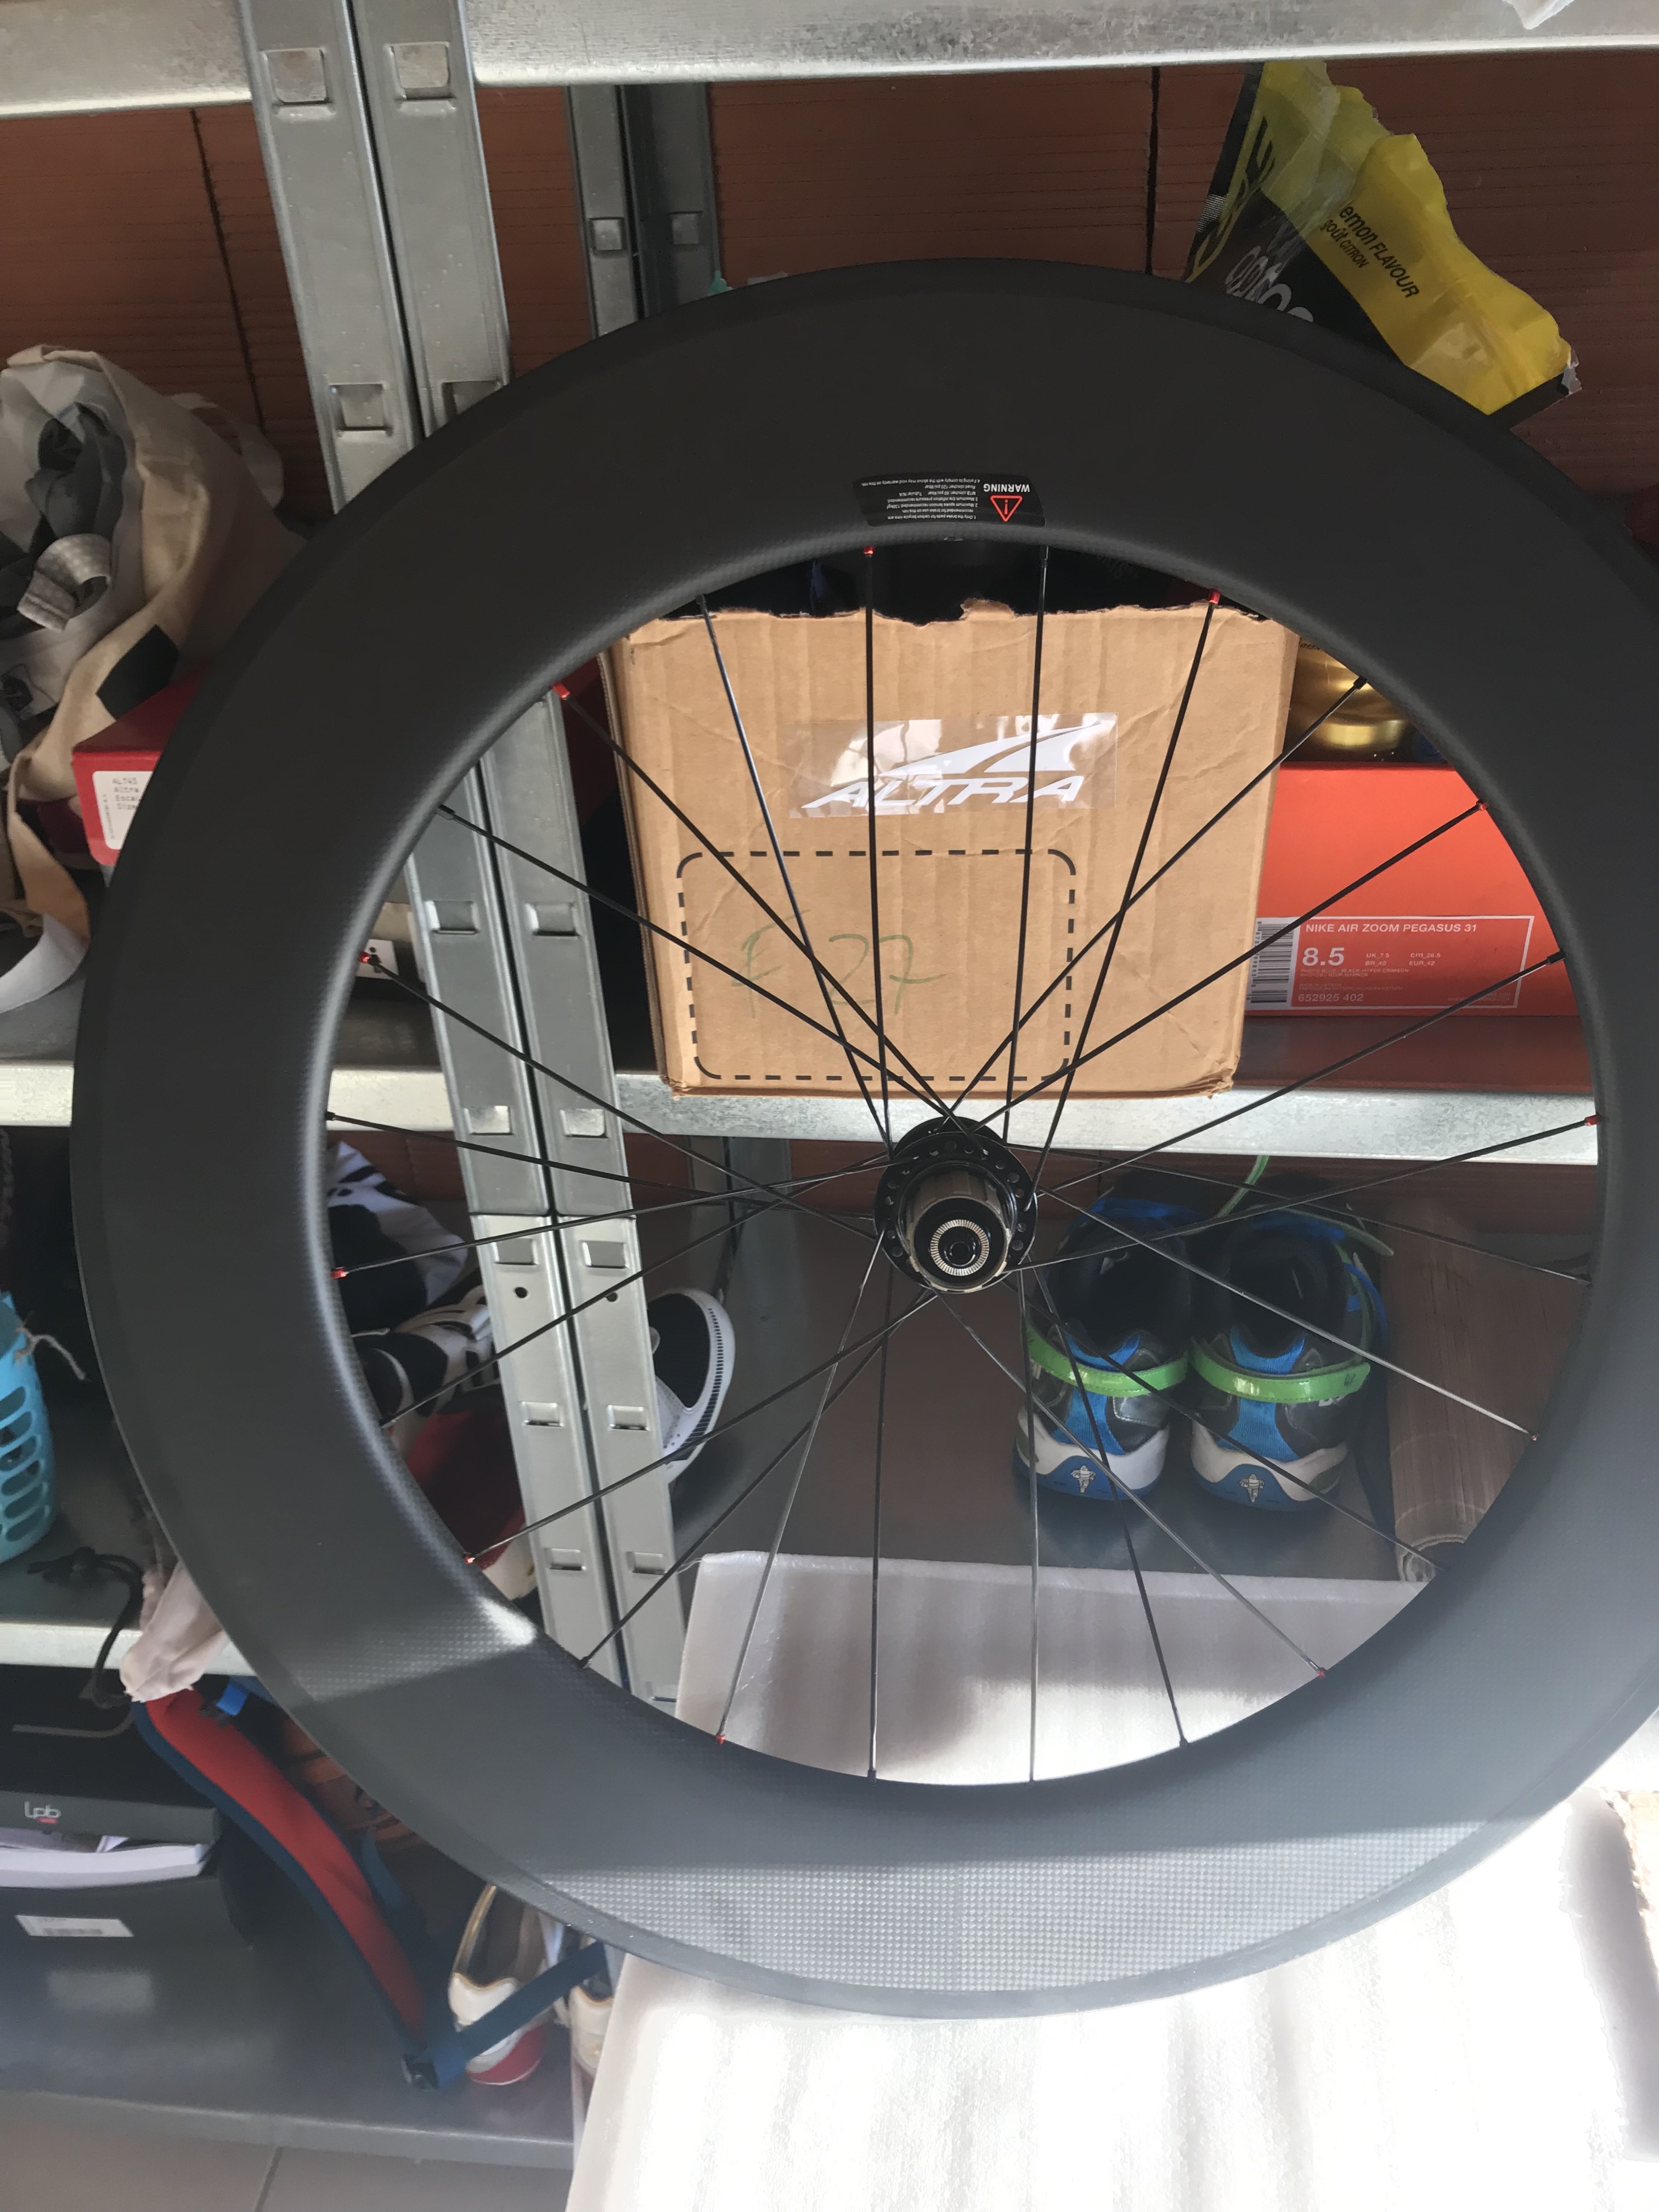
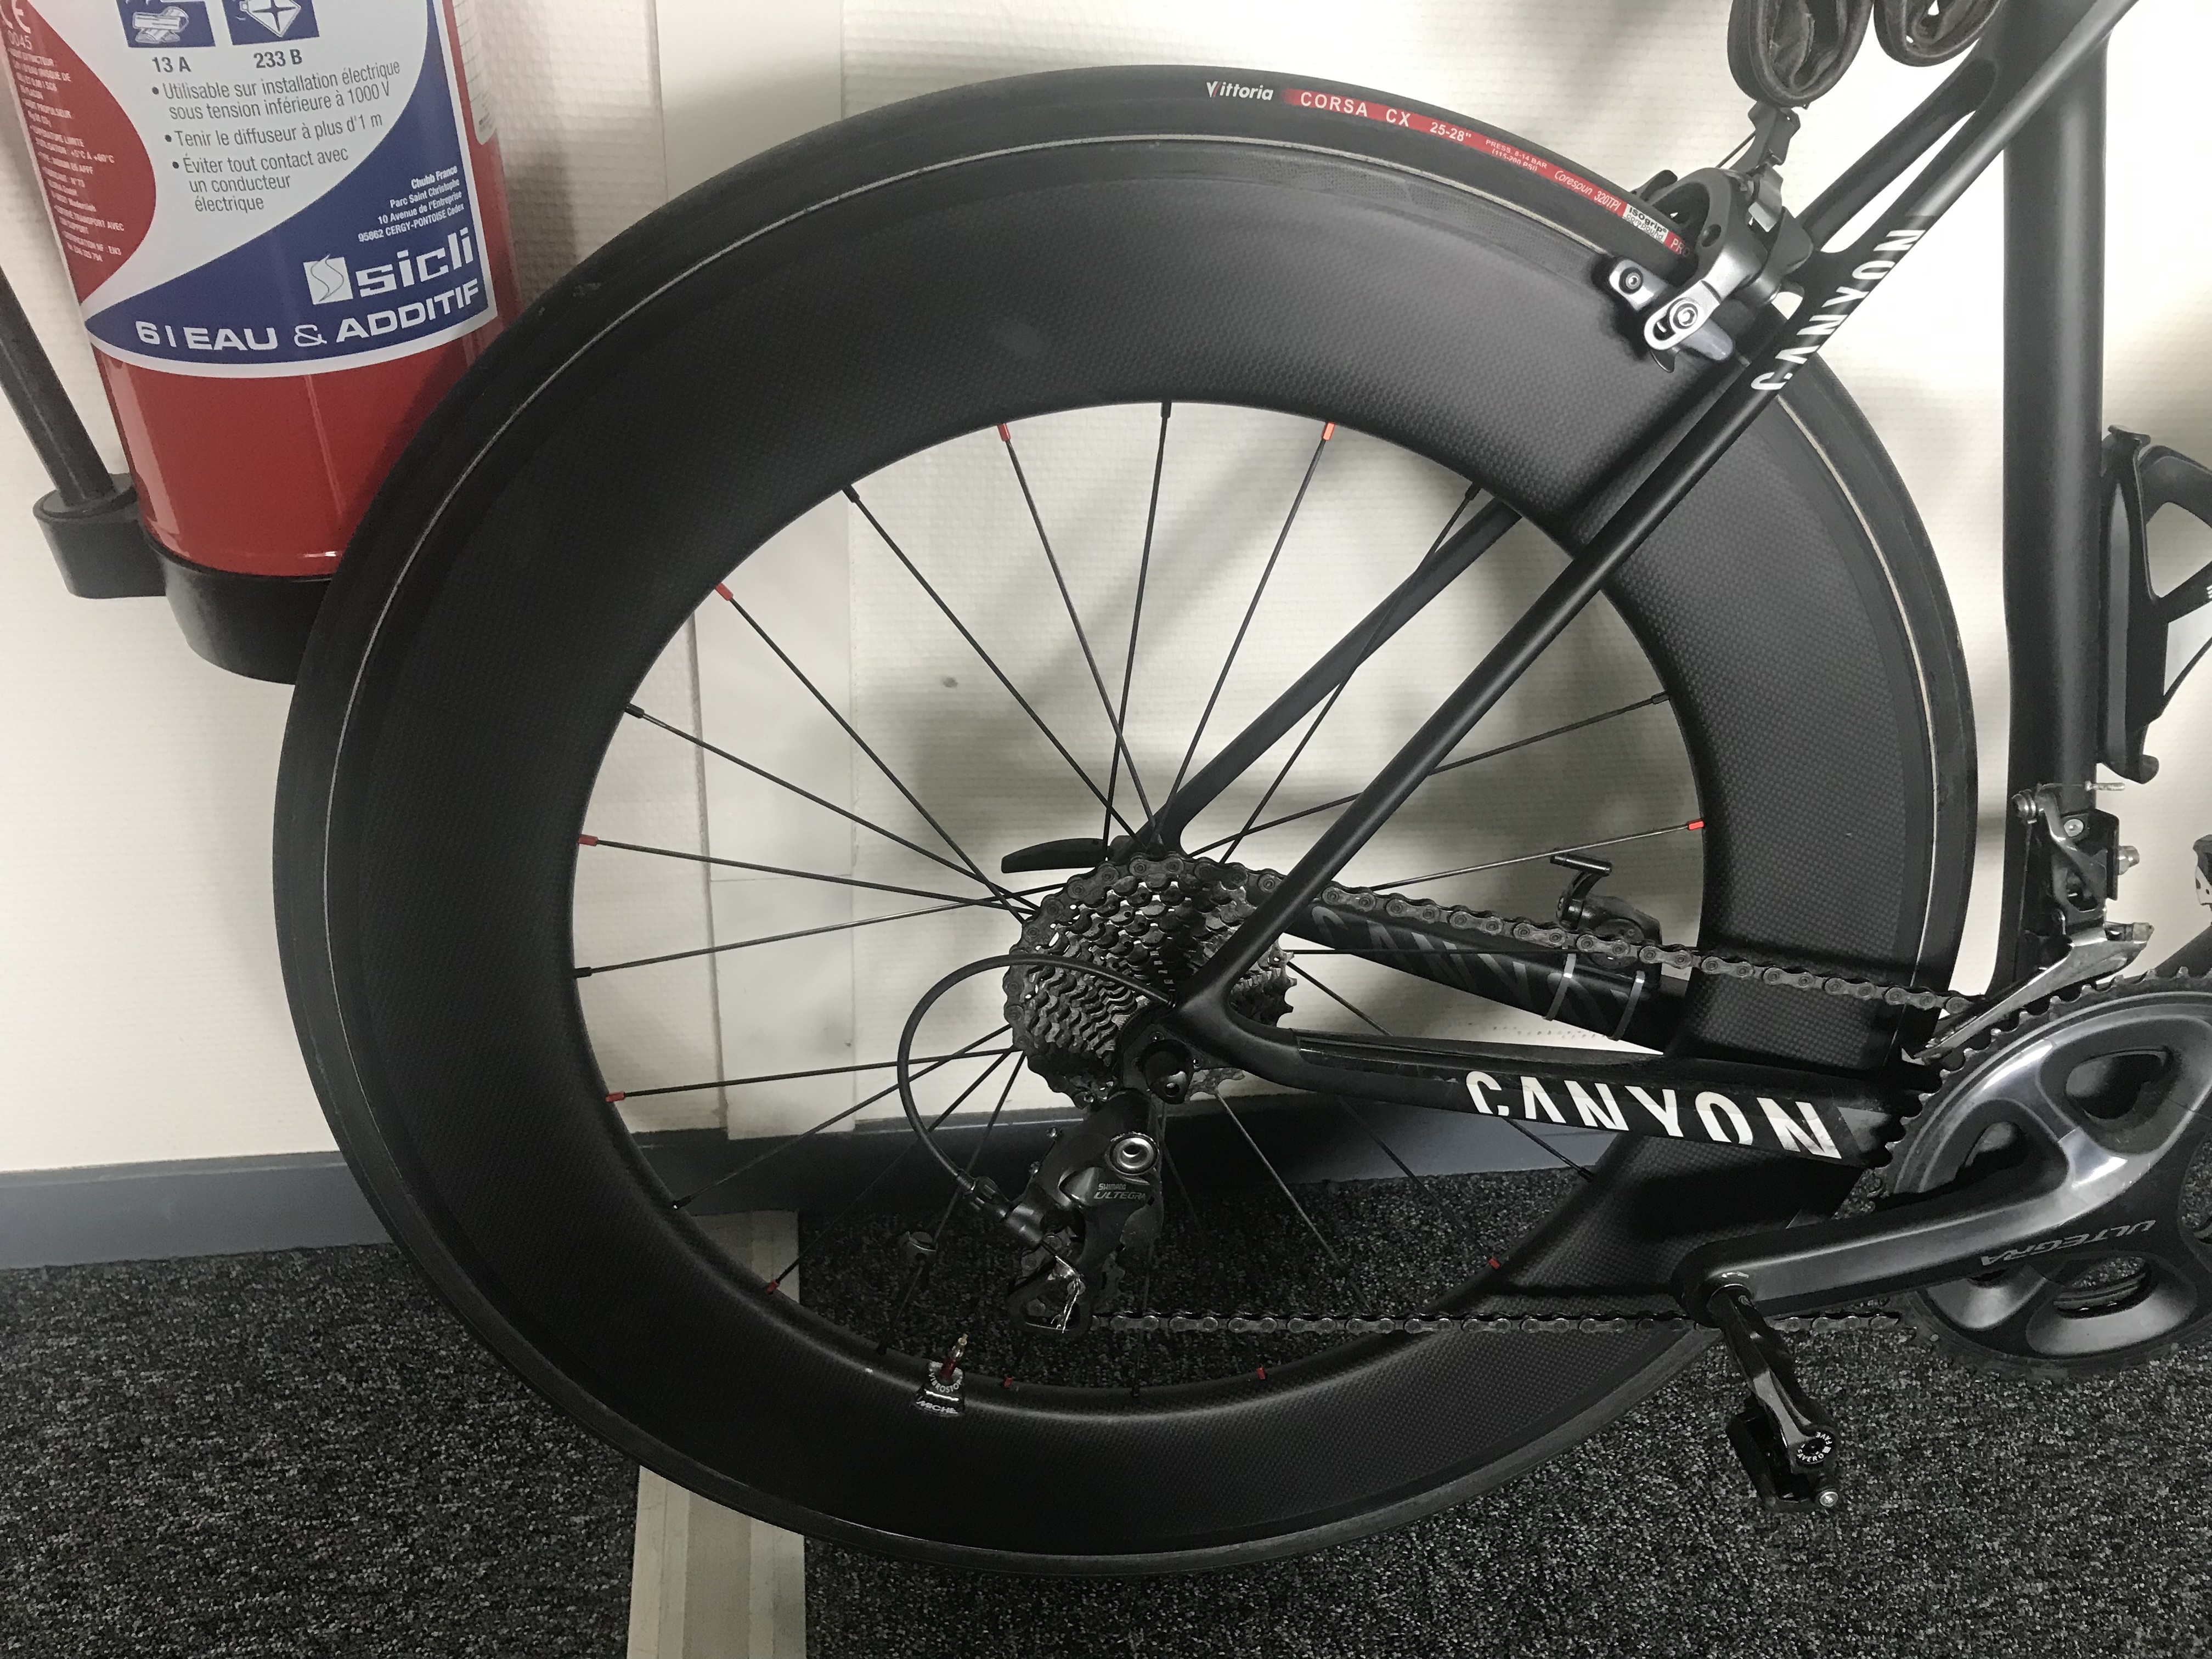
Since I opted for a 25mm wide wheel, I need to move my brake caliper aside a bit so that my wheel can pass. My caliper is compatible with rims up to 28mm so no problem but it can be verified before to buy. It is quite easy with an Allen key, it is quickly settled. I install the wheel without problem and here is the result in image below.
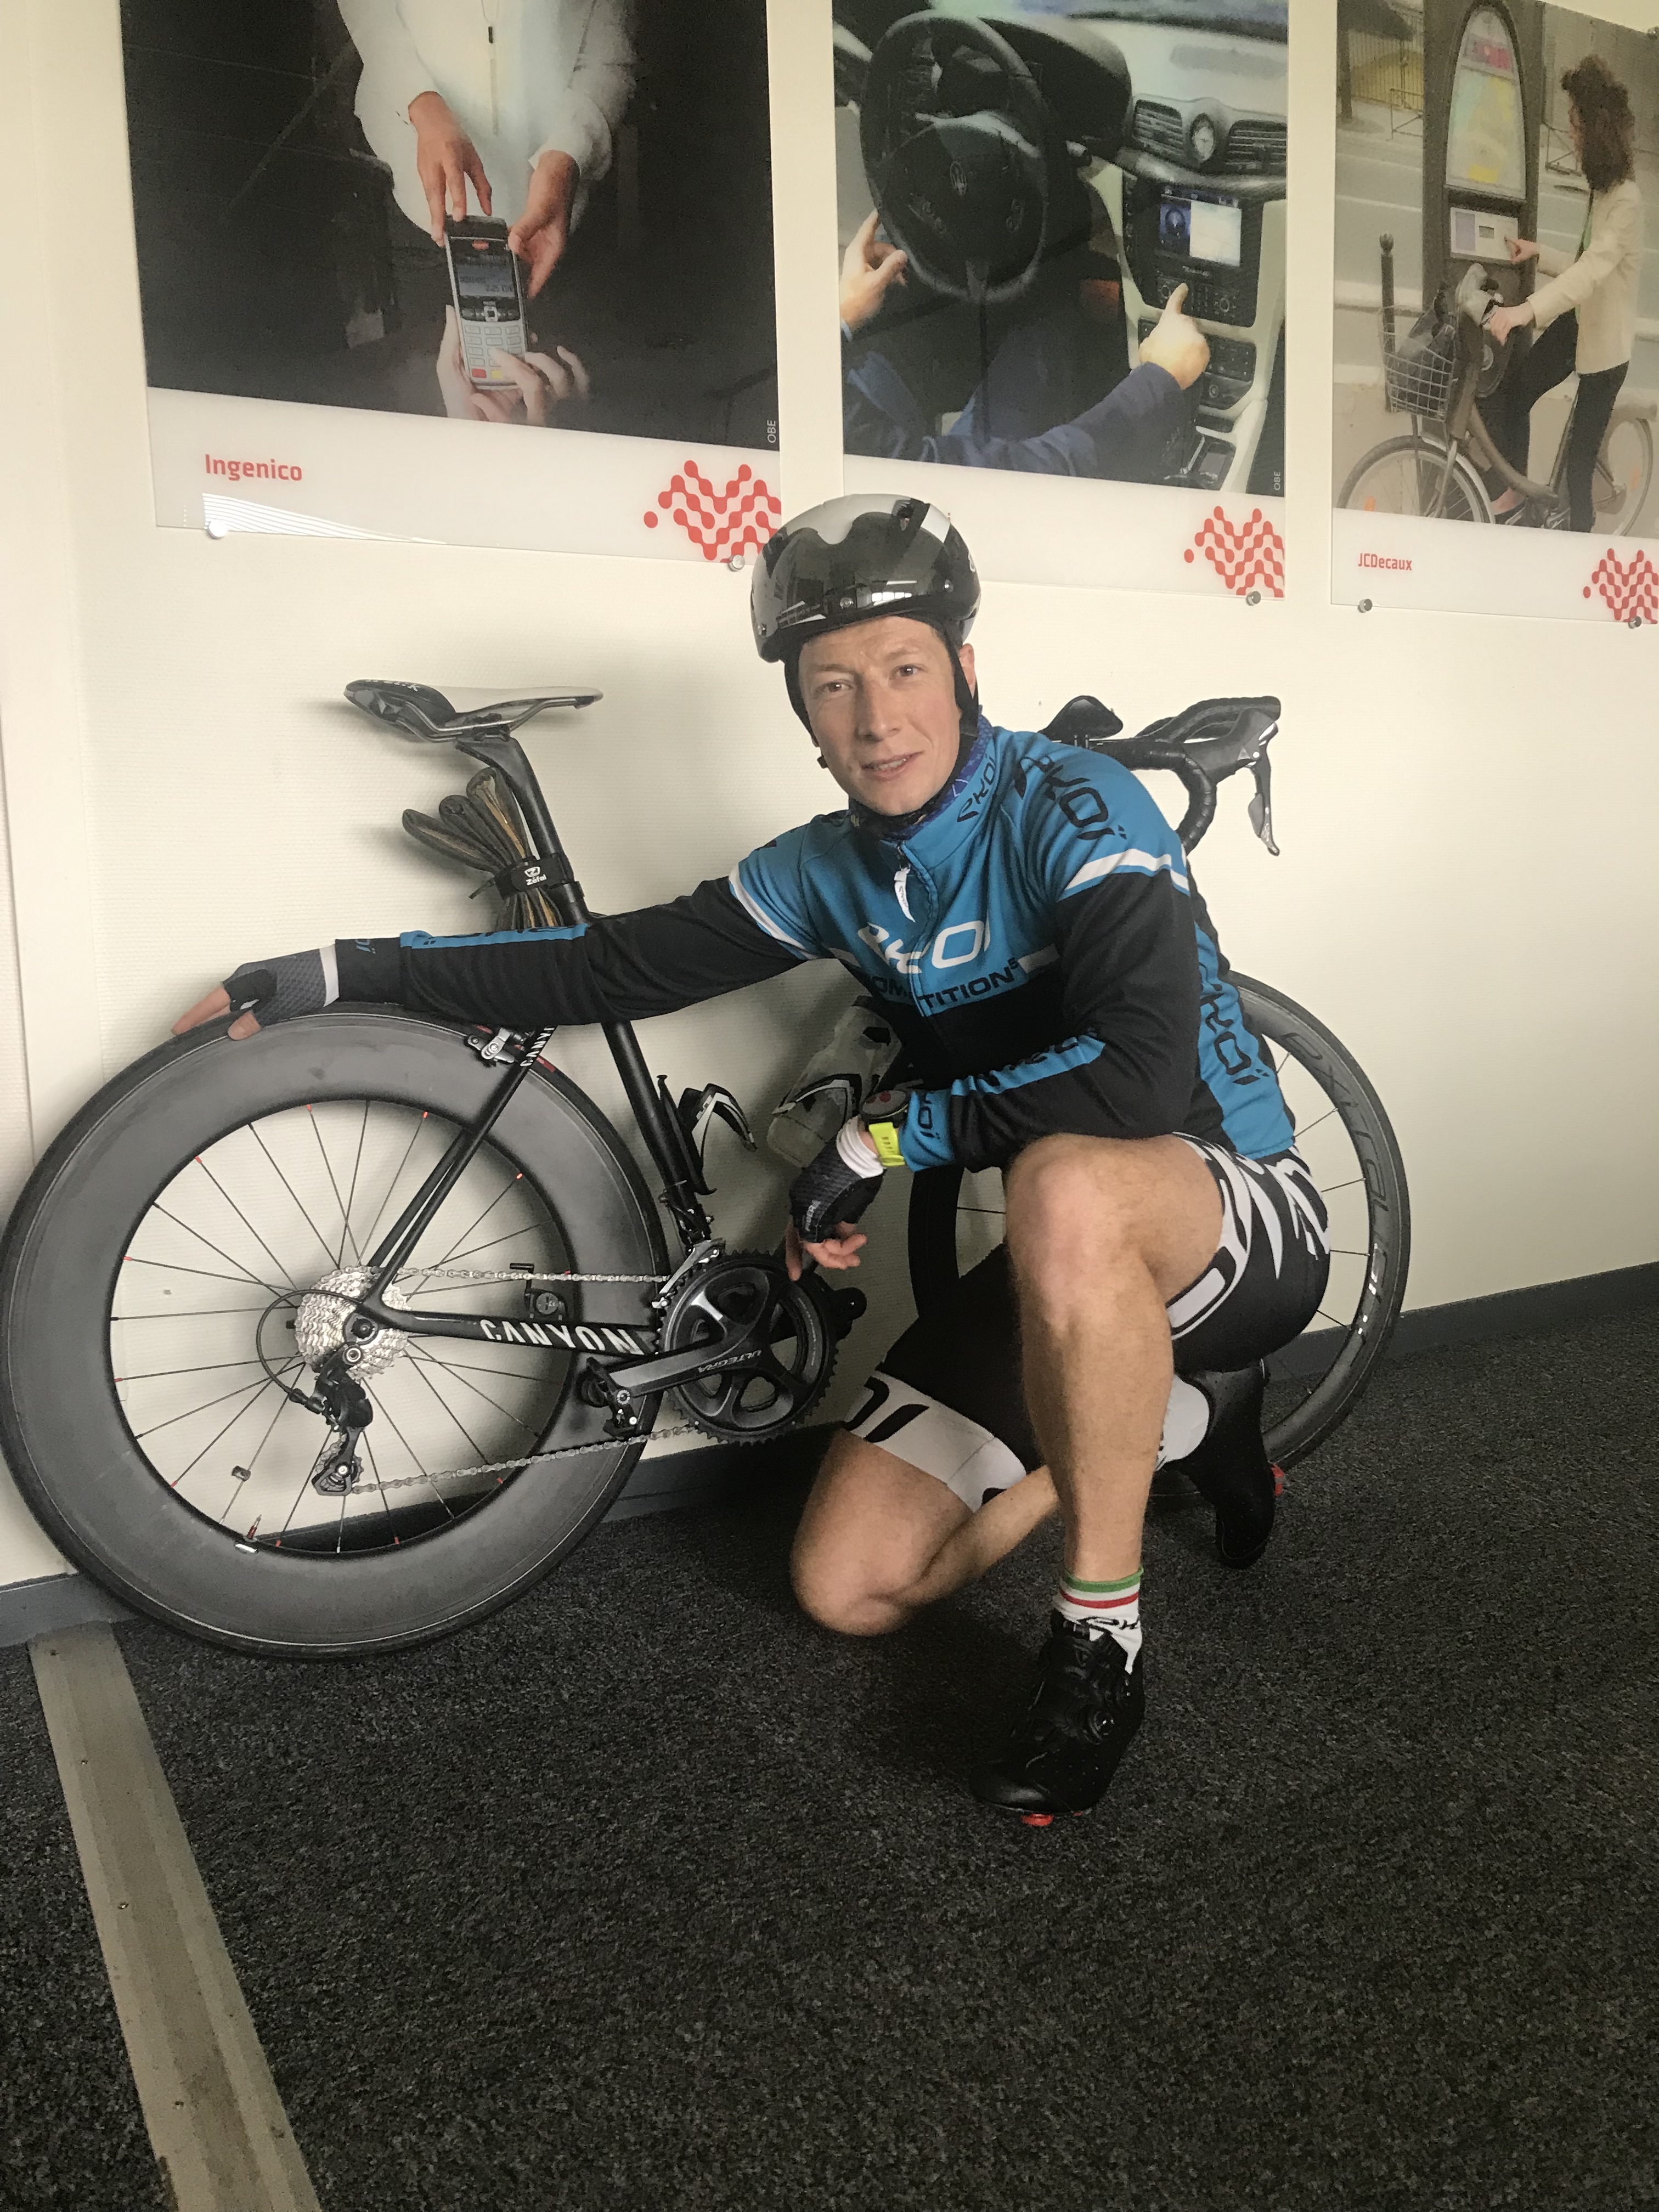
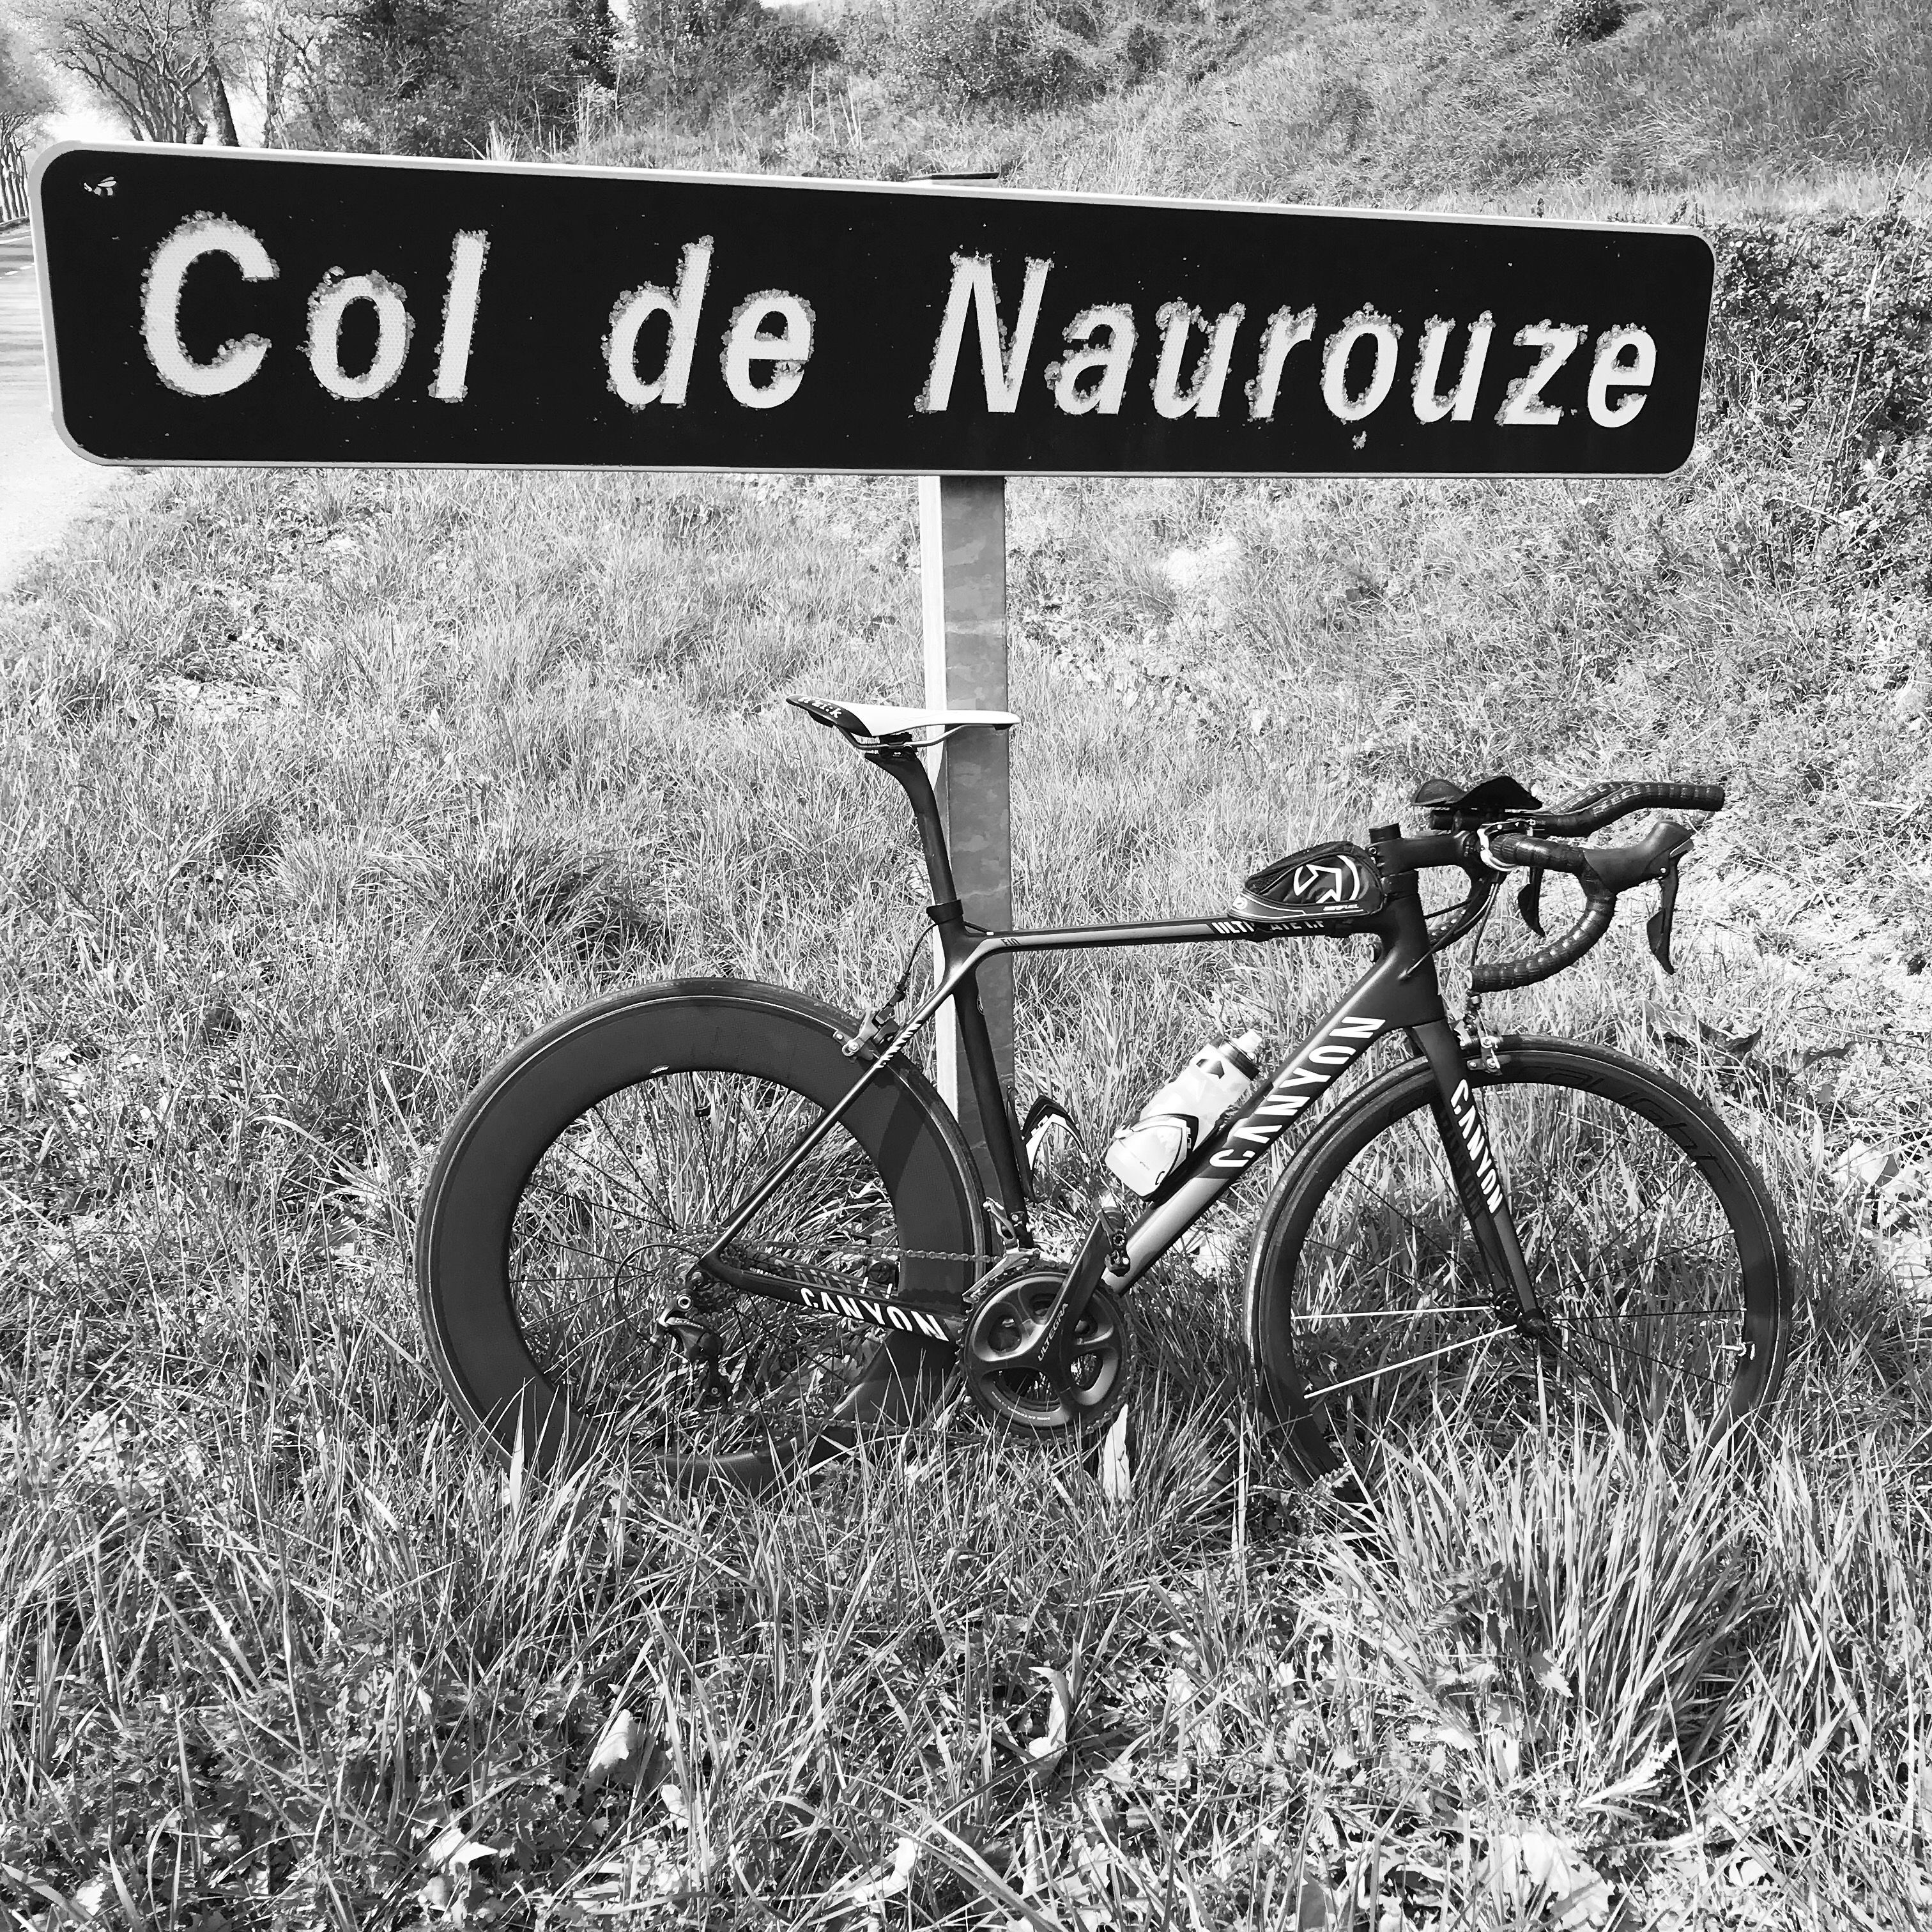
The bike is ready for the road test, let’s go! The proof in pictures !
Summary of costs
A rear wheel costs more, more spokes, more expensive hub, more spokes and a cassette.
Bare wheel
| Description | Weight | Quantity | United Price. | Total Price | Total Weight |
|---|---|---|---|---|---|
| Carbon rim H=88mm L=25mm;24 Holes; Tubular | 525g | 1 | 103.67 | 103.67 | 525g |
| Novatec FS482SB 24 Hole Hub | 228g | 1 | 59.98 | 59.98 | 228g |
| Spokes Sapim CX-Ray Black | 4g | 24 | 2.20 | 52.8 | 96g |
| Sapim Double Square Red Nuts | 0.4g | 24 | 0.30 | 7.2 | 9.6g |
| Total | 223.65 | 859g |
Accessories
| Description | Weight | Quantity | United Price. | Total Price | Total Weight |
|---|---|---|---|---|---|
| Vittoria CX 25c 320TPI hose | 250g | 1 | 34.99 | 34.99 | 250g |
| Extender Miche 70mm red (sold by 2) | 10g | 1 | 16.99 | 16.99 | 10g |
| Quick coupler Mavic Rear Axle 9mm 130mm | 50g | 1 | 25.00 | 25.00 | 50g |
| Shimano 11s cassette | 228g | 1 | 59.99 | 59.99 | 228g |
| Swiss Stop flash Pro brake pads | - | 2 | 14.99 | 14.99 | - |
| Total | 151.96 | 538g |
Conclusion
I hope this article will help others find answers or try experience. For my part, I am very proud of the result and I plan to make myself more assemblies (Straight Pull hub) and why not mount a complete bike.
References
- Professionnal Guide to Wheel Building - Roger Musson
- Bicycle Wheel - Jobst Brandt
- Wheel building - Sheldon Brown et John Allen